Getting Connected
Powering the Streamer X
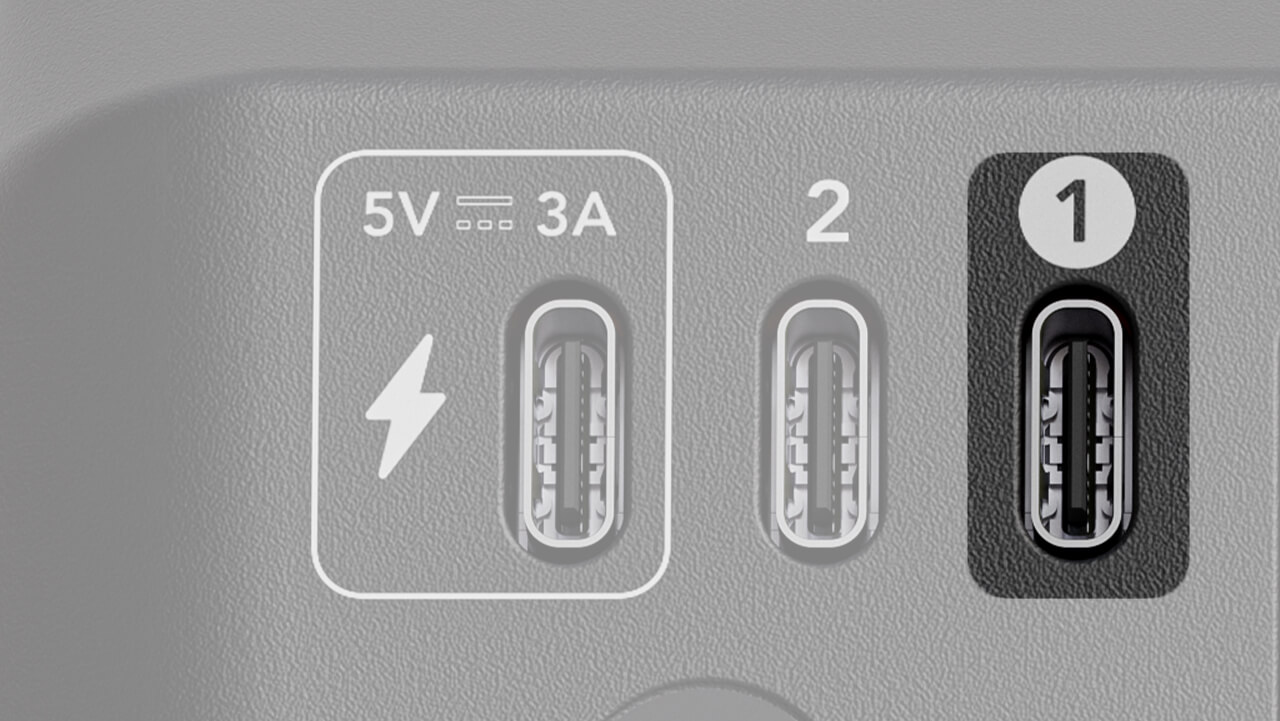
Plug the provided power supply into your wall outlet, and then connect it to the Streamer X’s USB-C port with the lightning indicator. It will automatically switch on when provided power. You can also power the Streamer X directly from your computer via the USB 1 port, as long as it's able to provide a minimum of 5V / 3A stable power.
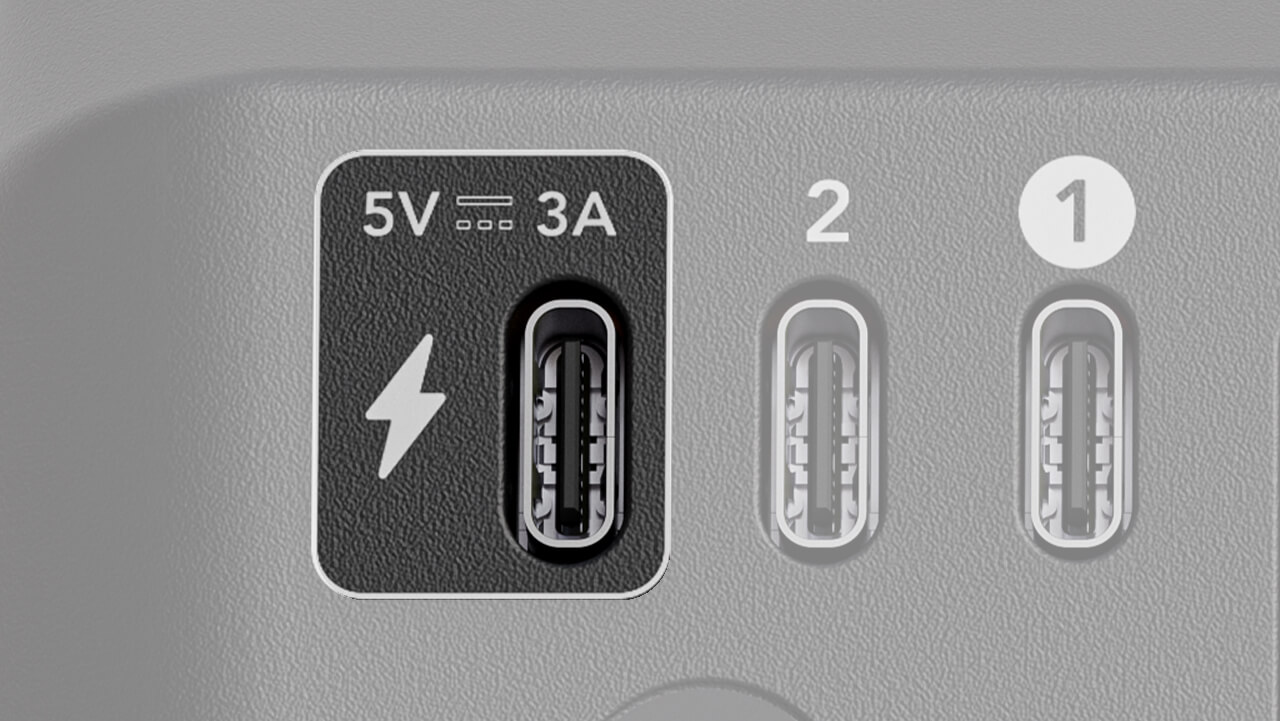
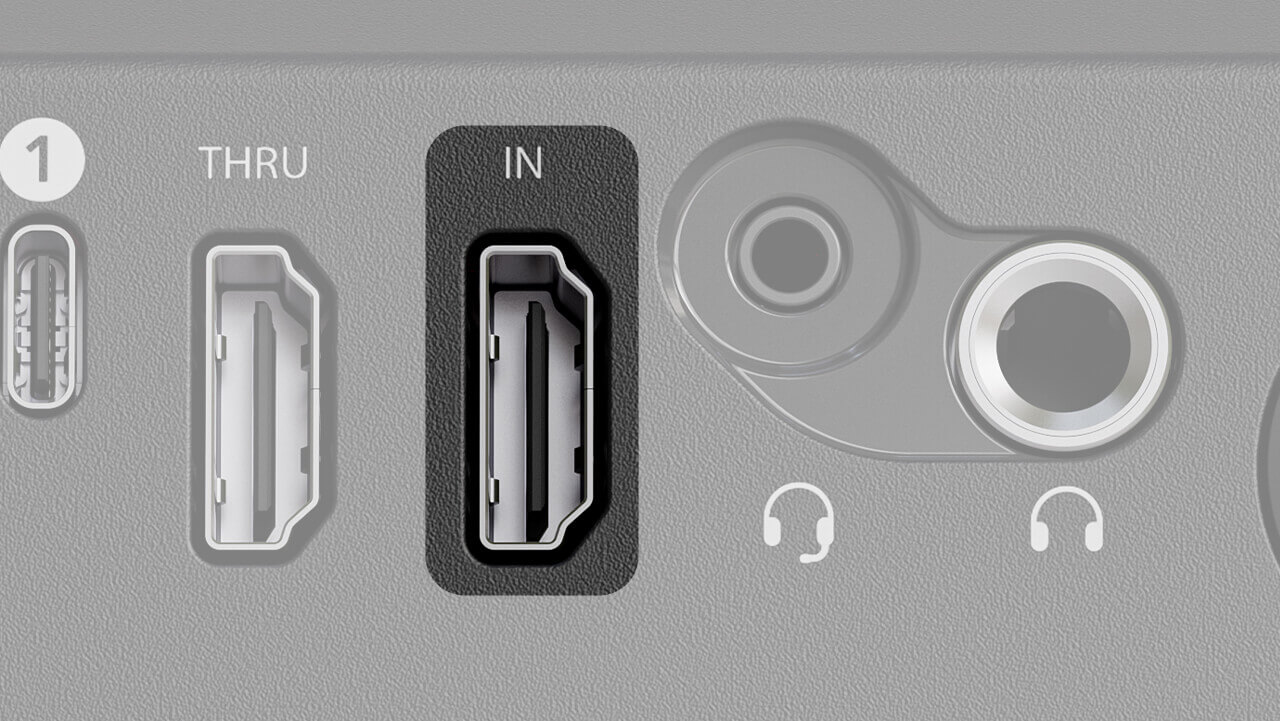
USB 1
This is the Streamer X’s primary USB port, and when connected, is used for sending and receiving video and audio data to your laptop or desktop computer. It can also be used to power the Streamer X if the power supply isn’t connected, provided your device can supply the appropriate level of power.
It’s important you use the included USB-C cable for this port, or alternatively a USB-C cable that supports SuperSpeed data transfer, as this is required to transmit the video feed.
When connected, the following devices will be available as input devices on your computer:
- Streamer X Main: This is the primary audio stream from your Streamer X and includes either the XLR microphone, instrument, headset microphone or wireless microphone system connected to your Streamer X.
- Streamer X HDMI (Audio): This input includes any audio that is sent into your Streamer X via the HDMI In connection. This can include the audio from your DSLR camera, video game console, or gaming computer, for instance.
- Streamer X HDMI (Video): This input represents the video stream sent to your Streamer X via HDMI In.
The Streamer X will also show up as an audio output device, which allows you to send audio from your computer to the headphone or headset output on your Streamer X.
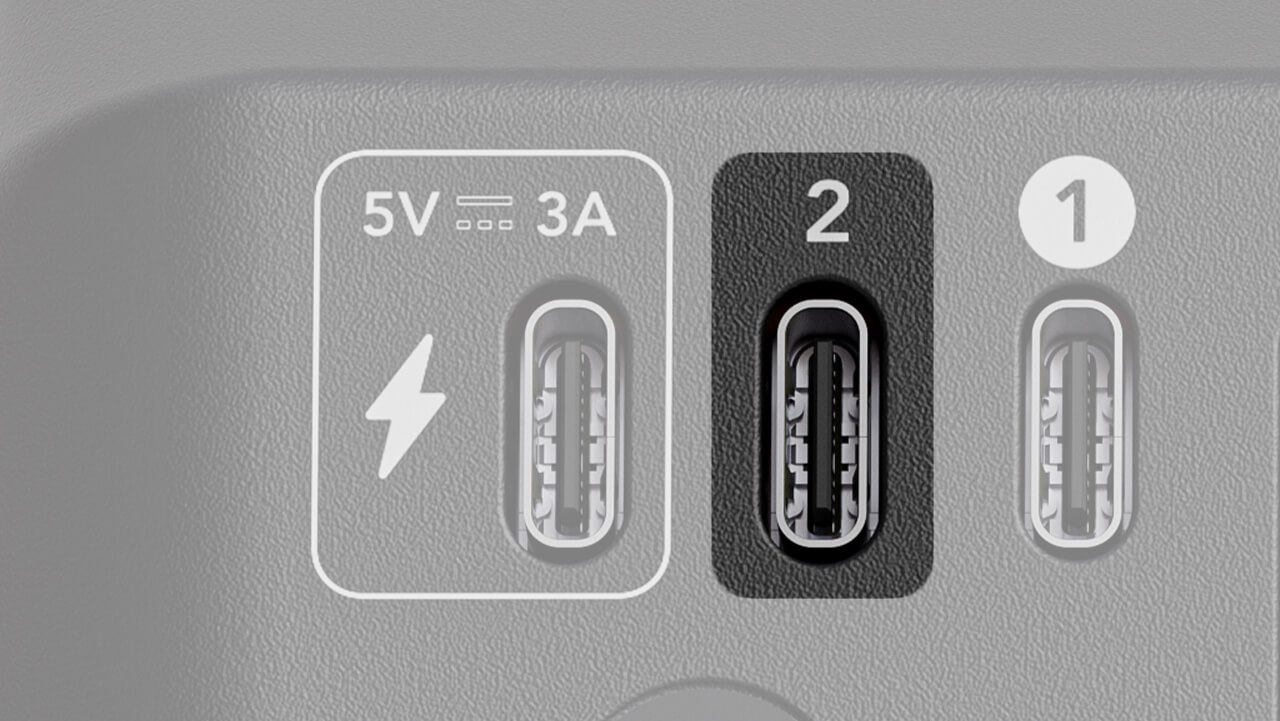
USB 2
The USB 2 is intended to be used to connect secondary audio devices, such as consoles, computers, Android phones and tablets and similar devices for music playback, chat applications and other uses. When connected, you’ll be able to send audio to and from the device connected to USB 2 by using the “Streamer X Secondary” option in your audio device configuration setup.
Note
Compatible with Android devices, iOS USB-C devices, PC, Mac and PlayStation 5 systems. iOS devices with a lightning port are not supported.
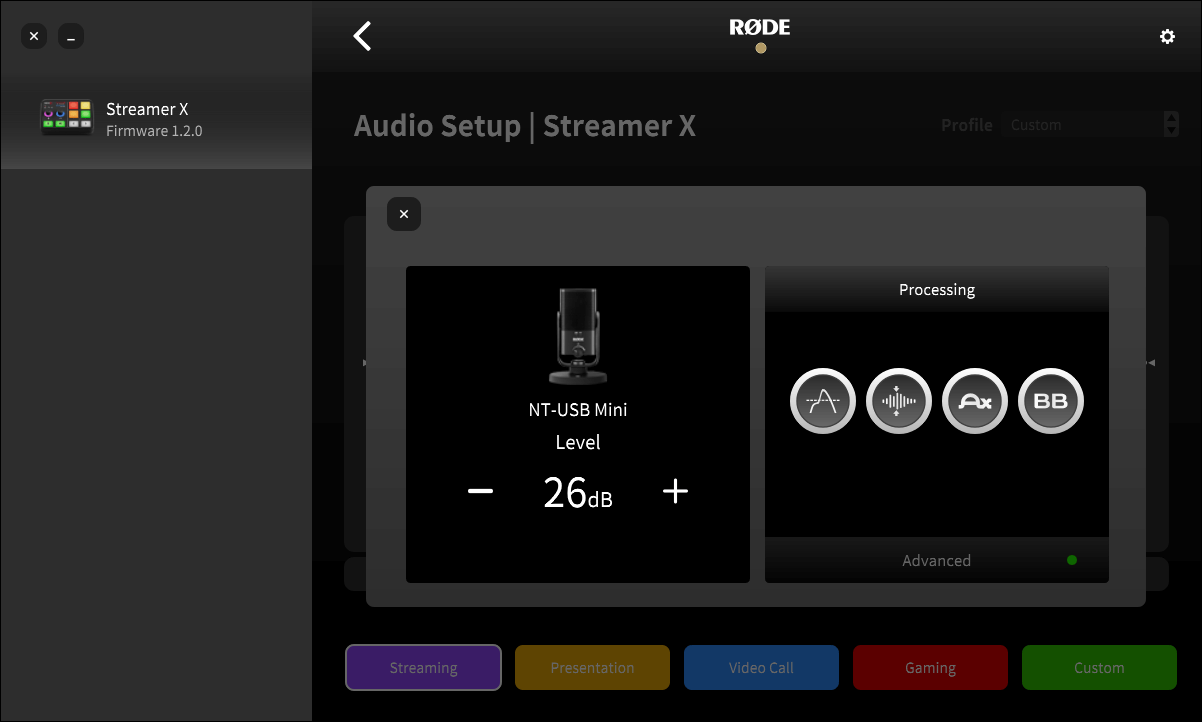
Using RØDE USB-C Microphones
You can connect a RØDE USB microphone to the Streamer X's USB 2 port using a USB-C-to-C cable, allowing for an additional microphone input.
Once connected, simply adjust its settings using the USB 2 channel in the RØDECaster App like you would any other USB device. You can control the USB microphone's on-board processing in the channel setup screen. In the case of the PodMic USB, NT-USB Mini, XCM-50 and XDM-100, you can mute or un-mute the USB 2 channel by pressing the physical button on the microphone.
Compatible Microphones
- PodMic USB
- NT-USB+
- NT-USB Mini
- Video Mic NTG
- VideoMic GO II
- XCM-50
- XDM-100
- Wireless ME
- Wireless GO II
- Wireless GO Gen 3
- Wireless PRO
NOTE
The input gain control does not control the volume of microphones that are connected via the USB2 connection. This will also show up in Unify as USB-2.
HDMI IN
This input is used to connect the video device you’re capturing, such as a DSLR camera, video game console, or computer.
This input can support video capture up to 4K30 and pass-through up to 4K60 HDR and supports VRR (Variable Refresh Rate).
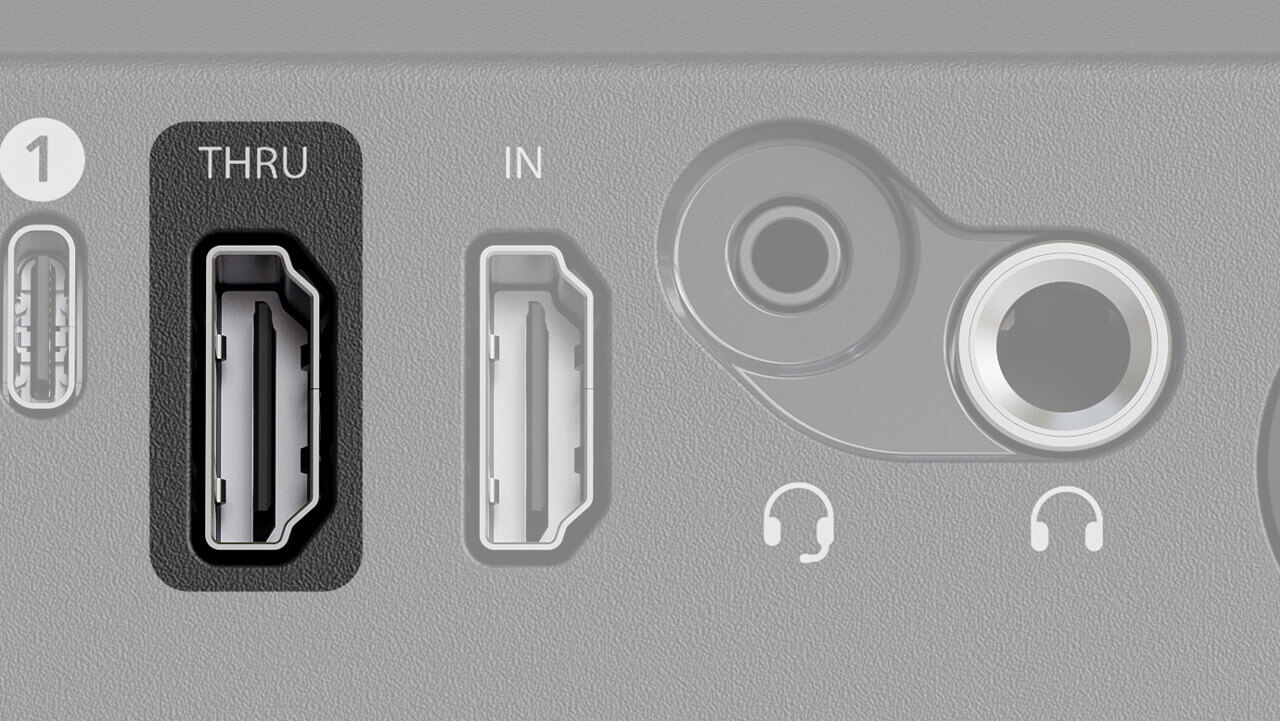
HDMI THRU
The HDMI Thru connection can be used to connect to your TV or monitor so you can still view your game console, computer, camera feed or anything connected to the HDMI In port on your screen, even while capturing it. This HDMI Thru port passes an exact copy of the original signal provided to HDMI In, with zero latency, VRR support and support for up to 4K60 HDR.
Note
Be sure to use a HDMI 2.0 cable or above for full 4K support. Need a cable? Our premium HDMI cables are available in 1 and 3 metre lengths here.
Input Format |
Compatible Capture Formats |
||||
1080p60 |
1080p60 HDR |
1080p120 |
1440p60 |
4k30 |
|
1080p60 |
|||||
1080p60 HDR |
|||||
1080p240 1080p120 |
|||||
1440p60 |
|||||
1440p60 HDR |
|||||
1440p240 1440p120 |
|||||
4k60 |
|||||
4k60 HDR |
|||||
"No Source Detected" Troubleshooting
If you’ve received the “No Source Detected” message when connecting a video source to your Streamer X’s HDMI IN port, try the following:
- Check you’re using the included USB-C cable (or another SuperSpeed USB-C to C cable) to connect Streamer X’s USB 1 port to your computer
- Be sure your video source device is connected to the HDMI IN port, not the HDMI THRU port – we recommend using an HDMI cable that supports HDMI 2.0
- Make sure all cables are securely connected to both your computer and the Streamer X
- Be sure your video source device is outputting to HDMI (in some cameras, for instance, you can choose to output to USB instead of HDMI)
- Be sure your video source device is outputting a supported format (as seen in the table above)
Troubleshooting Tip
If you see the HDCP Capture Not Supported message, the device you’re attempting to record has High-bandwidth Digital Content Protection enabled. This is a function to protect against the piracy of copyrighted material. Please consult your video game console, computer or other device’s manual for more information on HDCP.
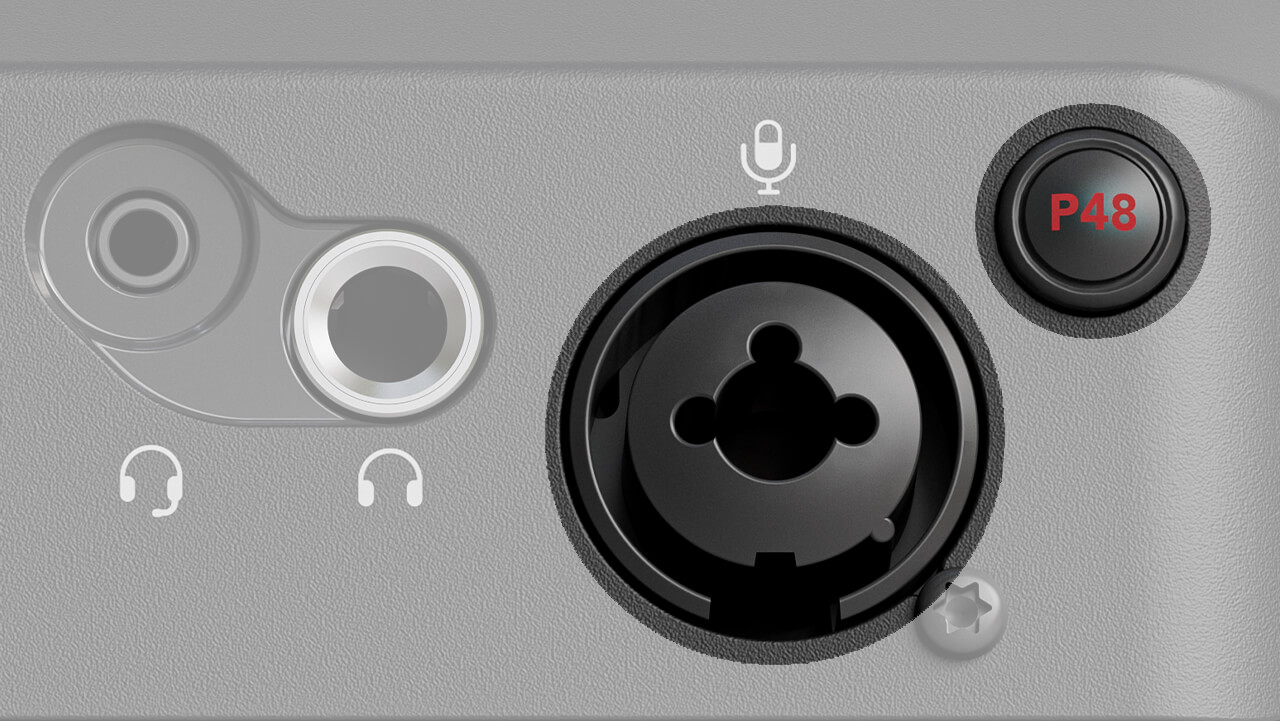
Combo Jack
This input allows you to connect either an XLR cable for a microphone, or a 1/4-inch cable for an instrument. By default, the input will be tailored to receive volume levels of microphones, but you can switch to instrument mode (which offers a high-impedance input) by pressing and holding the input rotary encoder until the LED ring changes colour from pink to blue.
If your microphone requires phantom power (such as the NT1 5th Generation), you can provide this by pressing the red ‘P48’ button next to the input. You’ll notice the ‘P48’ indicator LED on the front of the unit light up red.
Note
When activating phantom power, the combo jack input is muted for 3 seconds to avoid any clicks, pops or other unwanted sounds.
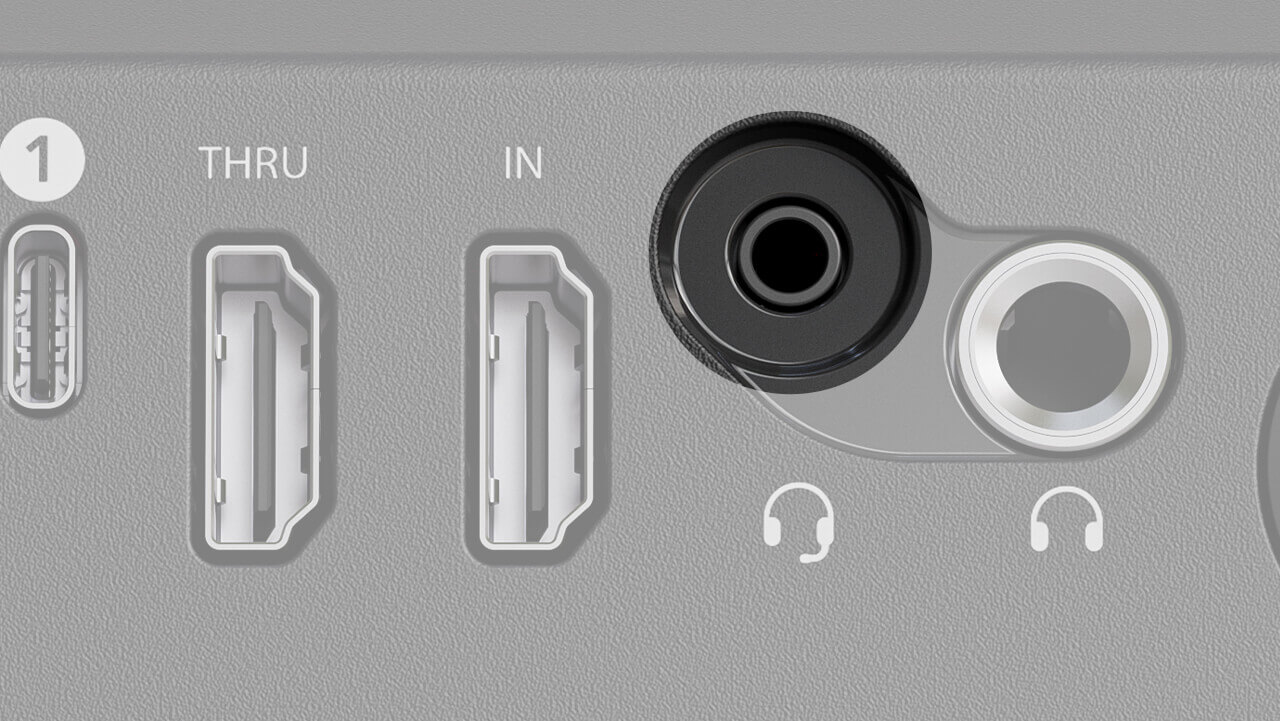
Headphones
This 1/4-inch output can be used to connect headphones like the NTH-100 in order to monitor all audio passing through the Streamer X. This allows you to monitor any audio captured with your microphone, wireless or instrument input, as well as listen to any audio passed over HDMI via the HDMI In port (this could be audio from your game console, camera or other computer). You can also send audio to this output from your computer by selecting “Streamer X Main” as your audio output device on your computer.
You can control the volume level of these headphones with the headphone encoder, and mute the headphone output by clicking the encoder.
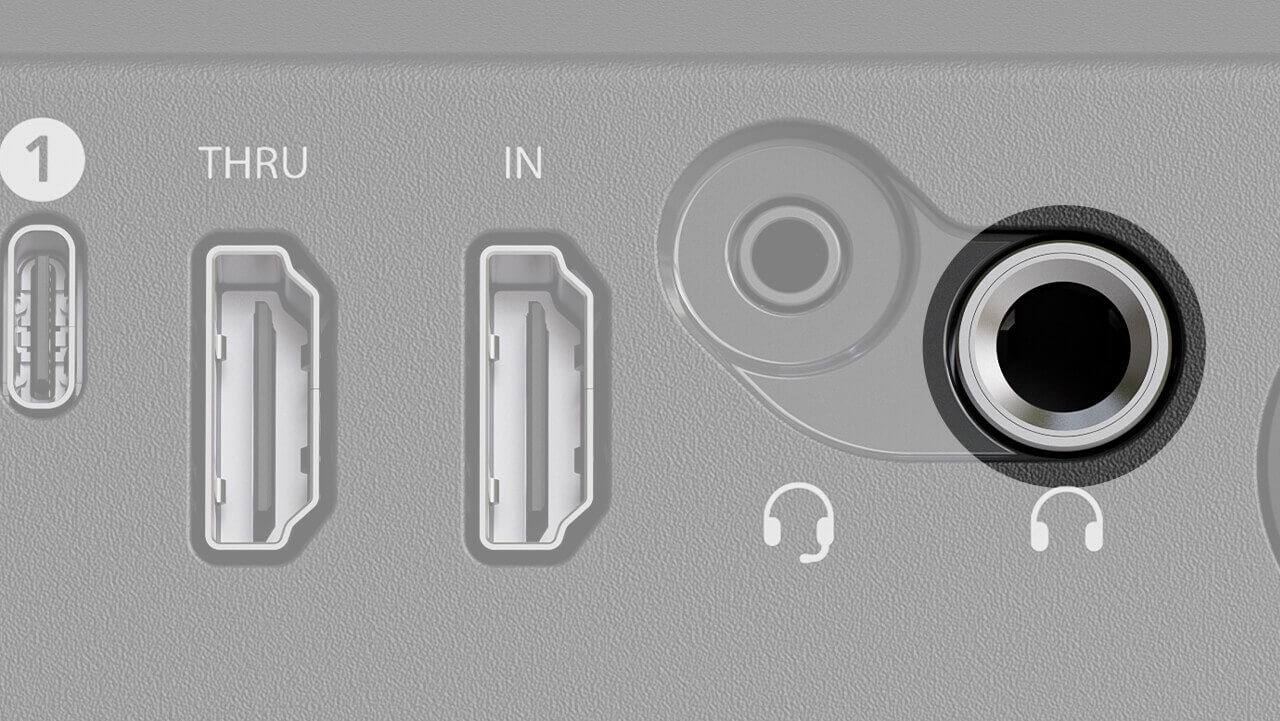
Headset
This 3.5mm connector can be used to connect a headset such as the NTH-100M in order to capture your voice as well as monitor audio on the Streamer X. Like the headphone output, this allows you to monitor any audio captured with your microphone, wireless or instrument input, as well as listen to any audio passed over HDMI via the HDMI In port (this could be audio from your game console, camera or other computer). You can also send audio to this output from your computer by selecting “Streamer X Main” as your audio output device on your computer.
You can control the volume level of this headset with the headphone encoder, and mute the headset output by clicking the encoder.
Controlling Streamer X Using the Interface
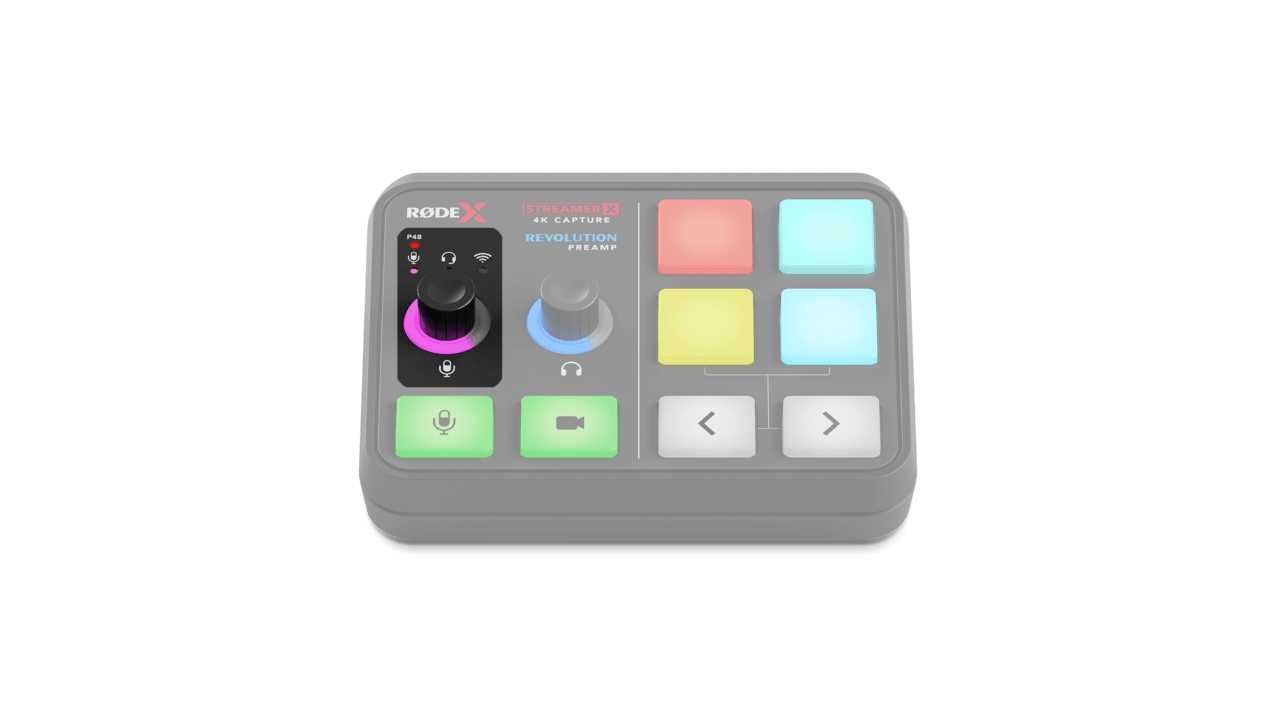
Input Encoder
This encoder is used to adjust the input level of the currently selected input device, whether that’s the microphone/instrument, headset or wireless microphone. Turn the encoder clockwise to increase the volume and notice the LED ring increase as you do so. You can click the encoder to cycle through these input devices and their respective indicator LEDs above the encoder will change accordingly.
Microphone/Instrument: This input is indicated by the pink ring around the input encoder and controls the level of the microphone or instrument connected to the combo jack (either an XLR or 1/4-inch connector). When in this mode, press-and-hold the encoder to switch between microphone input levels and high-impedance instrument levels, changing the encoder LED from pink to blue.
Headset: This input is indicated by the green ring around the input encoder and controls the level of the headset microphone plugged into the headset connector (3.5mm TRRS).
Wireless: This input is indicated by the cyan ring around the input encoder and controls the level of the RØDE Series IV wireless transmitter that’s paired with your Streamer X.
Setting Your Input Gain
To set your input gain correctly, talk into your microphone or headset as loudly as you are likely going to be talking during your stream or recording. You will see the input indicator LED above the left encoder turn green, orange or red as you talk. You should aim to keep the input gain at a level where the LED is mostly green with occasional flashes of orange when you get louder. If the LED turns red at all, turn the encoder counterclockwise to decrease the input gain. If the LED doesn't light up at all, you will need to increase your gain.
NOTE
The Input encoder does not change the input volume of the USB-2 input. For this you will need to use the RØDE Unify or Central application to set the input level.
How to Pair Your Wireless Transmitter
To pair your transmitter to the Streamer X when in this mode, press-and-hold the input encoder until the cyan LED above it begins to flash, power on your transmitter and enter the transmitter into pairing mode. For the Wireless ME and Wireless GO II, this is just a short-press on the transmitter’s power button while the transmitter is already powered on and not paired to another receiver.

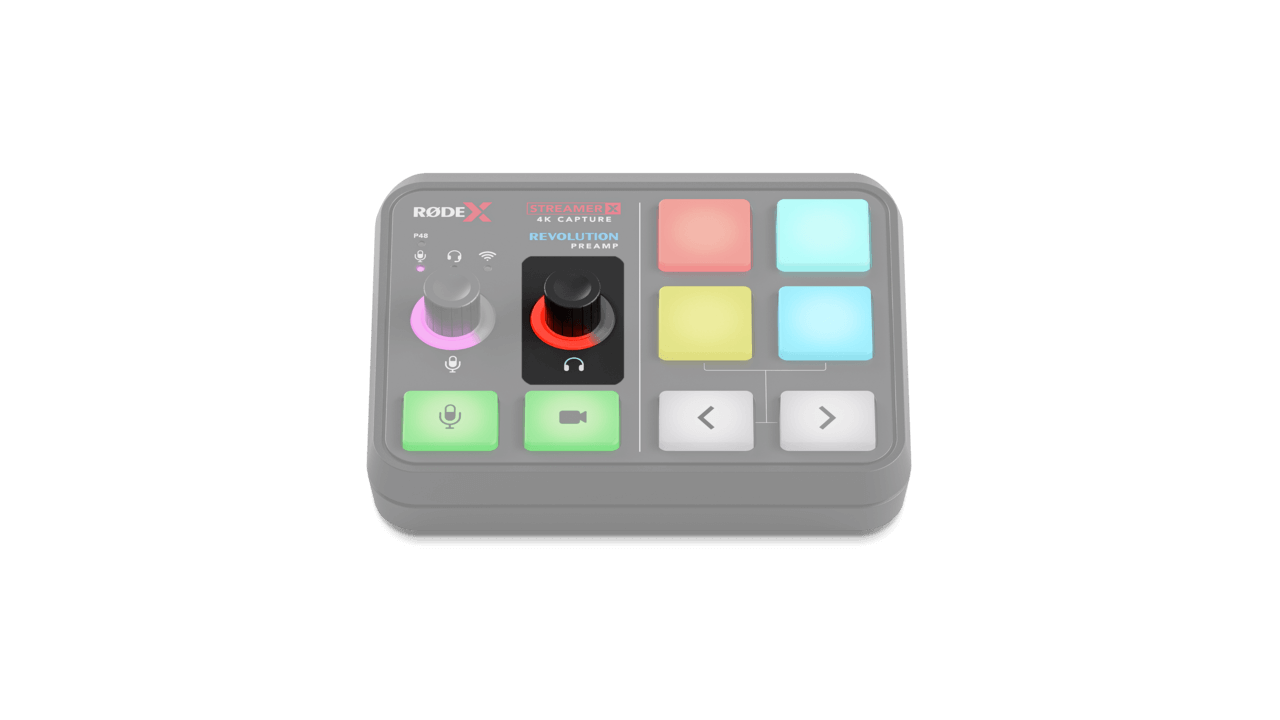
Headphone Encoder
You can use this control to raise or lower the volume of your headphones or headset. Turn the encoder clockwise to increase the volume, and notice the LED ring increase as you do so. Turn the encoder counterclockwise to reduce the volume. You can press this encoder in order to mute your headphones or headset, indicated by the encoder LED ring turning red.
Note
This encoder affects the output volume of both the headphone output (1/4-inch) and headset output (3.5mm).
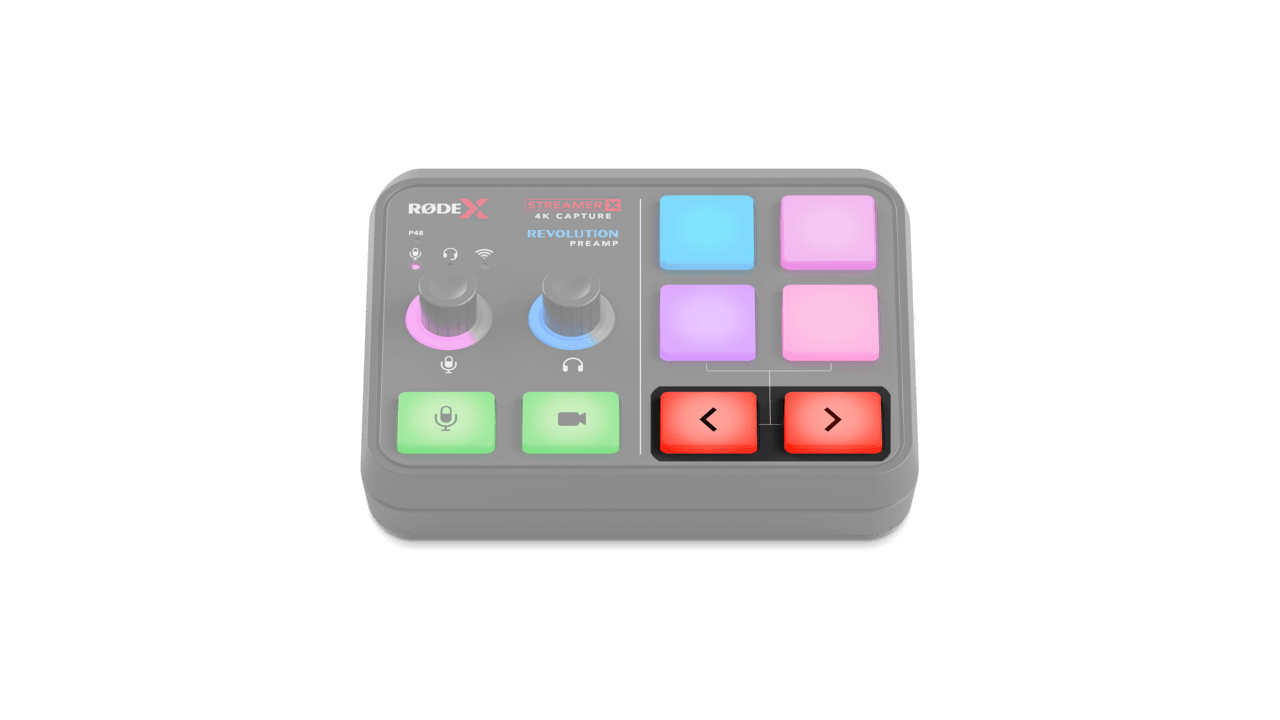
Microphone Mute and Video Cut Switches
Microphone Mute: Pressing the microphone mute will instantly mute all microphone inputs and turn the button from green to red. This means the microphone inputs won’t be sent to any connected device (such as your computer) via USB, or to your headphones. This button synchronises to the UNIFY Stream Mix control and will affect all linked mixes (more on UNIFY below).
Video Cut: Pressing the video cut button will stop the video feed (from the HDMI input) being sent to your device connected to USB 1 and turn the button from green to red. Any audio passed over HDMI into the HDMI Input will not be muted, and the video and audio signal will still be passed to the HDMI Thru output.

SMART Pads
This section of Streamer X consists of four SMART pads and a pair of navigation arrows. The SMART pads have a wide range of uses, from triggering sounds and voice effects to MIDI commands and mixer actions. By default, the pads include a pitch-up and pitch-down effect, a censor button and various sound recordings, but these can be configured using the RØDECaster App or UNIFY.
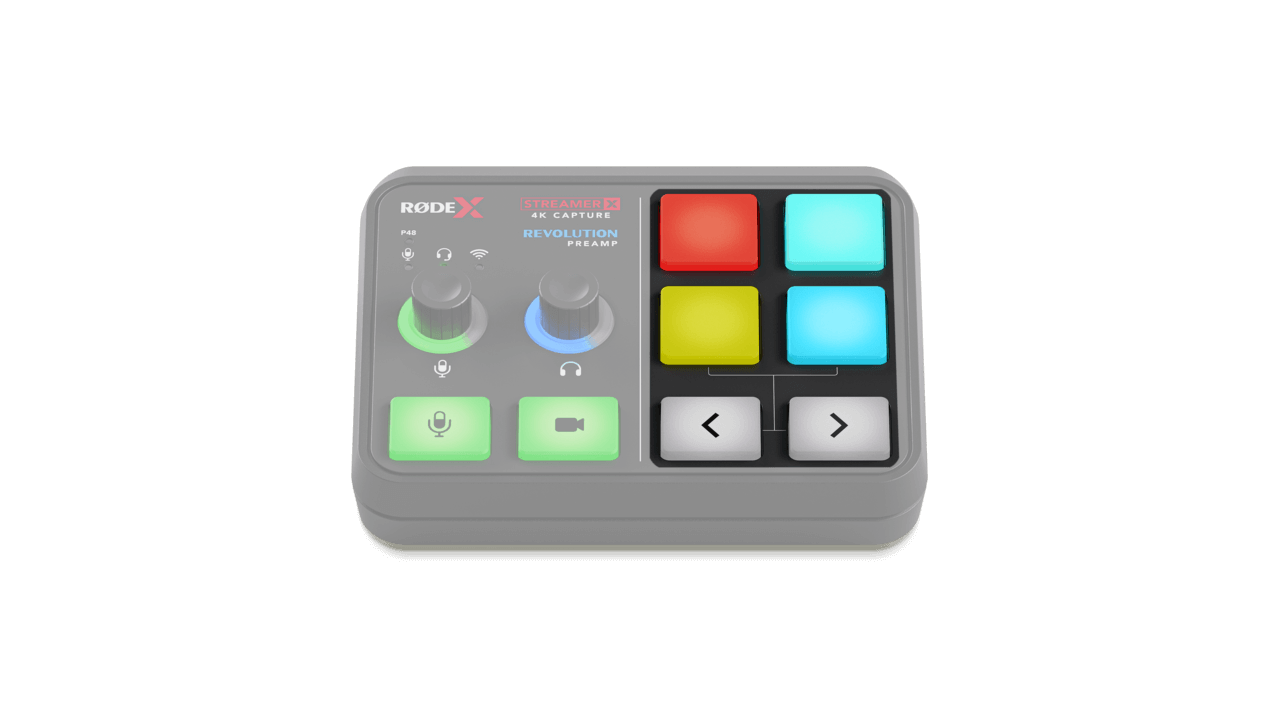
Navigation Arrows
By default, these arrows allow you to cycle between banks of SMART pads (there are two banks on the Streamer X by default). The colour of your arrows will change (from white to red) when you’ve cycled to a different bank.
You can also enable ‘Presentation’ mode via the RØDECaster App under the ‘Customize SMART Pad’ menu, or UNIFY, which allows these arrows to perform the function of the left and right keys on your keyboard.
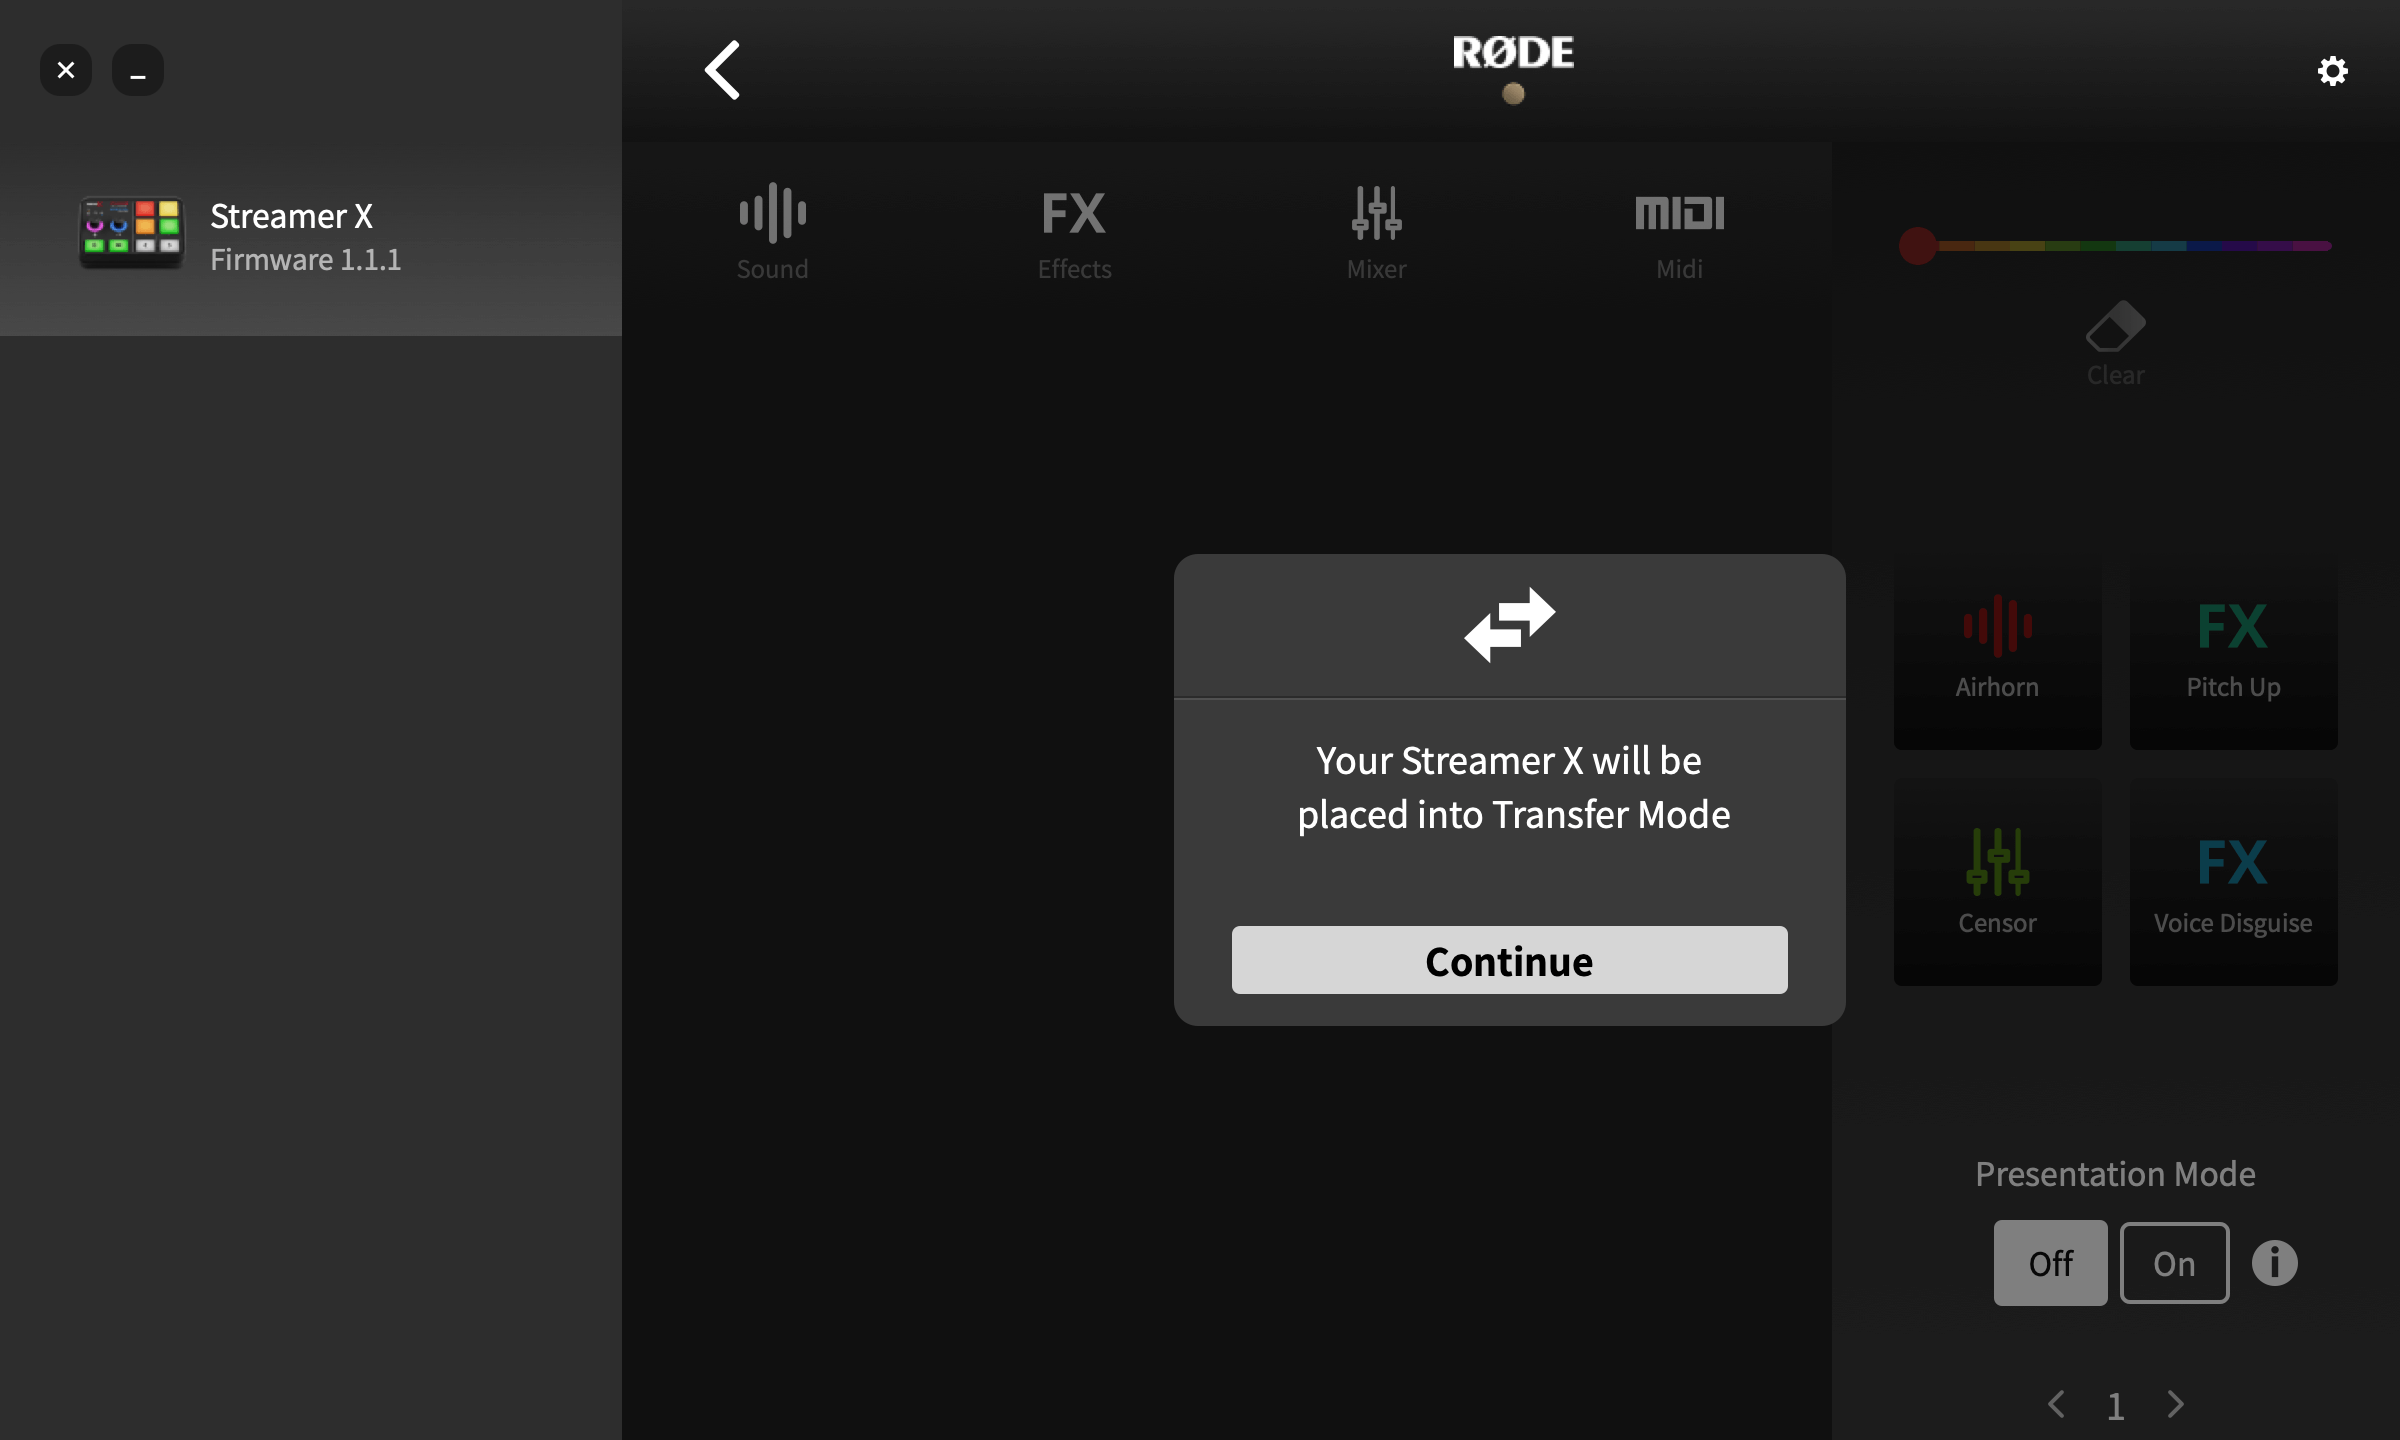
Setting Up Your SMART Pads in the RØDECaster App
To set up a SMART pad, open the ‘Customize SMART Pads’ menu in the RØDECaster App and click ‘Continue’ to place your Streamer X in Transfer Mode. There are four different SMART pad categories: ‘Sound’, ‘Effects’, ‘Mixer’ and 'MIDI’. Within each of these different categories there is a range of different functions that the pad can perform, which are covered in the Using the SMART Pads section.
Configuring the Streamer X with the RØDECaster App
Connecting to the RØDECaster App
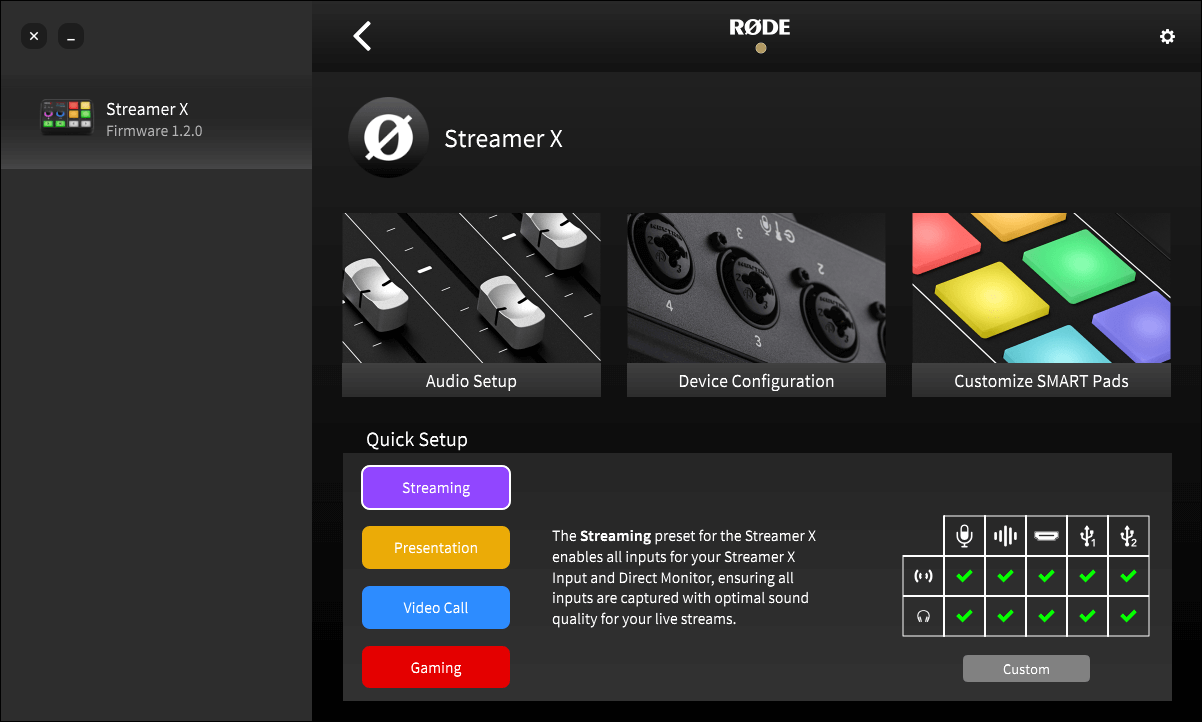
While you can access most of the Streamer X’s settings from its convenient front-panel controls, using it with the RØDECaster companion software gives you even greater control, including the ability to configure powerful effects and processing for your input audio, fine control over your headphone and stream mix levels, and customising the SMART pads.
To access these settings, simply connect your Streamer X to your computer via USB and launch the RØDECaster App. Click the icon for the Streamer X on the left-hand side and choose one of the three options.
This screen also includes a quick setup section at the bottom to help you quickly select an audio configuration profile (learn more about profiles in this section), along with brief explanations of each profile and a table to show which headphone and stream outputs are muted in each profile.
Using Streamer X with the RØDECaster App on a Mac
The first time you open the RØDECaster App with your Streamer X connected to a Mac computer, a pop-up message will appear asking to accept permissions for keystroke inputs. It’s essential that you accept these permissions for correct operation of the Streamer X with the RØDECaster App.
Note
If you don’t accept the permissions, you can manually allow them by navigating to System Settings > Privacy & Security > Input Monitoring and then allowing the RØDECaster App.
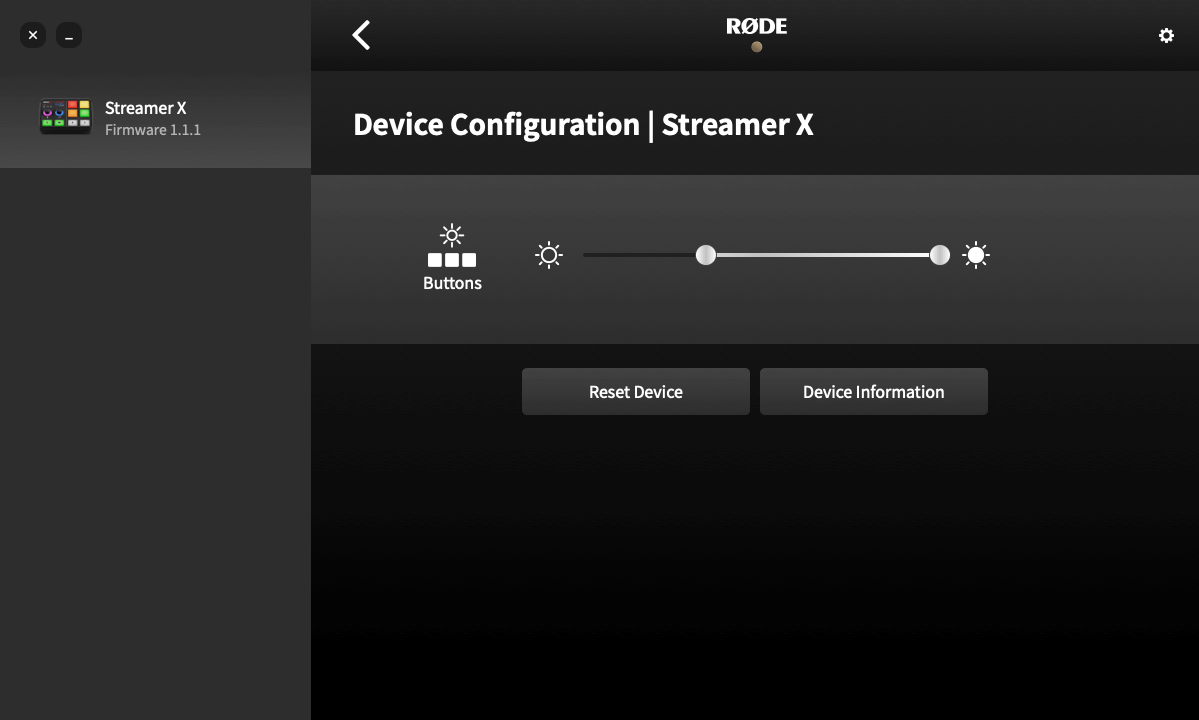
Button Brightness
Under the ‘Device Configuration’ menu, you can adjust the maximum and minimum brightness of the LED lights on your Streamer X SMART pads and mute/cut switches. The minimum setting will adjust the brightness of these pads when inactive, while the maximum setting will adjust the brightness of these pads when activated.
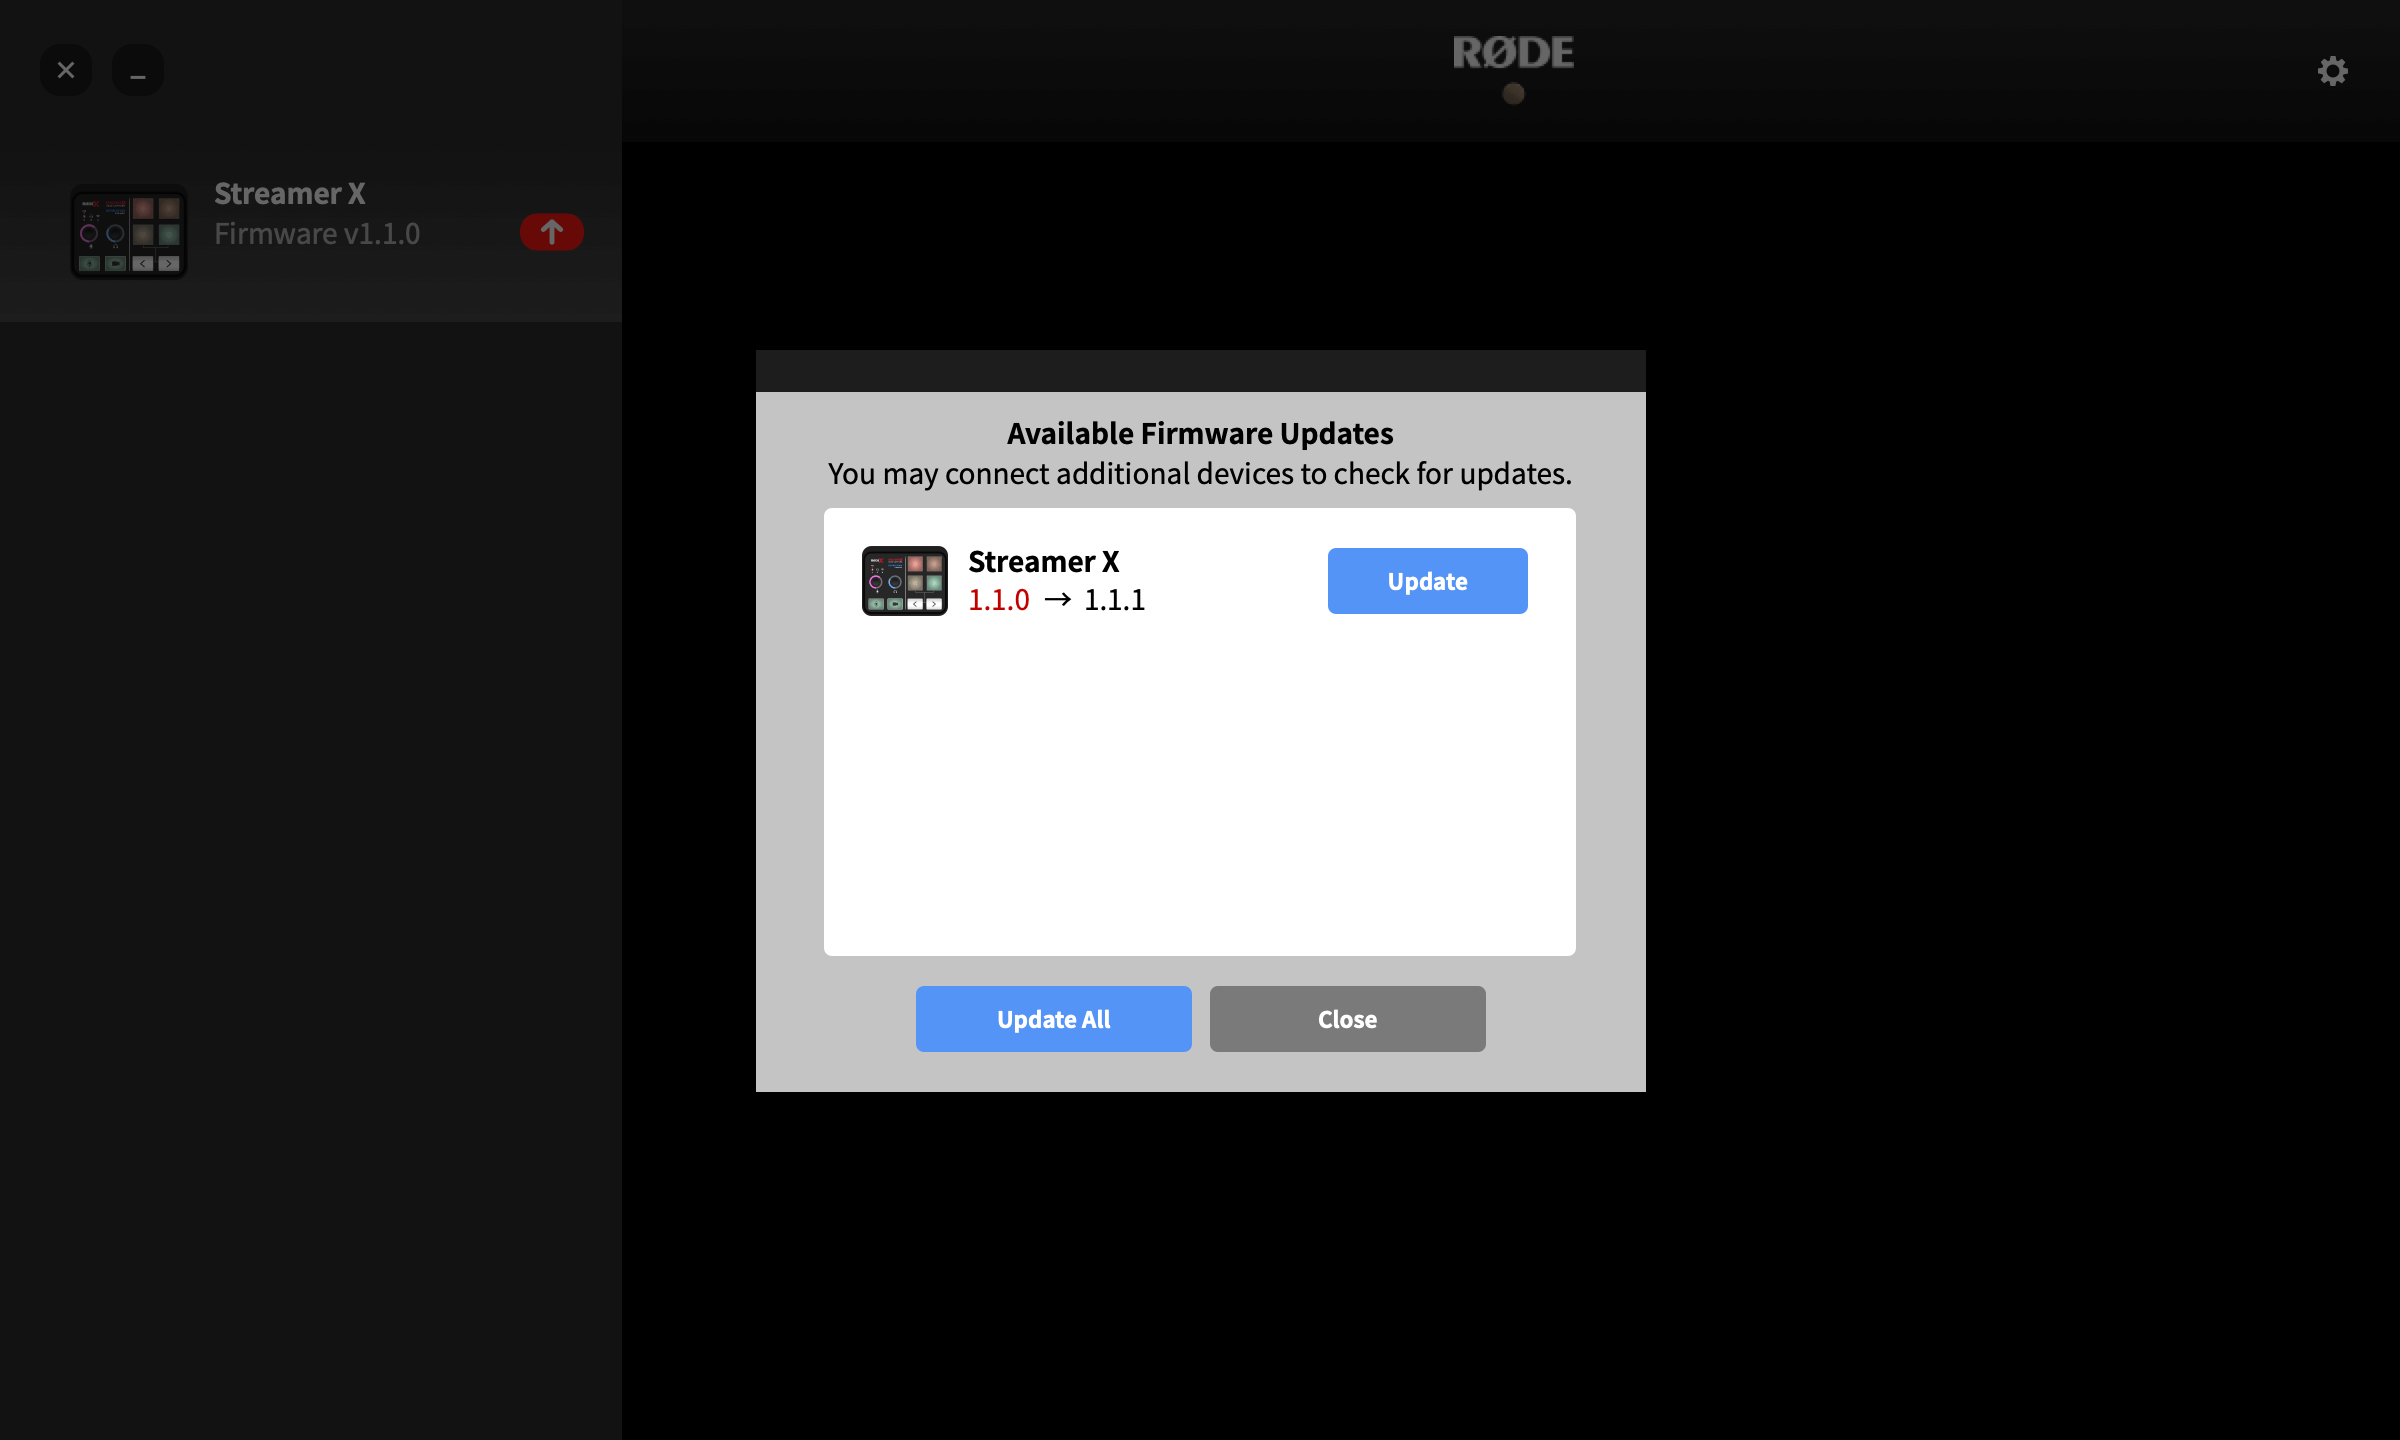
Updating Streamer X Firmware
Connect your Streamer X to a computer and run the RØDECaster App. If a firmware update is available, a red arrow will appear beneath the ‘Streamer X’ icon, which you can click and follow the prompts to update to the latest firmware.
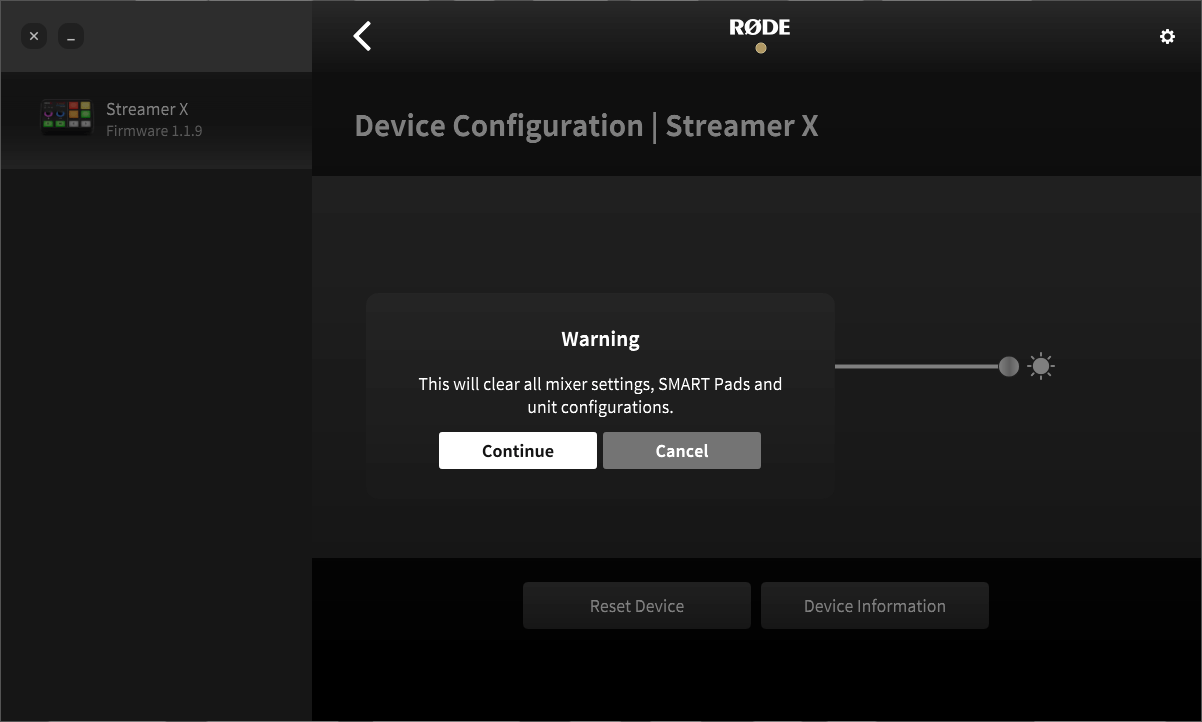
Reset Device
If you wish to return your Streamer X to its default state without having to factory reset it to an earlier firmware version, you can use this ‘Reset Device’ option. You'll be warned before proceeding, but when you do, all mixer settings, SMART Pads and unit configurations will be cleared.