Using the SMART Pads
Using the SMART Pads to Trigger Sounds
When in ‘Sound’ mode, audio can be assigned to pads and will play when the pad is pressed. Audio can be loaded onto the pads and played back in different ways. This is useful for firing off stings, intro or outro music, sound effects or other content during livestream, or any other application where you need to trigger audio with instant playback.
Connecting to the RØDECaster App to Load and Export Sounds
To allocate audio to a pad, you’ll need to load a sound file from your computer onto the unit, which you can do by using the RØDECaster App. To do this, connect your Streamer X to your computer via USB and launch the RØDECaster App. Click the icon for the Streamer X, then select ‘Customize SMART Pads’.
.png)
Note
This process will put your Streamer X into ‘Transfer Mode’; you cannot use audio functions on the device whilst in transfer mode, so do not do this if you are using the Streamer X for audio playback, recording or streaming.
Loading an Audio File onto a Sound Pad
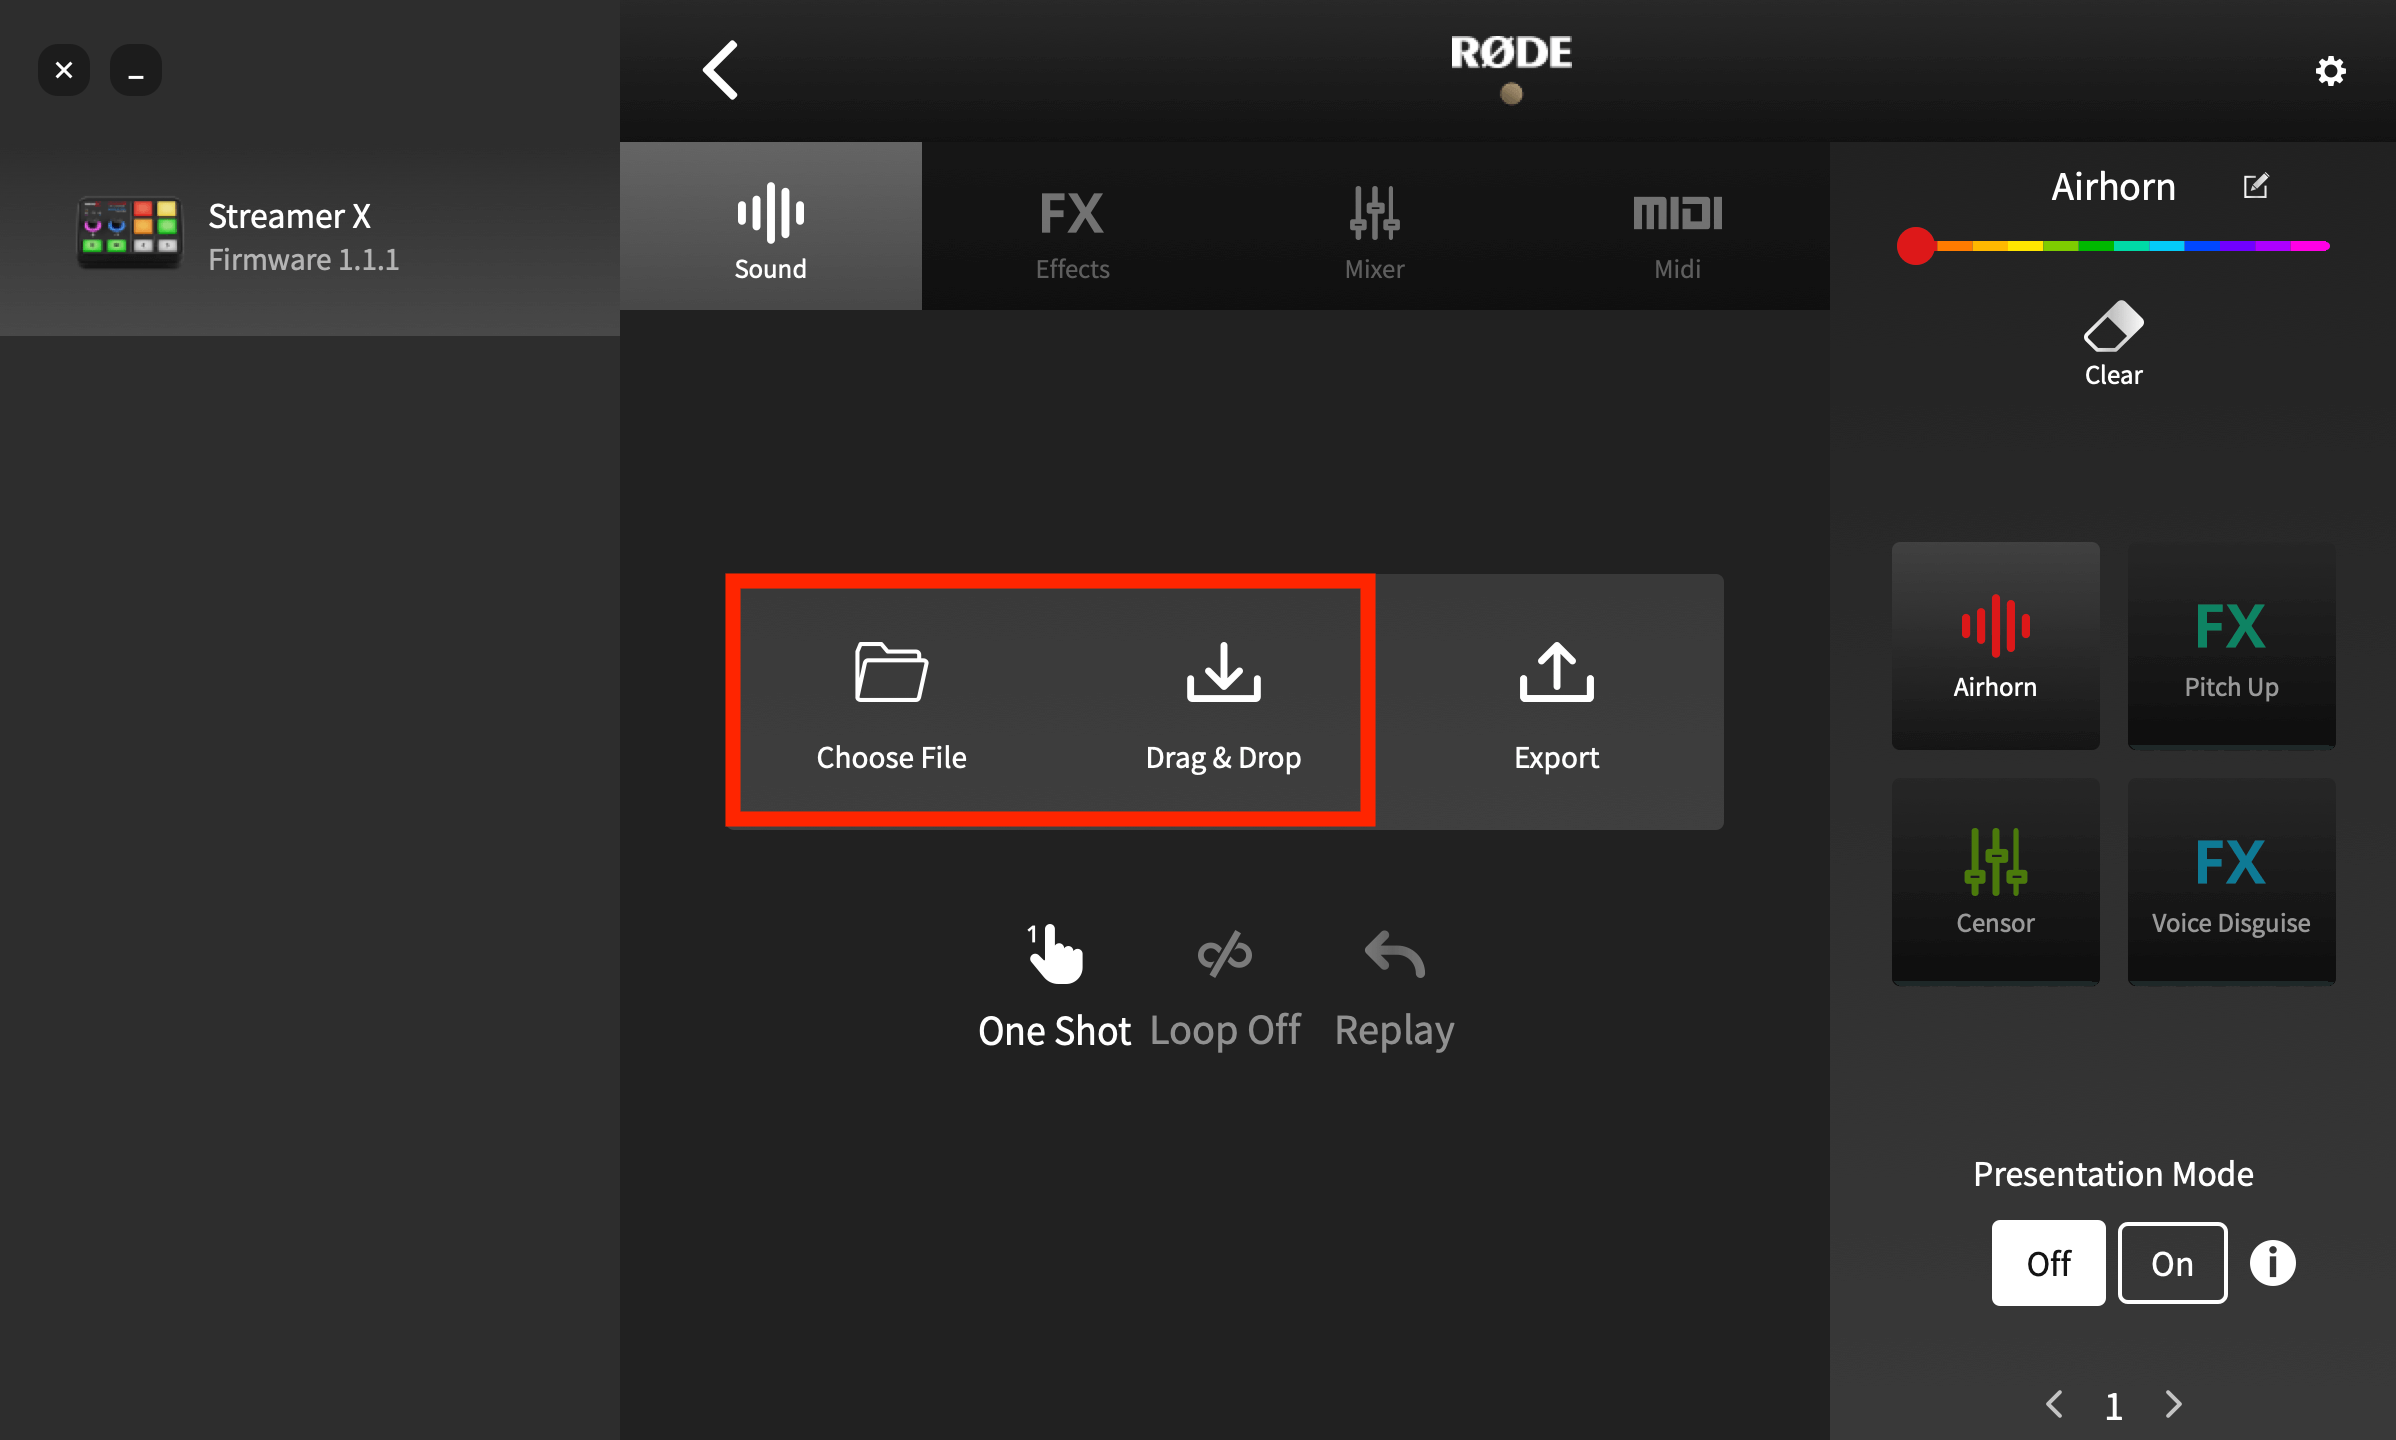
To load a sound onto a pad, click on the target pad. If it is blank or already has a sound loaded on it, you will see ‘Drag & Drop’ and ‘Export’ icons. If it has a different function allocated (Effects, Mixer or MIDI), you can change it to a sound pad by selecting ‘Sound’ in the top menu bar and then clicking “Yes! Overwrite the pad”. Then, simply drop the audio file from your computer file browser onto the ‘Drag & Drop’ icon to load a sound. The file will be transferred, and the sound allocated to the pad, replacing the existing sound if one was previously loaded.
Loading an Audio File onto a Sound Pad
To load a sound onto a pad, click on the target pad. If it is blank or already has a sound loaded on it, you will see ‘Drag & Drop’ and ‘Export’ icons. If it has a different function allocated (Effects, Mixer or MIDI), you can change it to a sound pad by selecting ‘Sound’ in the top menu bar and then clicking “Yes! Overwrite the pad”. Then, simply drop the audio file from your computer file browser onto the ‘Drag & Drop’ icon to load a sound. The file will be transferred, and the sound allocated to the pad, replacing the existing sound if one was previously loaded.
Note
The Streamer X only accepts MP3 or WAV files.
Exporting an Audio File from a Sound Pad
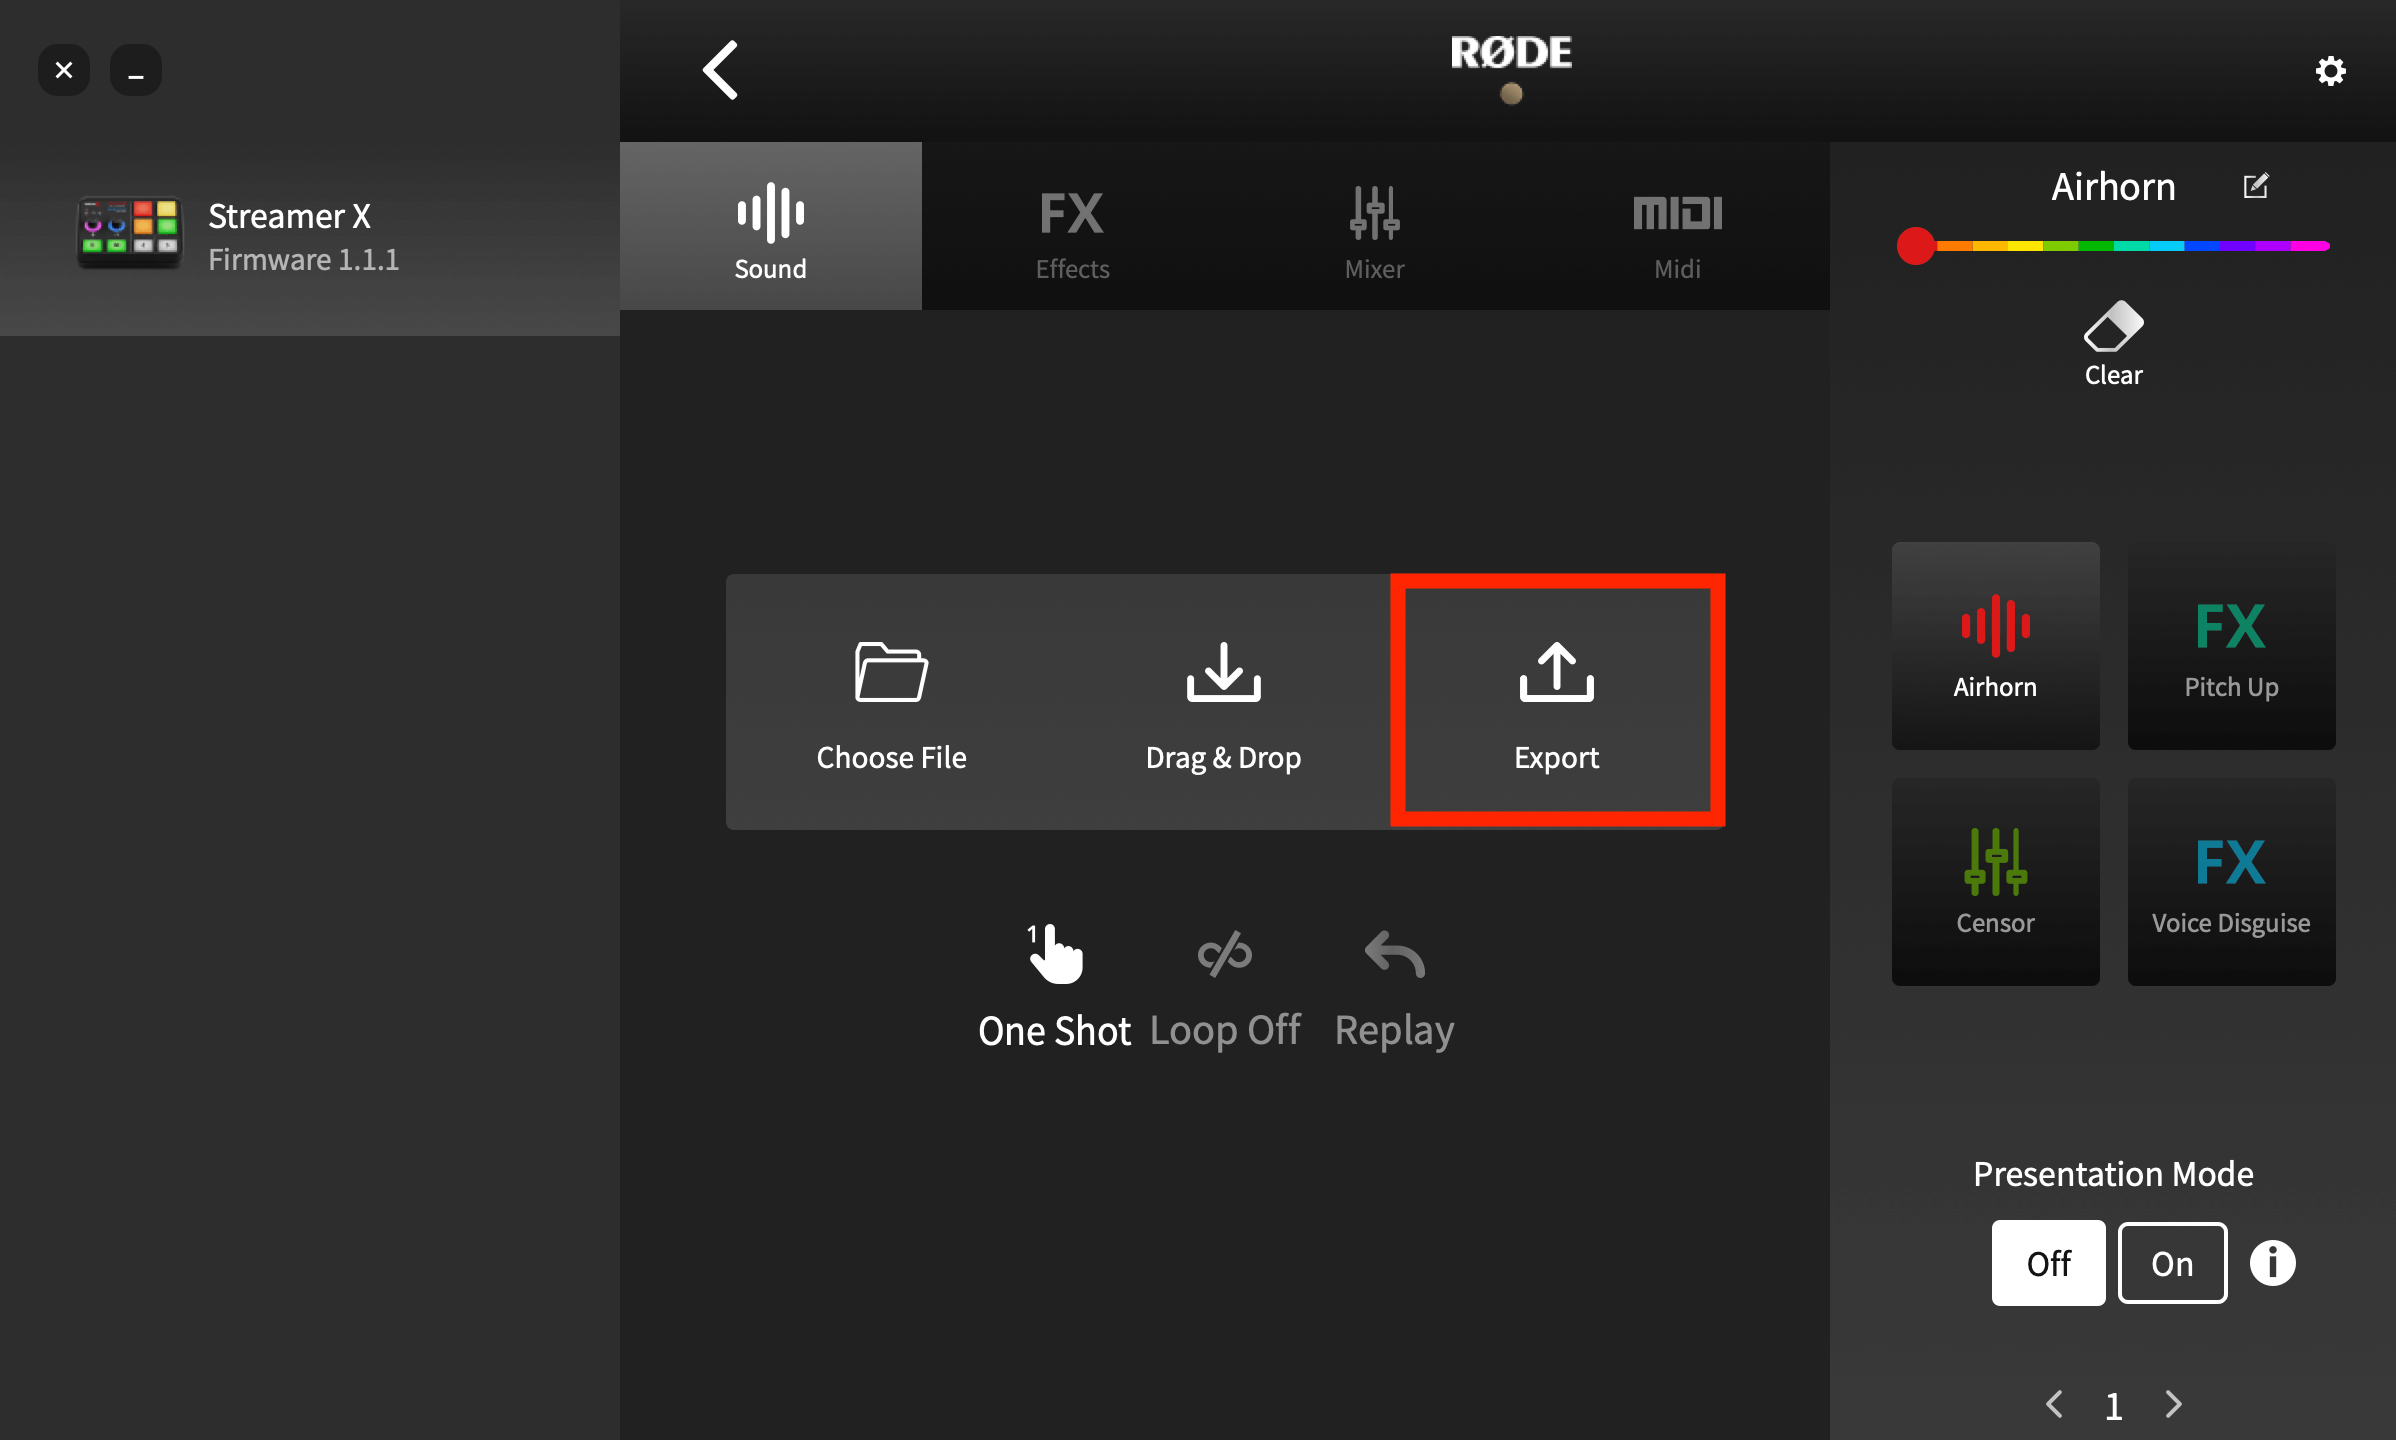
You can also export a sound from a pad onto your computer. To do this, select the pad with the recording you want to save from the pad list on the right, then click ‘Export’. A dialog box will allow you to specify where to save the file.
Sound Pad Playback Modes
There are multiple audio playback modes for the sound pads. To access these using the RØDECaster App, go to the ‘Customize SMART Pads’ screen and click on the pad you want to edit.
There are three parameters you can adjust:
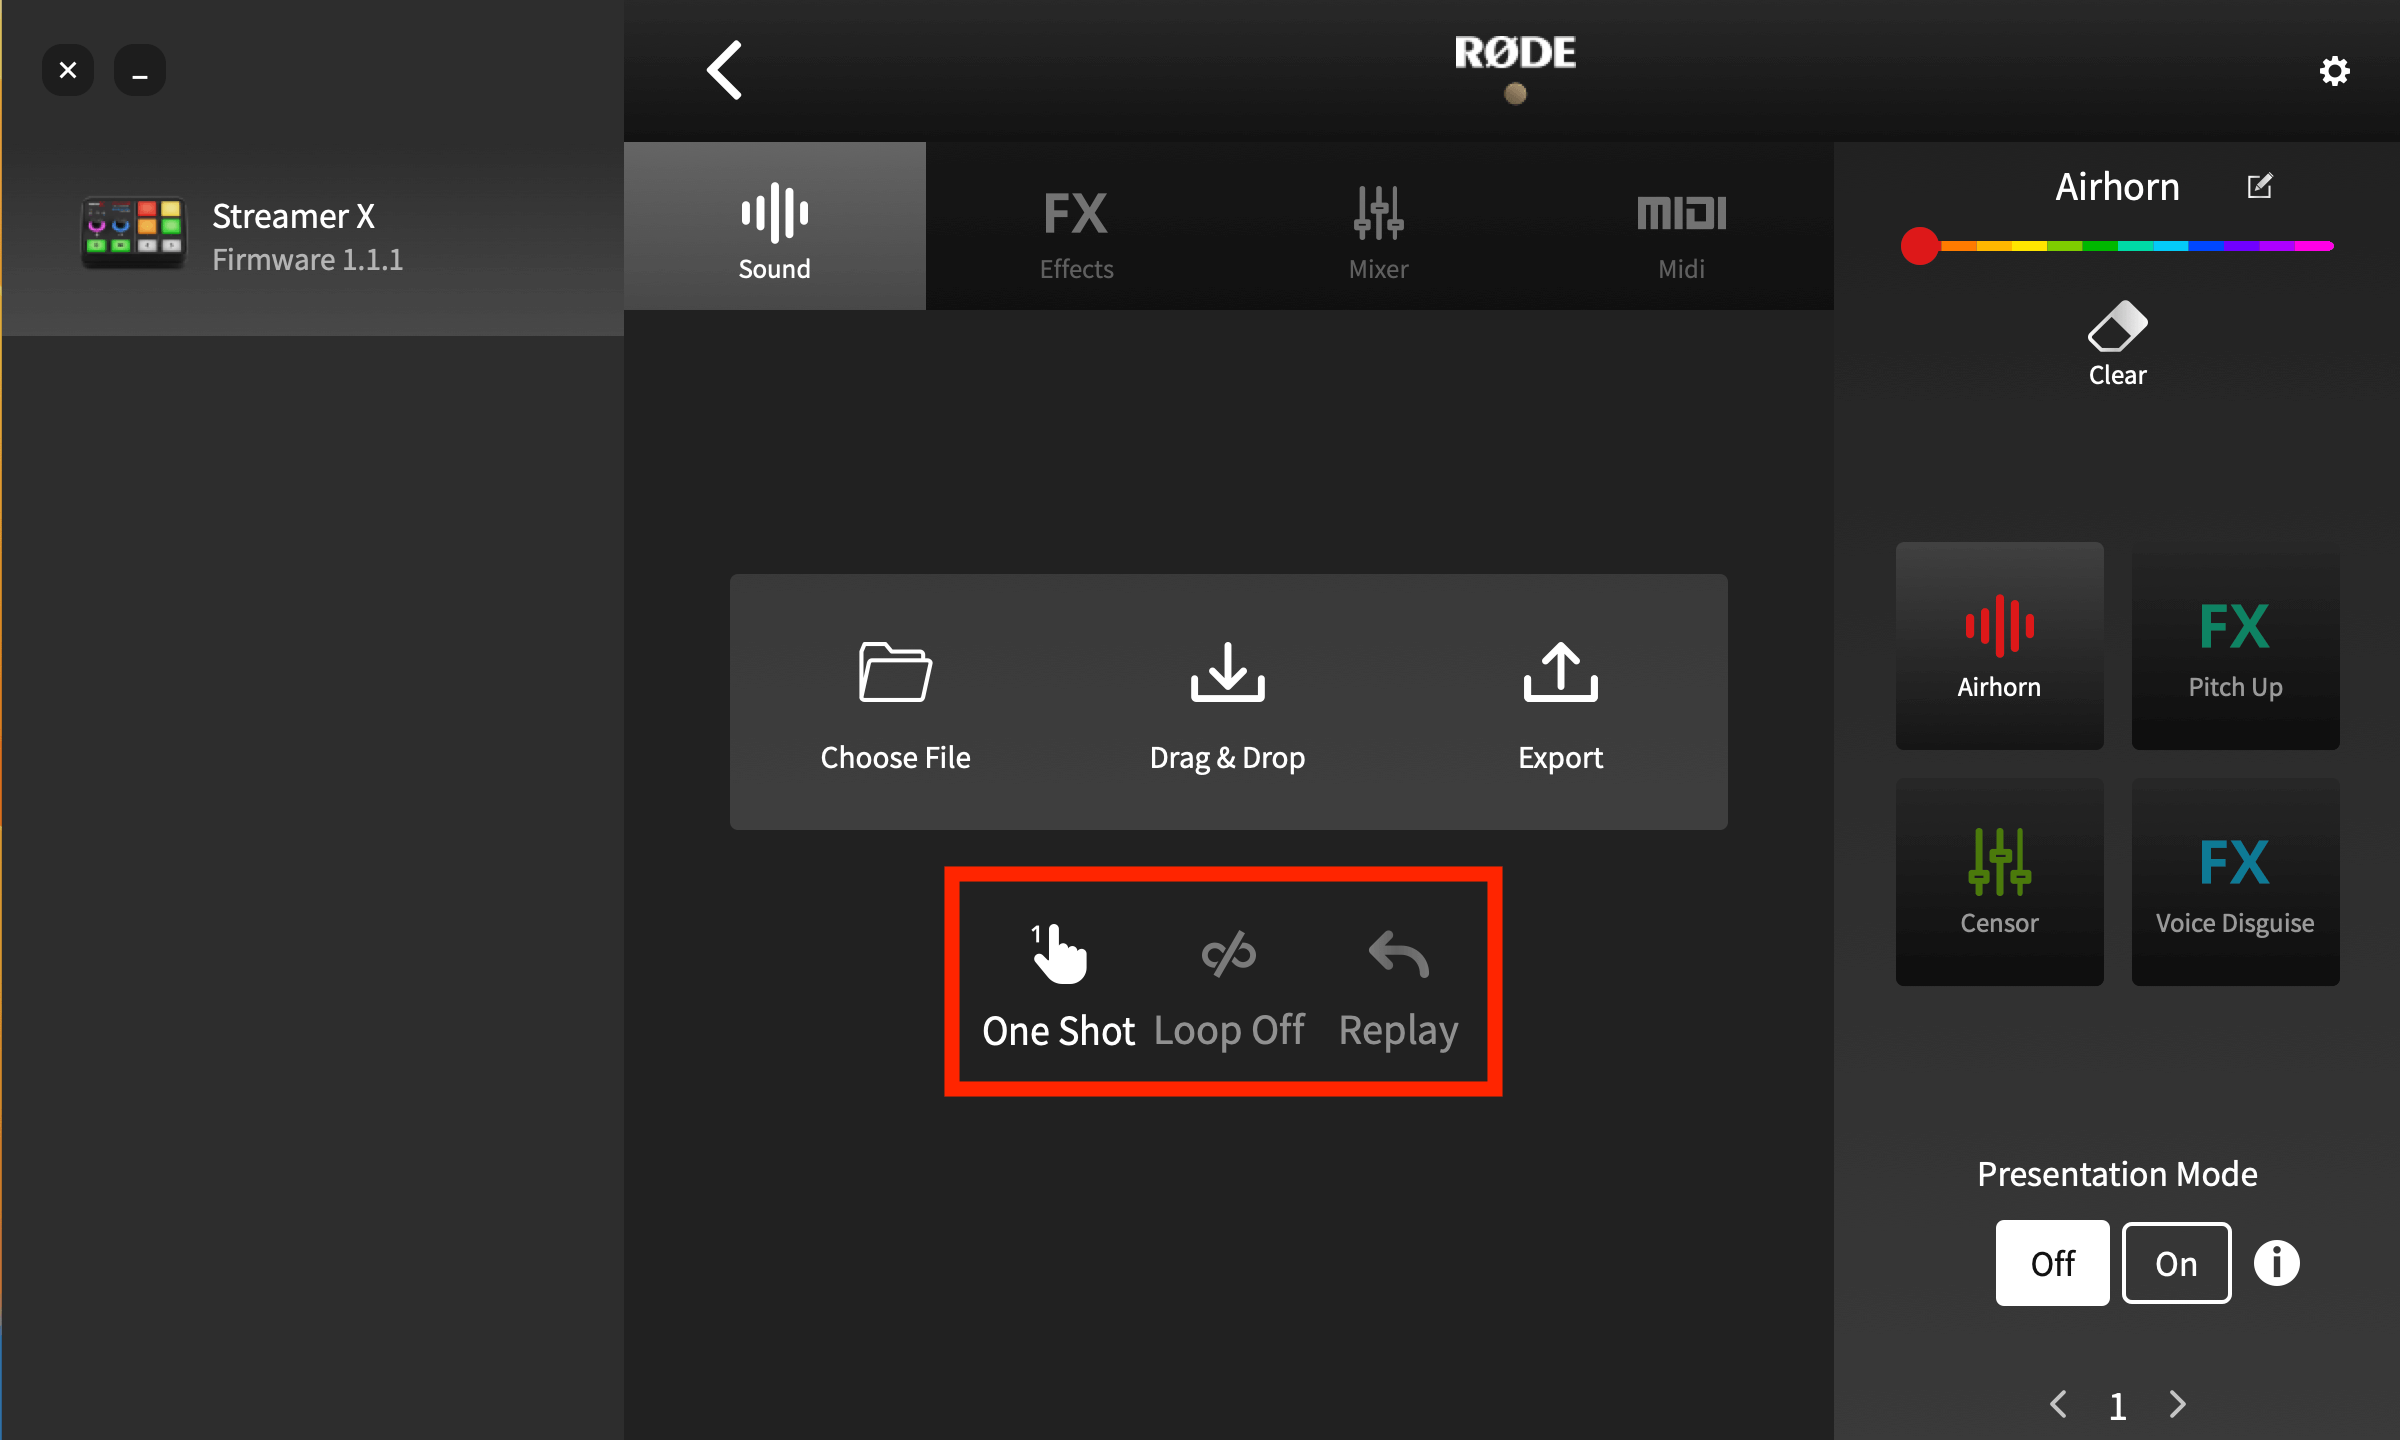
Toggle/One Shot/Hold: This setting affects how the audio triggers when you press the pad. ‘Toggle’ means one press will start the sound and a second press will stop it. ‘One Shot’ means pressing the pad will play the sound from the beginning – repeated presses will restart playback from the beginning (you cannot force stop playback in this mode – either let the sound play out or fade the sound out manually). ‘Hold’ will play the sound for as long as the pad is pressed.
Loop: In this mode, the audio will play repeatedly in a loop until playback is stopped (this mode is not available in ‘One Shot’ mode).
Replay/Continue: When in ‘Toggle’ mode, this sets whether playback starts from the beginning (if the pad is pressed after being stopped) or resumes from the pause position.
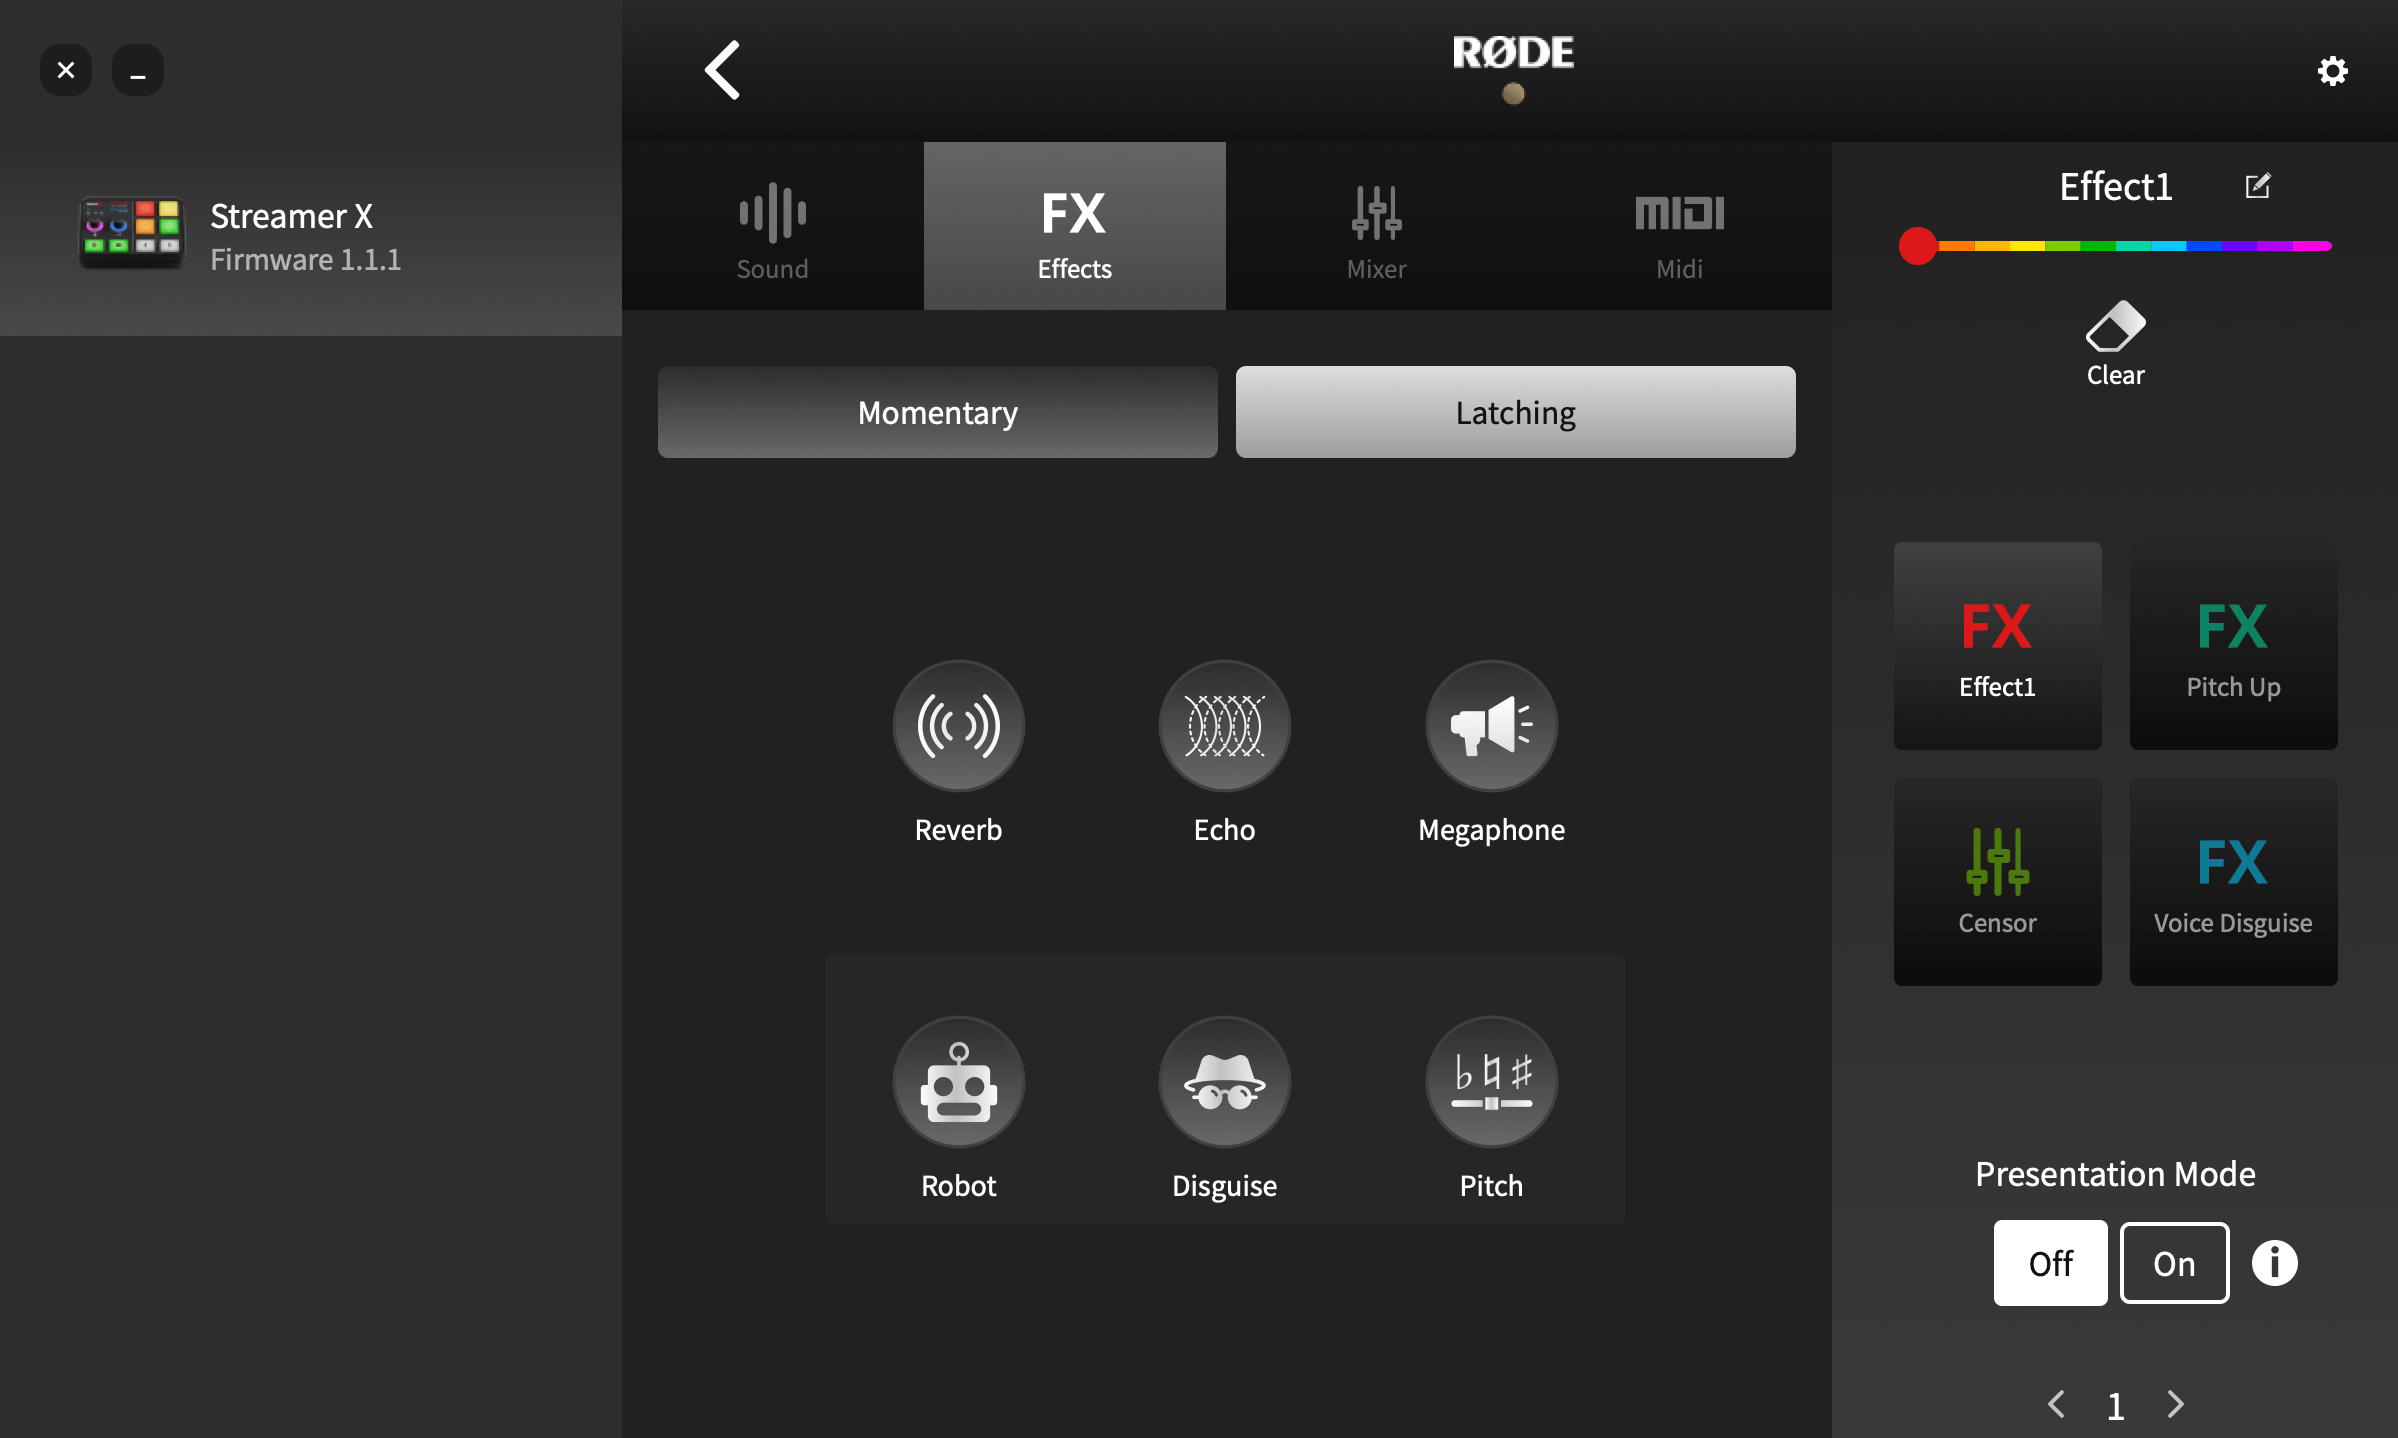
Using the SMART Pads to Trigger Voice Effects
Voice effects allow you to add a range of transformations and enhancements to microphone channels by pressing the pads. This could be as subtle as adding reverb for a vocal performance to drastic vocal effects for livestreaming or podcasting. There are four effects available: reverb, echo (delay), megaphone, and voice-altering effects, of which there are three modes: robot voice, voice disguise and pitch shift. Any of the four effect types can be combined and activated simultaneously.
Setting up an FX Pad
To create or edit an effect pad using the RØDECaster App, go to the ‘Customize SMART Pads’ screen and either clear a pad and then select ‘FX’ as the type, or click ‘edit’ for an existing FX pad. If 'Latching' is selected at the top of the sceen, then pressing the pad will activate the effect, and it will stay activated until the pad is pressed again. If ‘Momentary’ is engaged, the pad will only trigger the effect whilst it is being pressed.
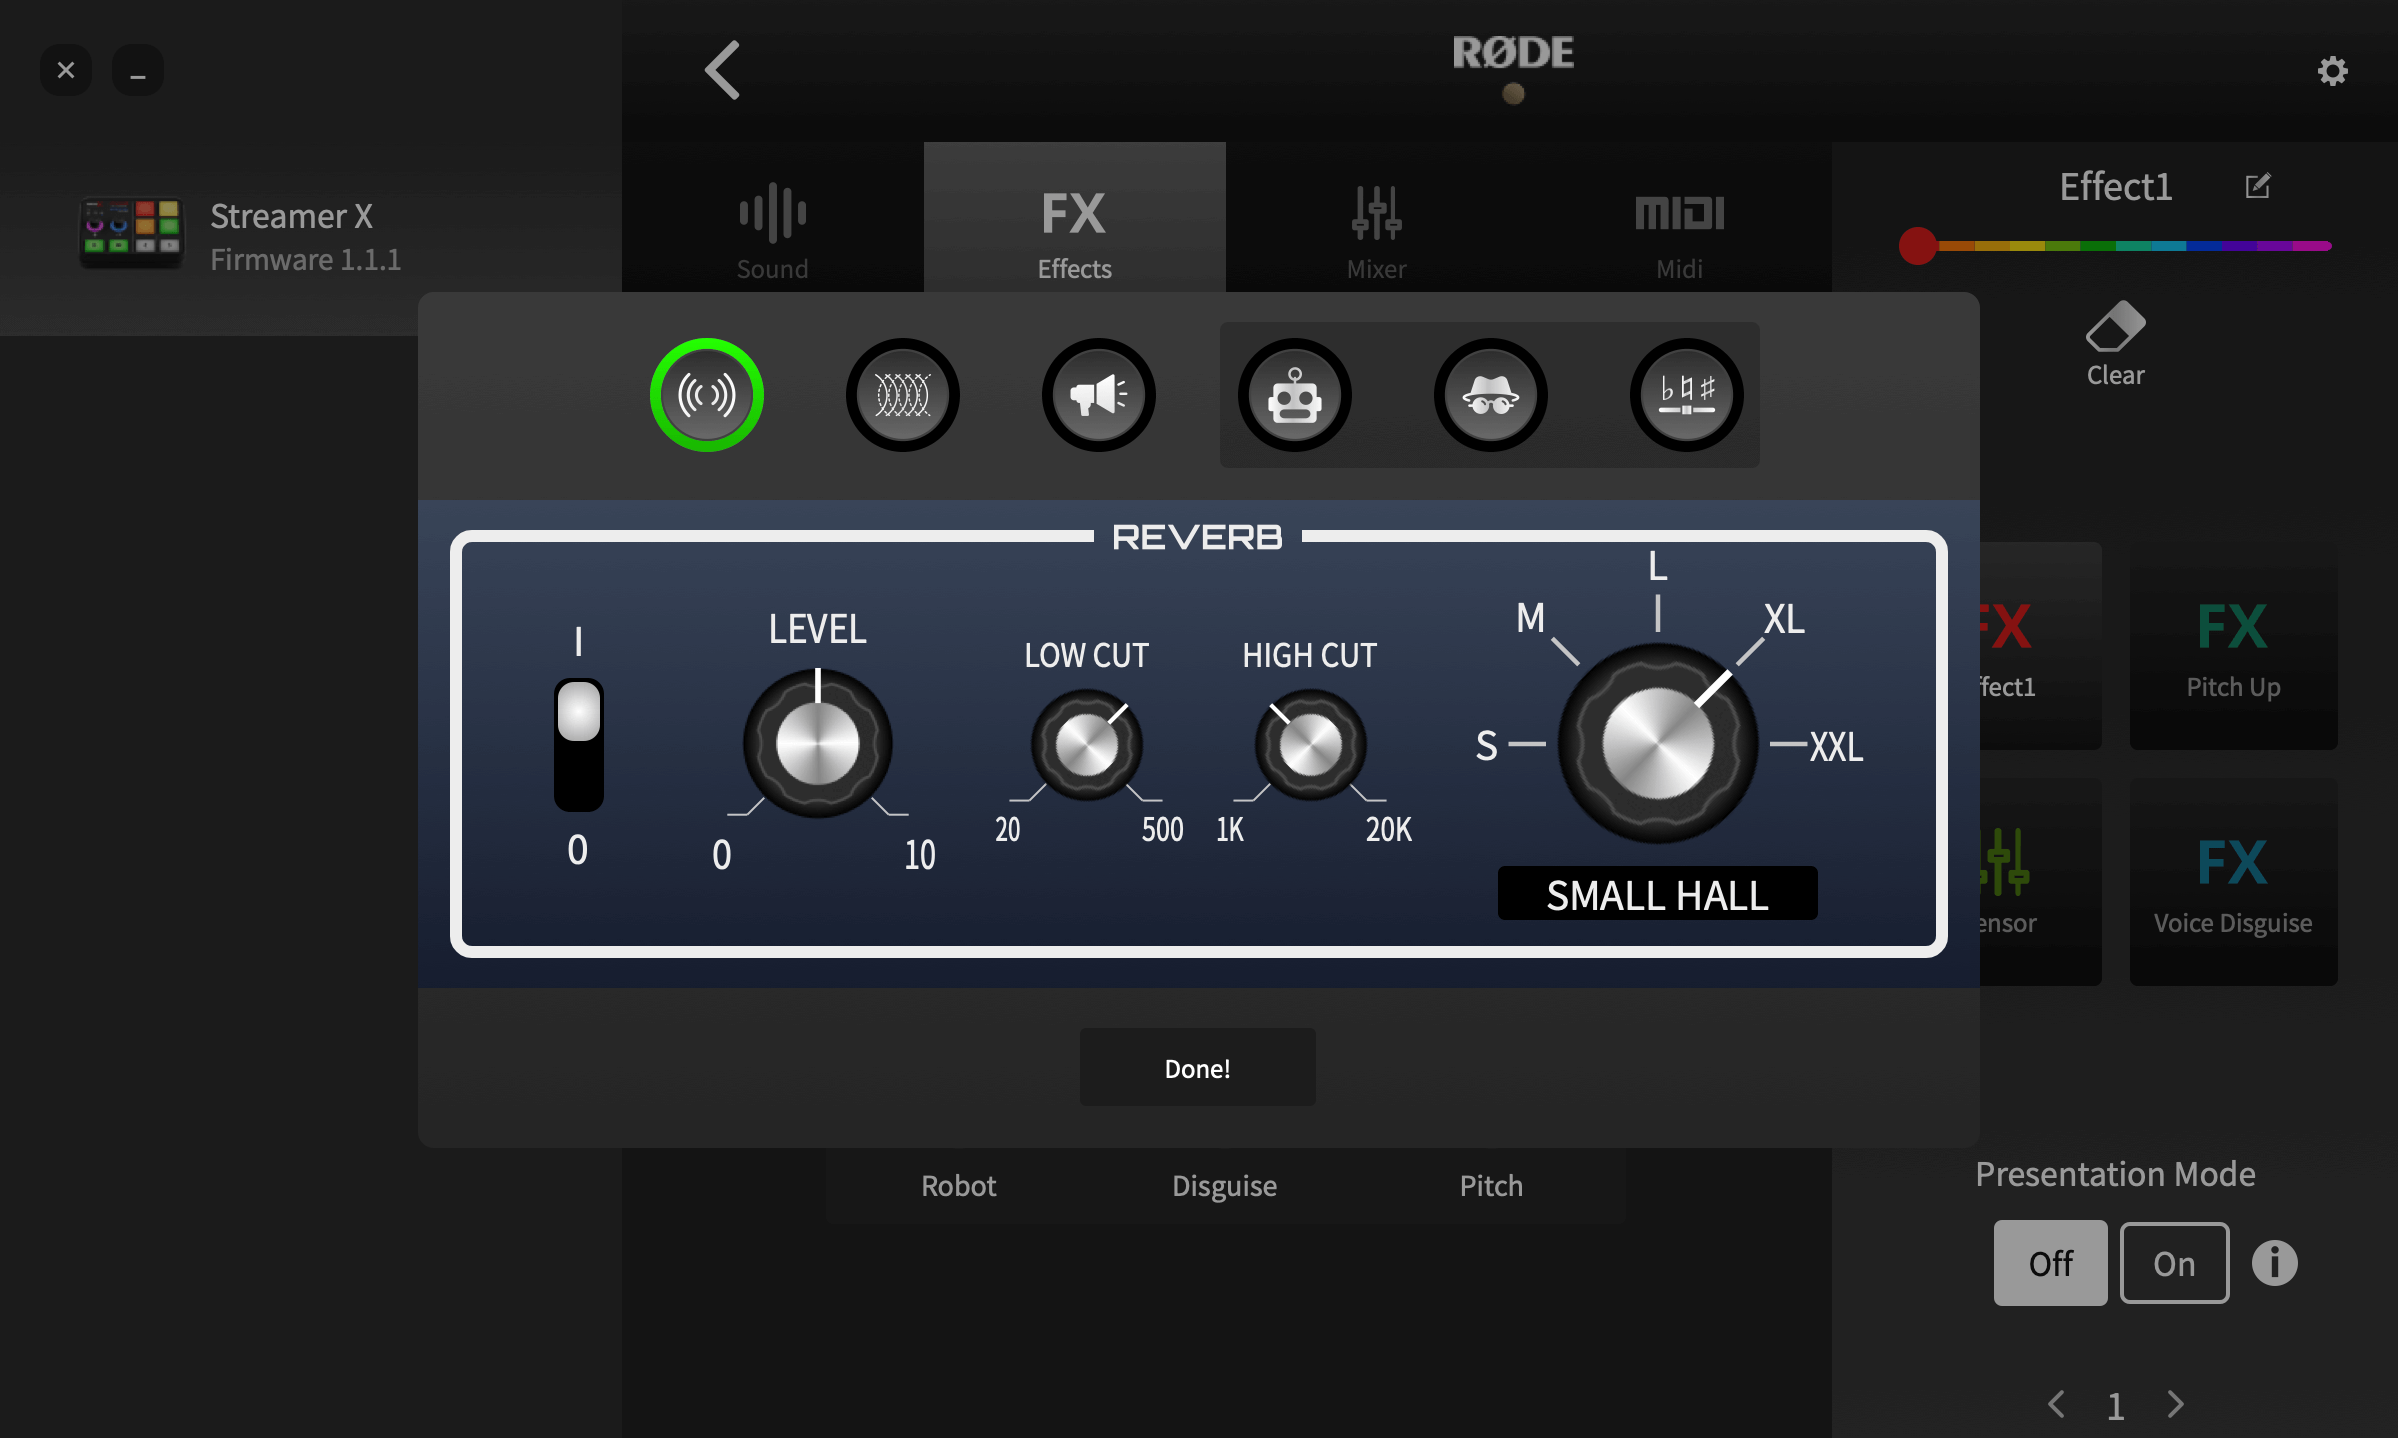
Reverb
The reverb effect has a range of controls that can be used to modify the effect to taste. Toggle the effect on and off using the switch on the left. The ‘Low Cut’ and ‘High Cut’ controls can be used to adjust the tonal balance of the reverb. And the type (or ‘size’) of reverb can be adjusted using the large control on the right.
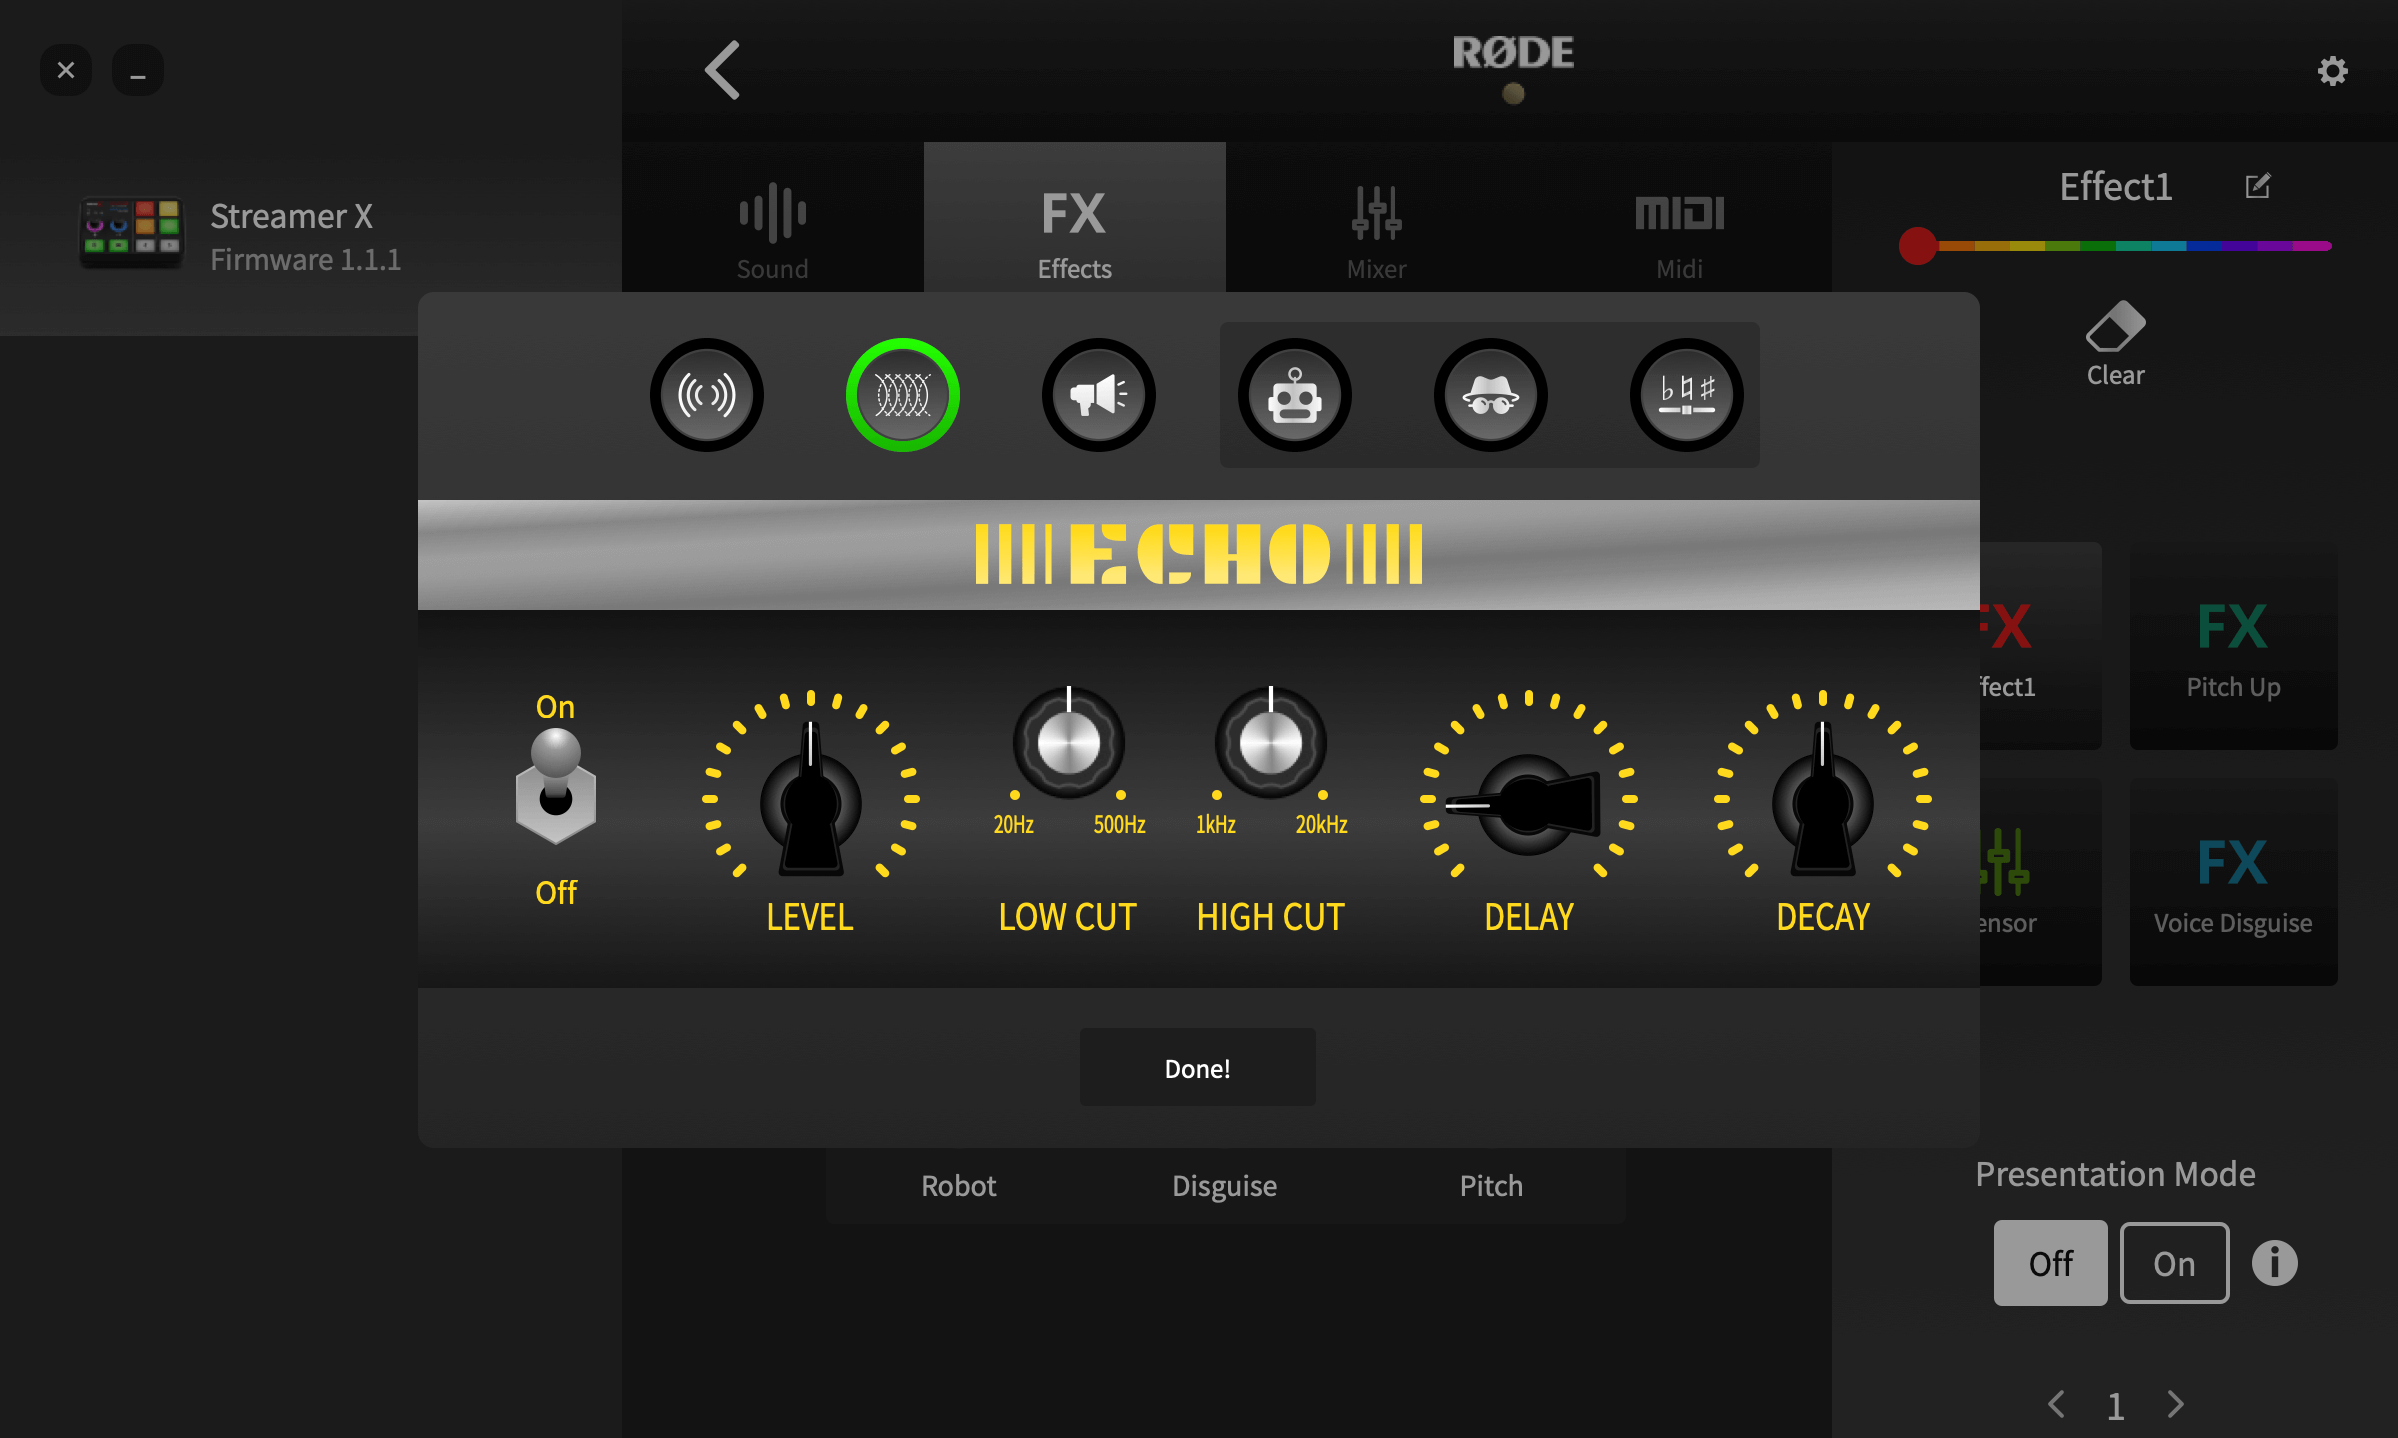
Echo
The delay setting has a range of controls that can be used to modify the effect. Toggle the effect on and off using the switch on the left. The level function controls the amount of echo that will be heard in the mix. The ‘Low Cut’ and ‘High Cut’ controls can be used to adjust the tonal balance of the echo. The ‘Delay’ control determines the time between echoes, with a maximum of one second. The ‘Decay’ control sets how long it takes for the echoes to die away.
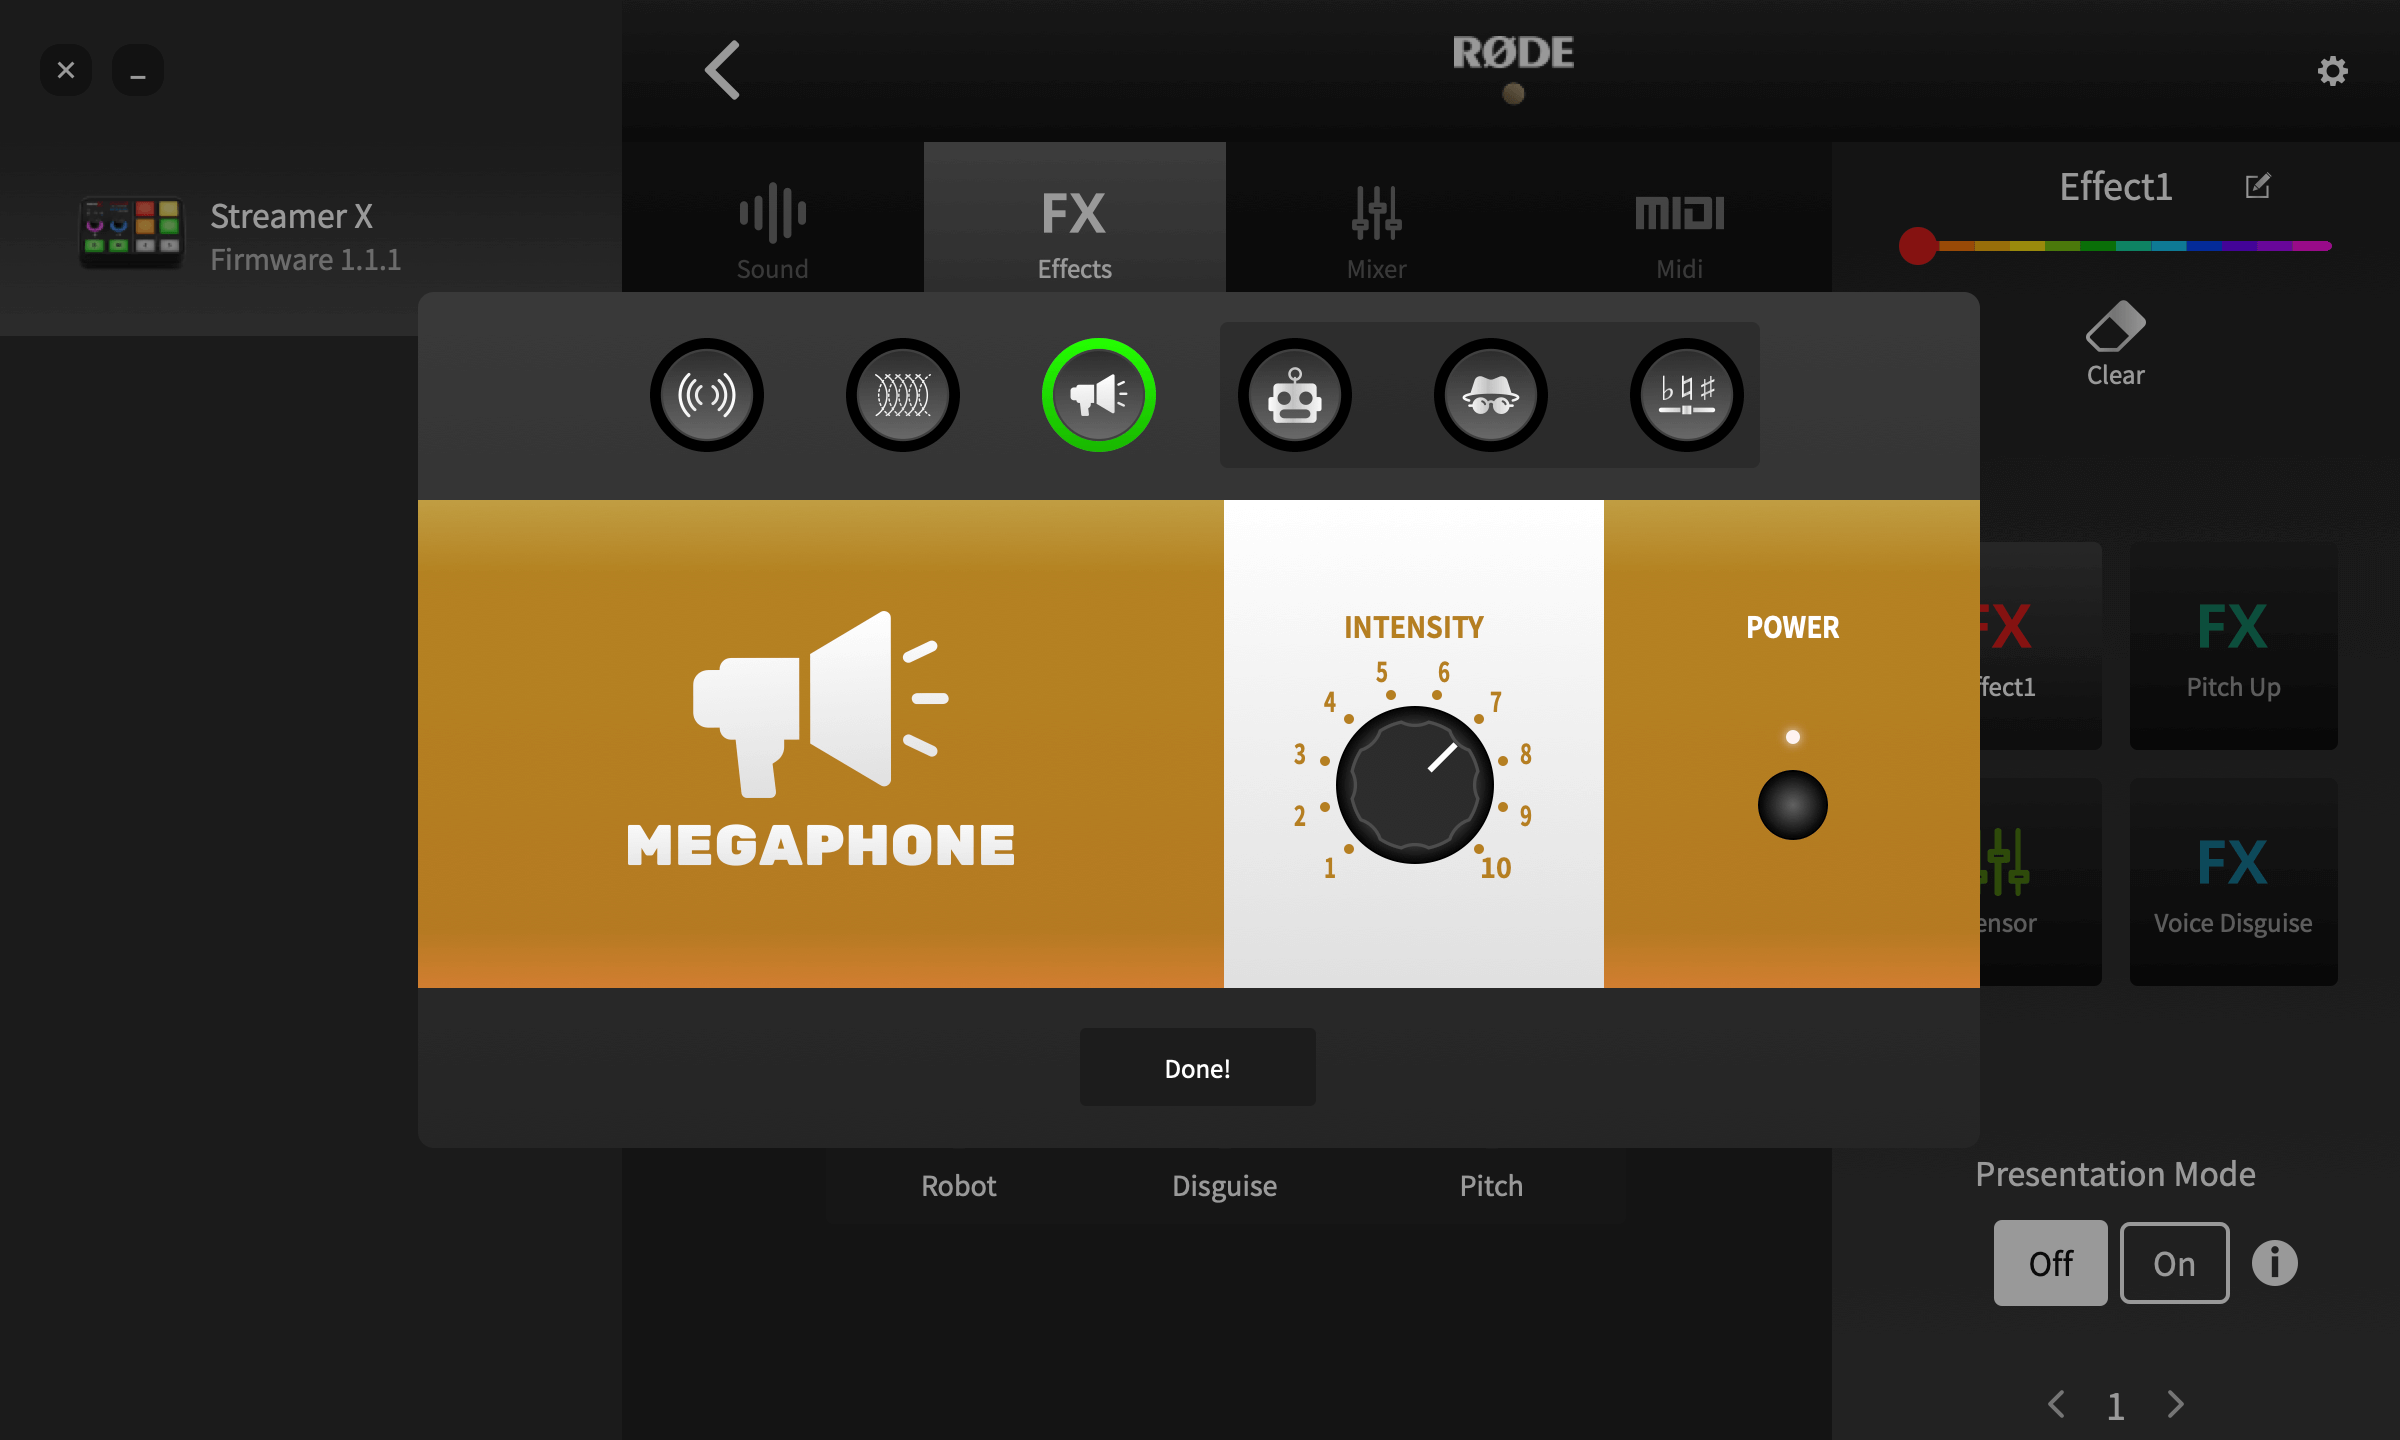
Megaphone
Toggle the effect on and off using the ‘Power’ switch on the right. The ‘Intensity’ control will adjust how dramatic the effect is.
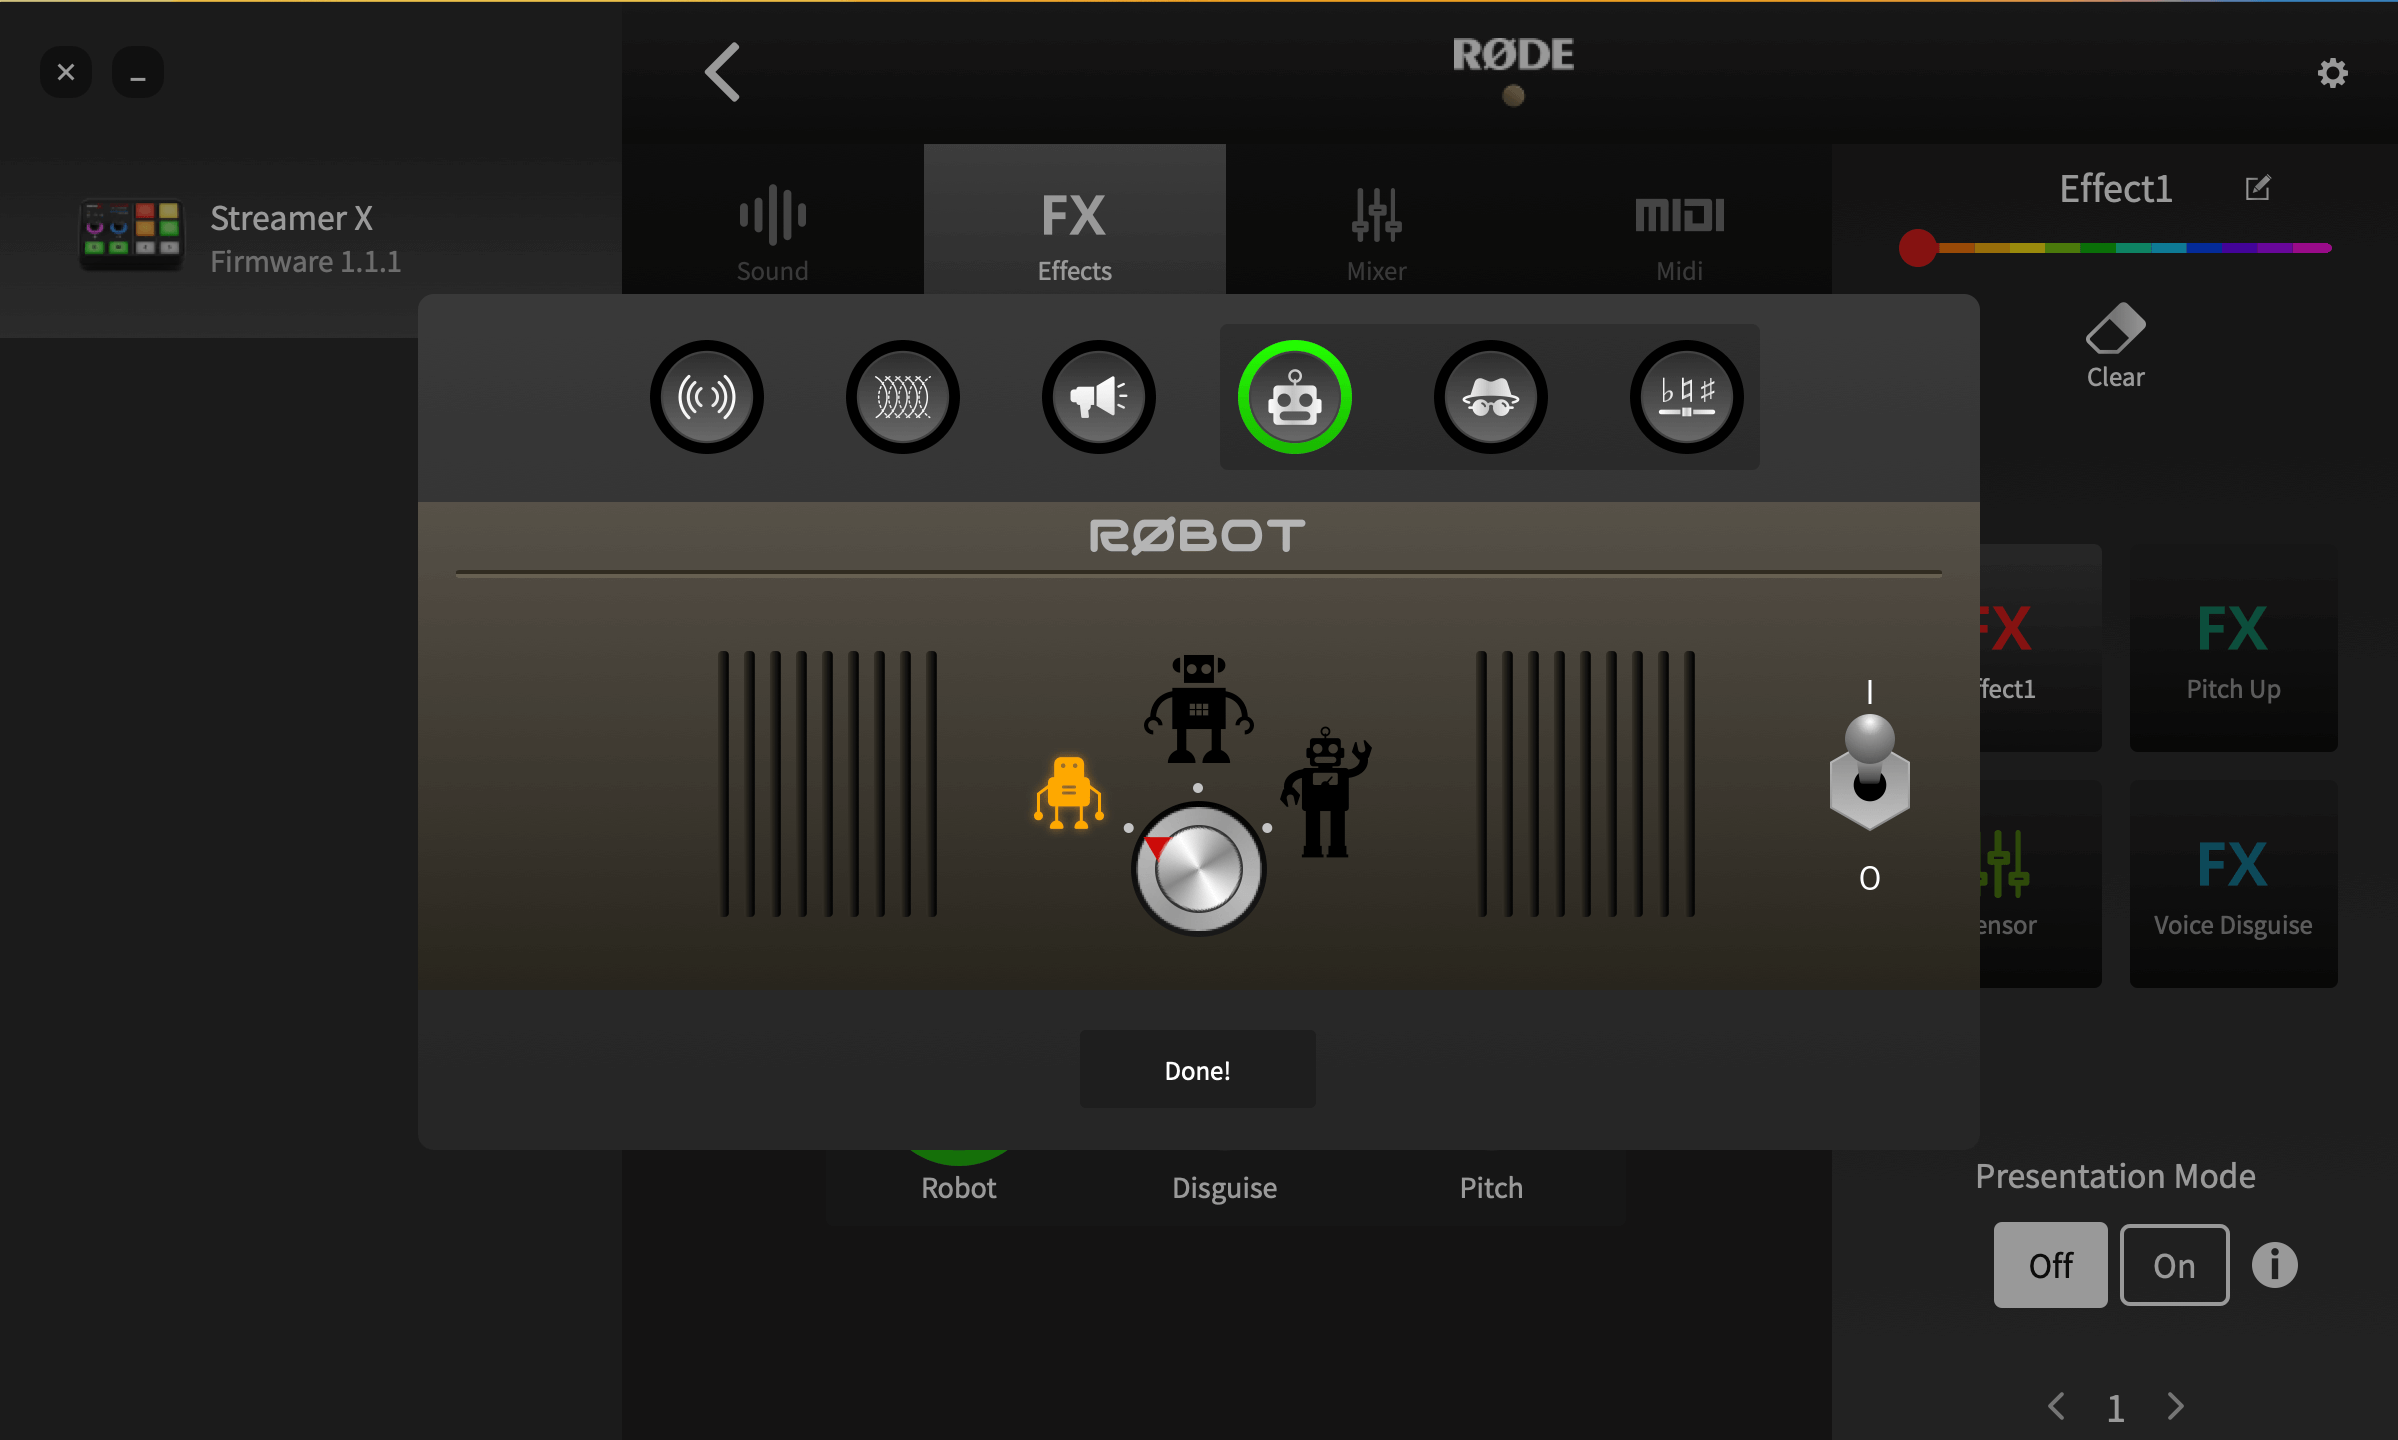
Robot
This is a classic robot voice effect. Toggle the effect on and off using the I/O switch on the right of the screen. There are three different robot voice types available – small, medium and large – which you can select with the dial.
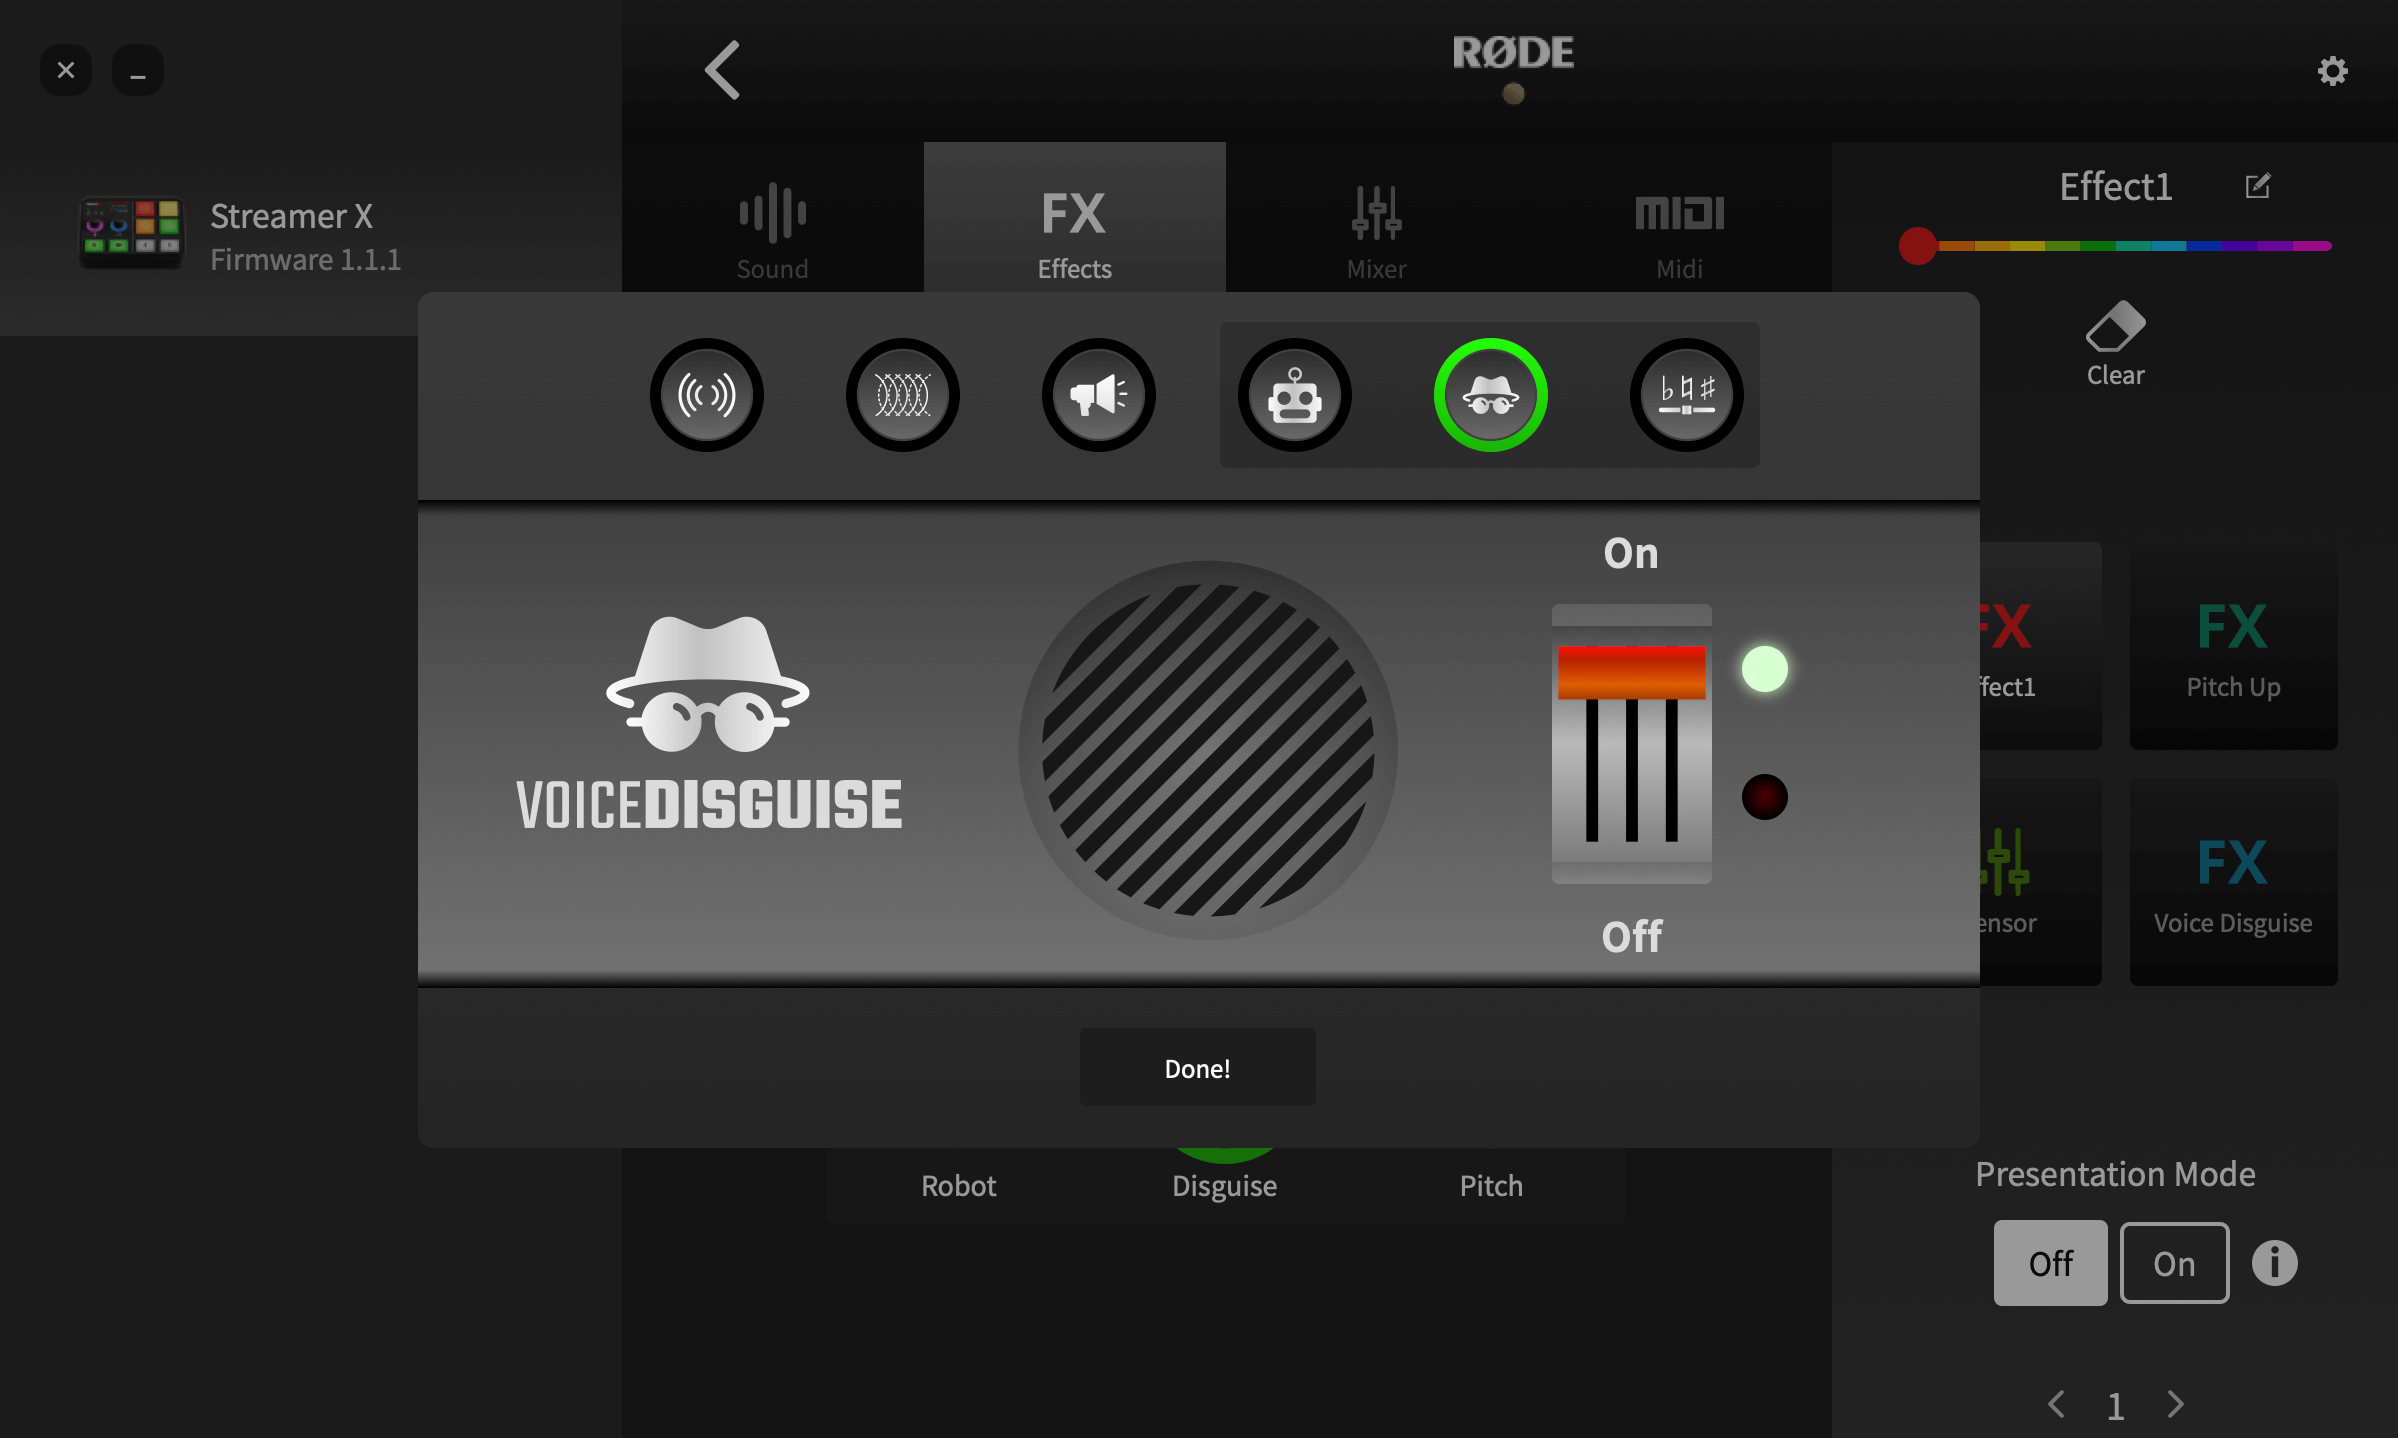
Voice Disguise
This effect changes your voice timbre to make it unrecognisable. It has a single on/off control.
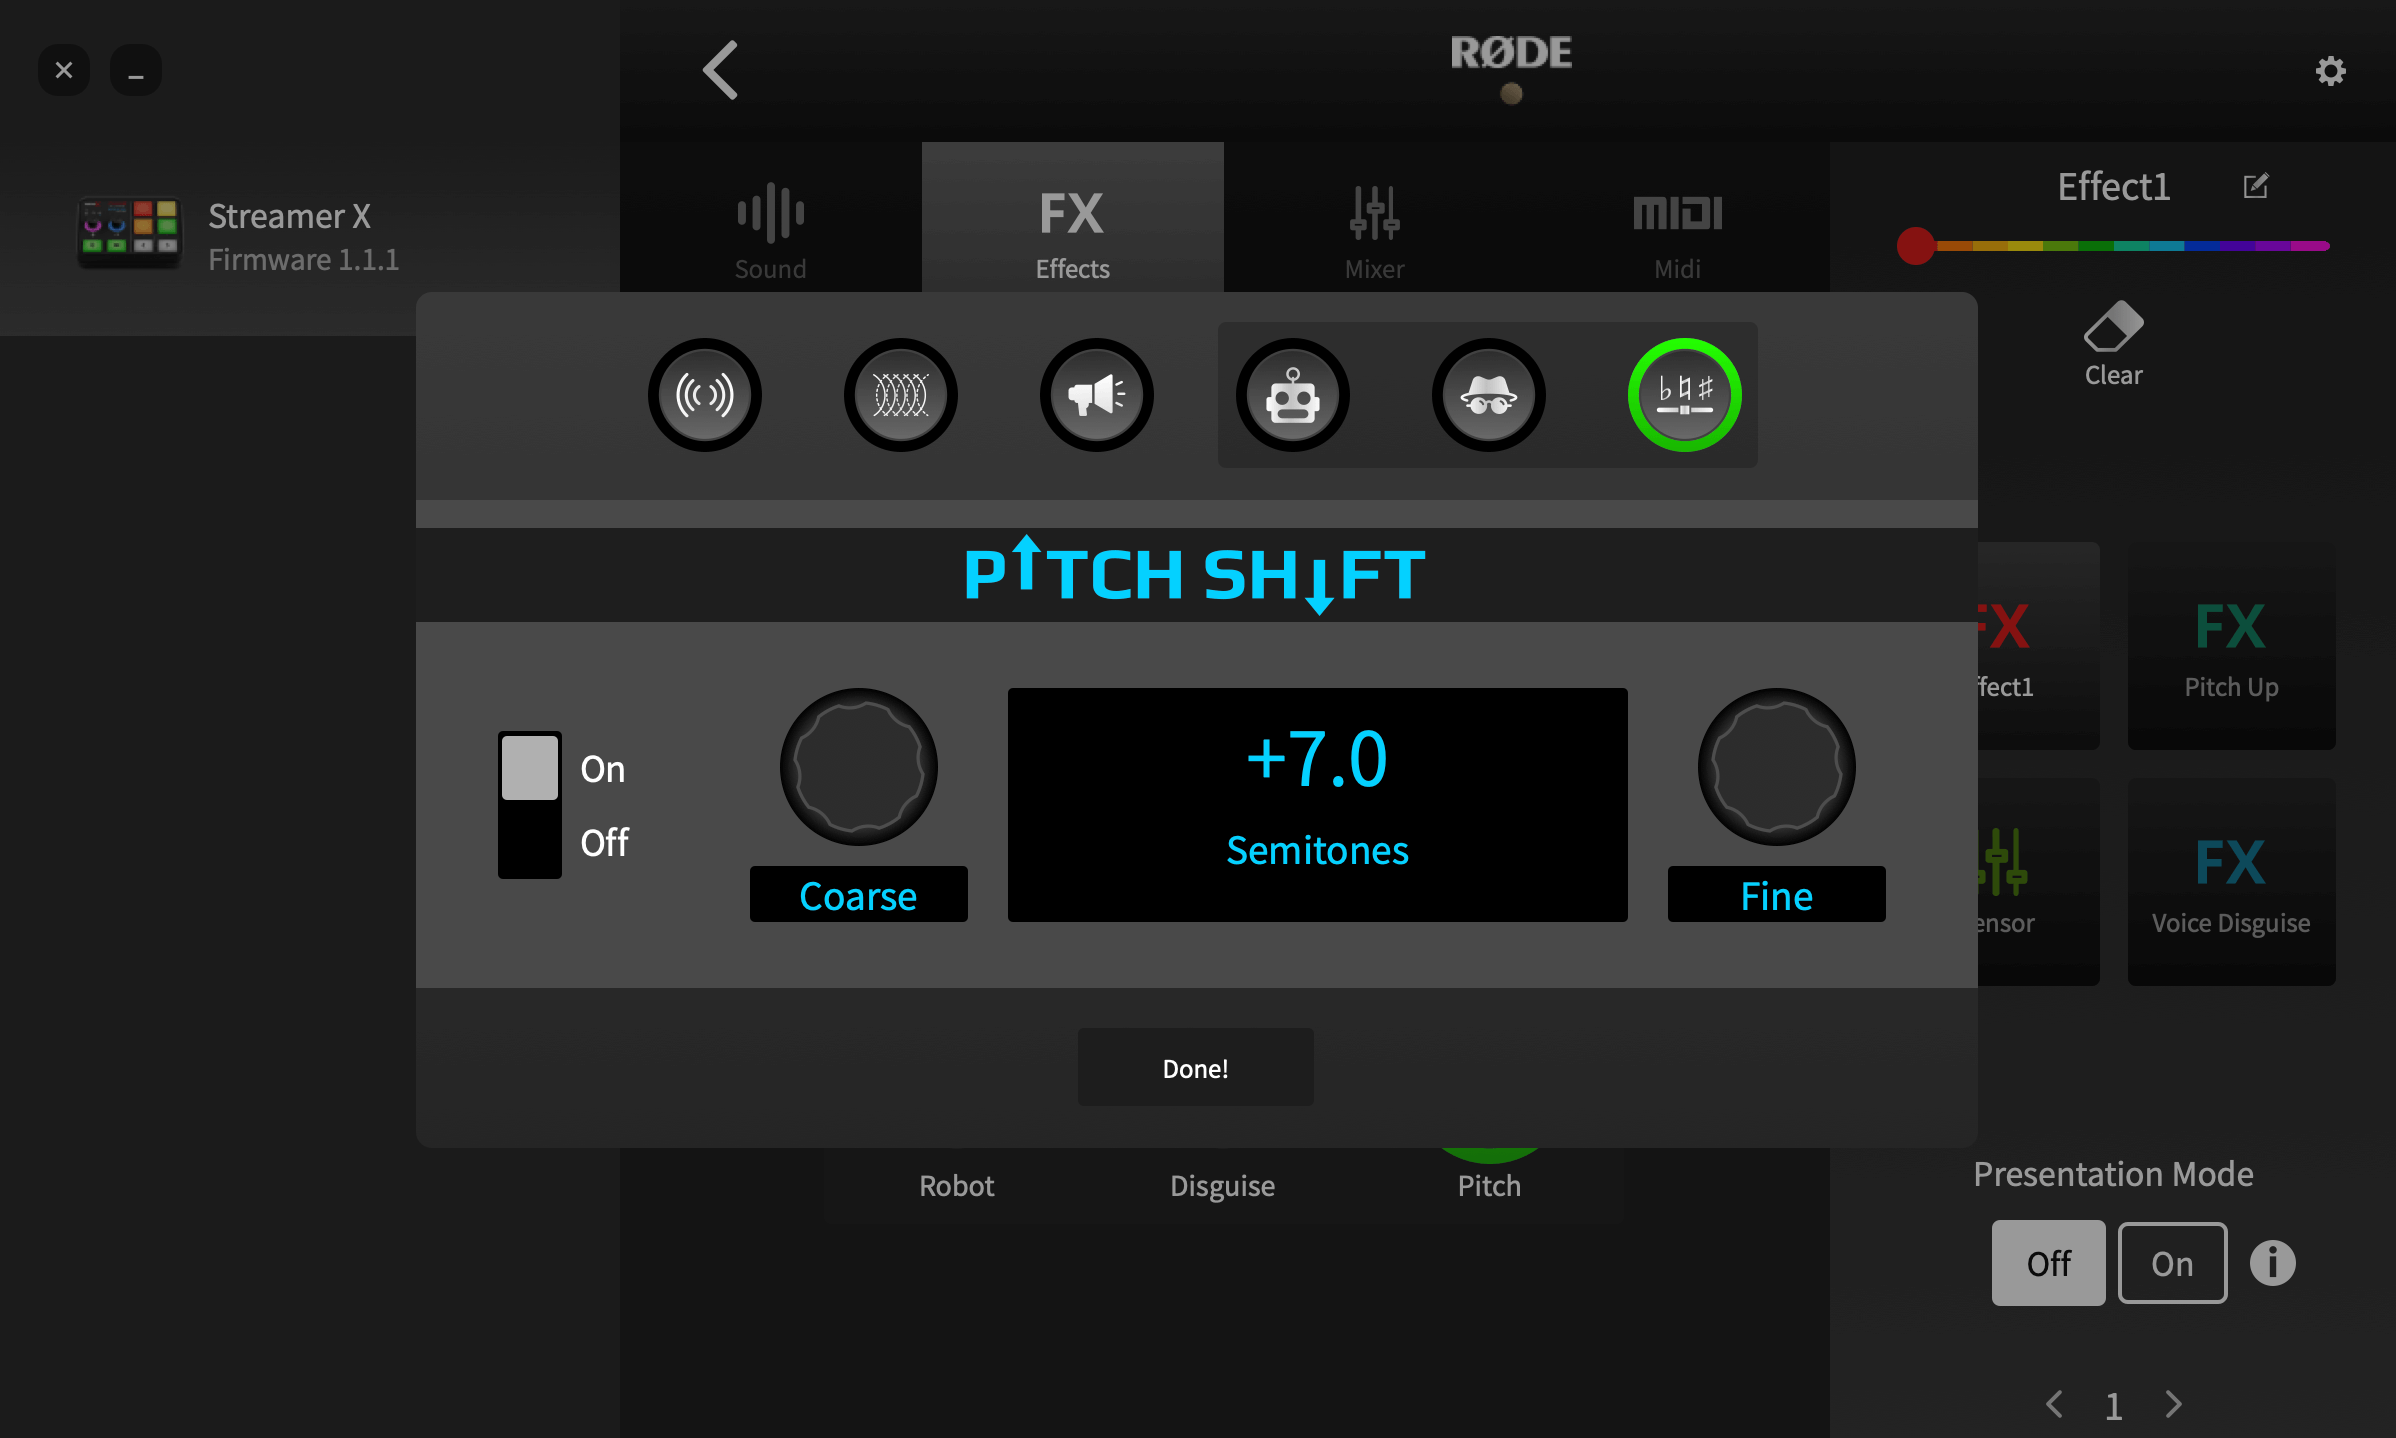
Pitch Shifter
This effect adjusts the pitch of the incoming signal by a set amount. It is calibrated in semitones, meaning it can be used for musical effects, as well as for comedic voices. Toggle the effect on and off using the ‘On/Off’ switch on the left of the screen. Use the ‘Coarse’ and ‘Fine’ controls to set the range of the pitch shifting, up to a maximum of one octave (12 semitones) above or below the incoming signal.
Using the SMART Pads to Trigger Mixer Actions
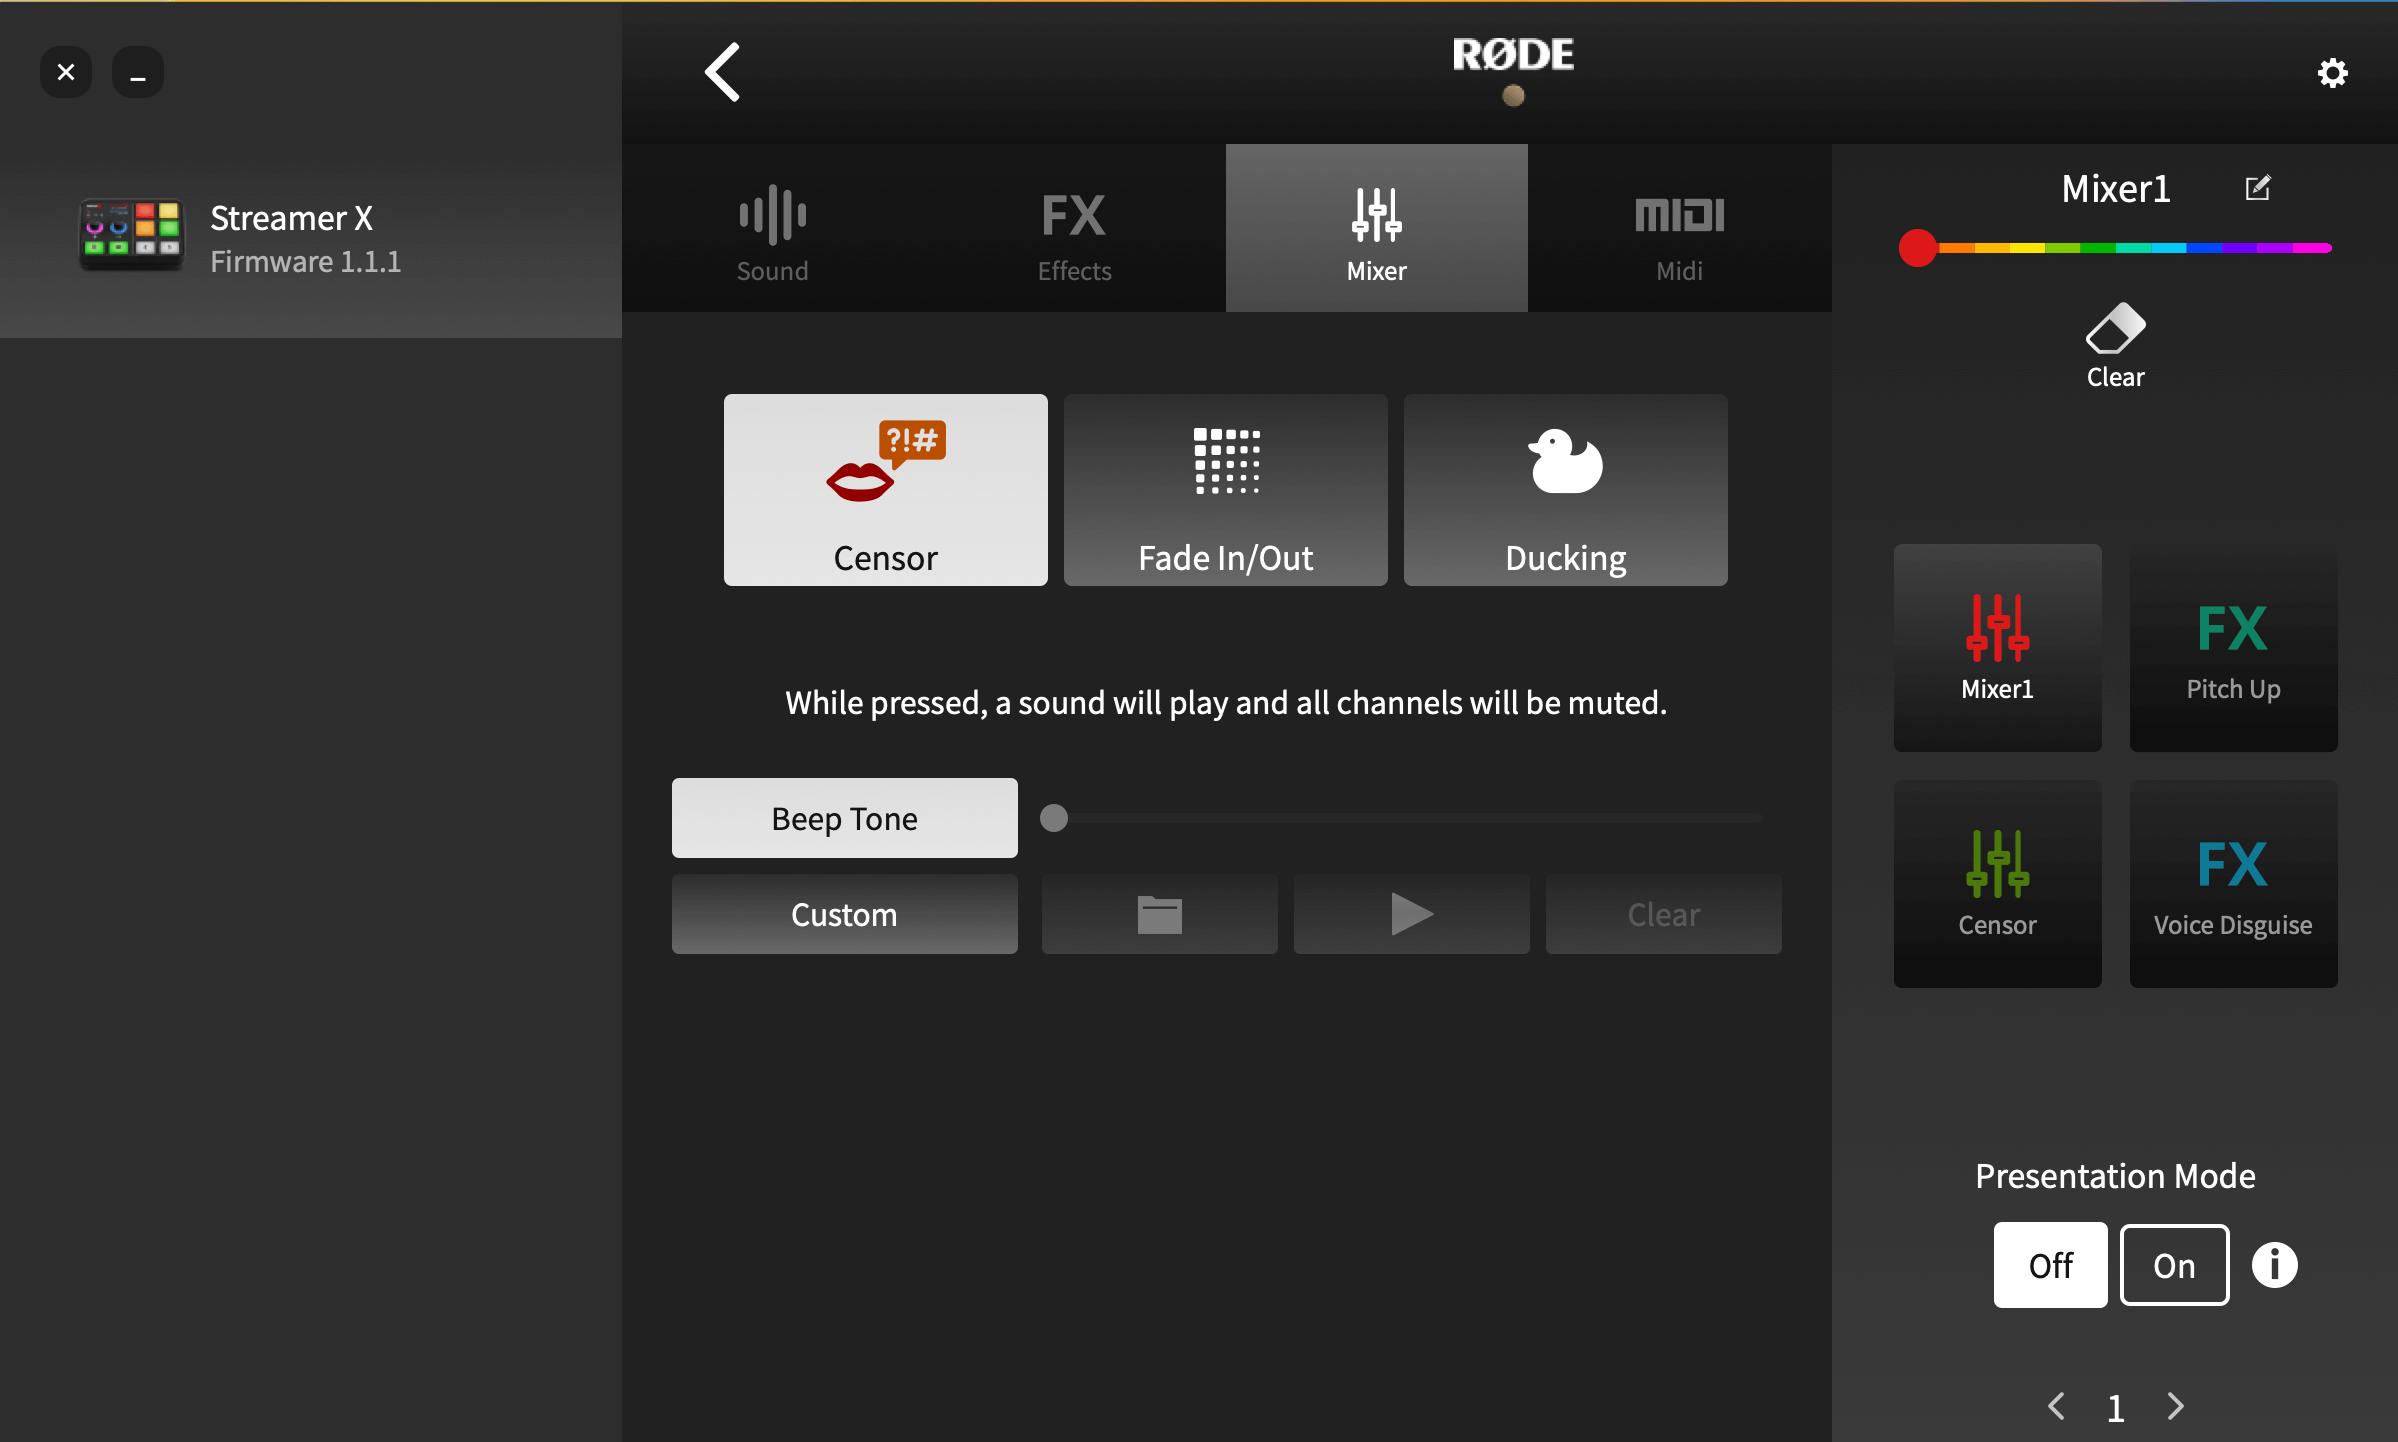
The ‘Mixer’ pad type offers a range of different actions that have an impact on your mixer levels and routing. They essentially allow you to perform multiple mixer functions with a single press of a pad, rather than having to make adjustments manually. This is especially useful in a live podcasting or streaming scenario. There are three different modes: ‘Censor’, ‘Fade In/Out’ and ‘Ducking’.
Censor
In this mode, when a pad is pressed, a preset sound will play, and all channels will be muted. By default, it uses a classic ‘beep’ tone, but this can be replaced with any sound you want. To use your own sound, click ‘Custom’ and then the folder icon to select a sound file from your computer. You can preview the recording with the play button and clear the recording using the clear button. The trigger mode can be set at the top of the screen. In ‘Latching’ mode, the Censor effect will start when the pad is pressed and stop when the pad is pressed again. In ‘Momentary’ mode, the effect will only play whilst the pad is pressed.
Note
Custom recordings will loop for as long as the pad is activated.
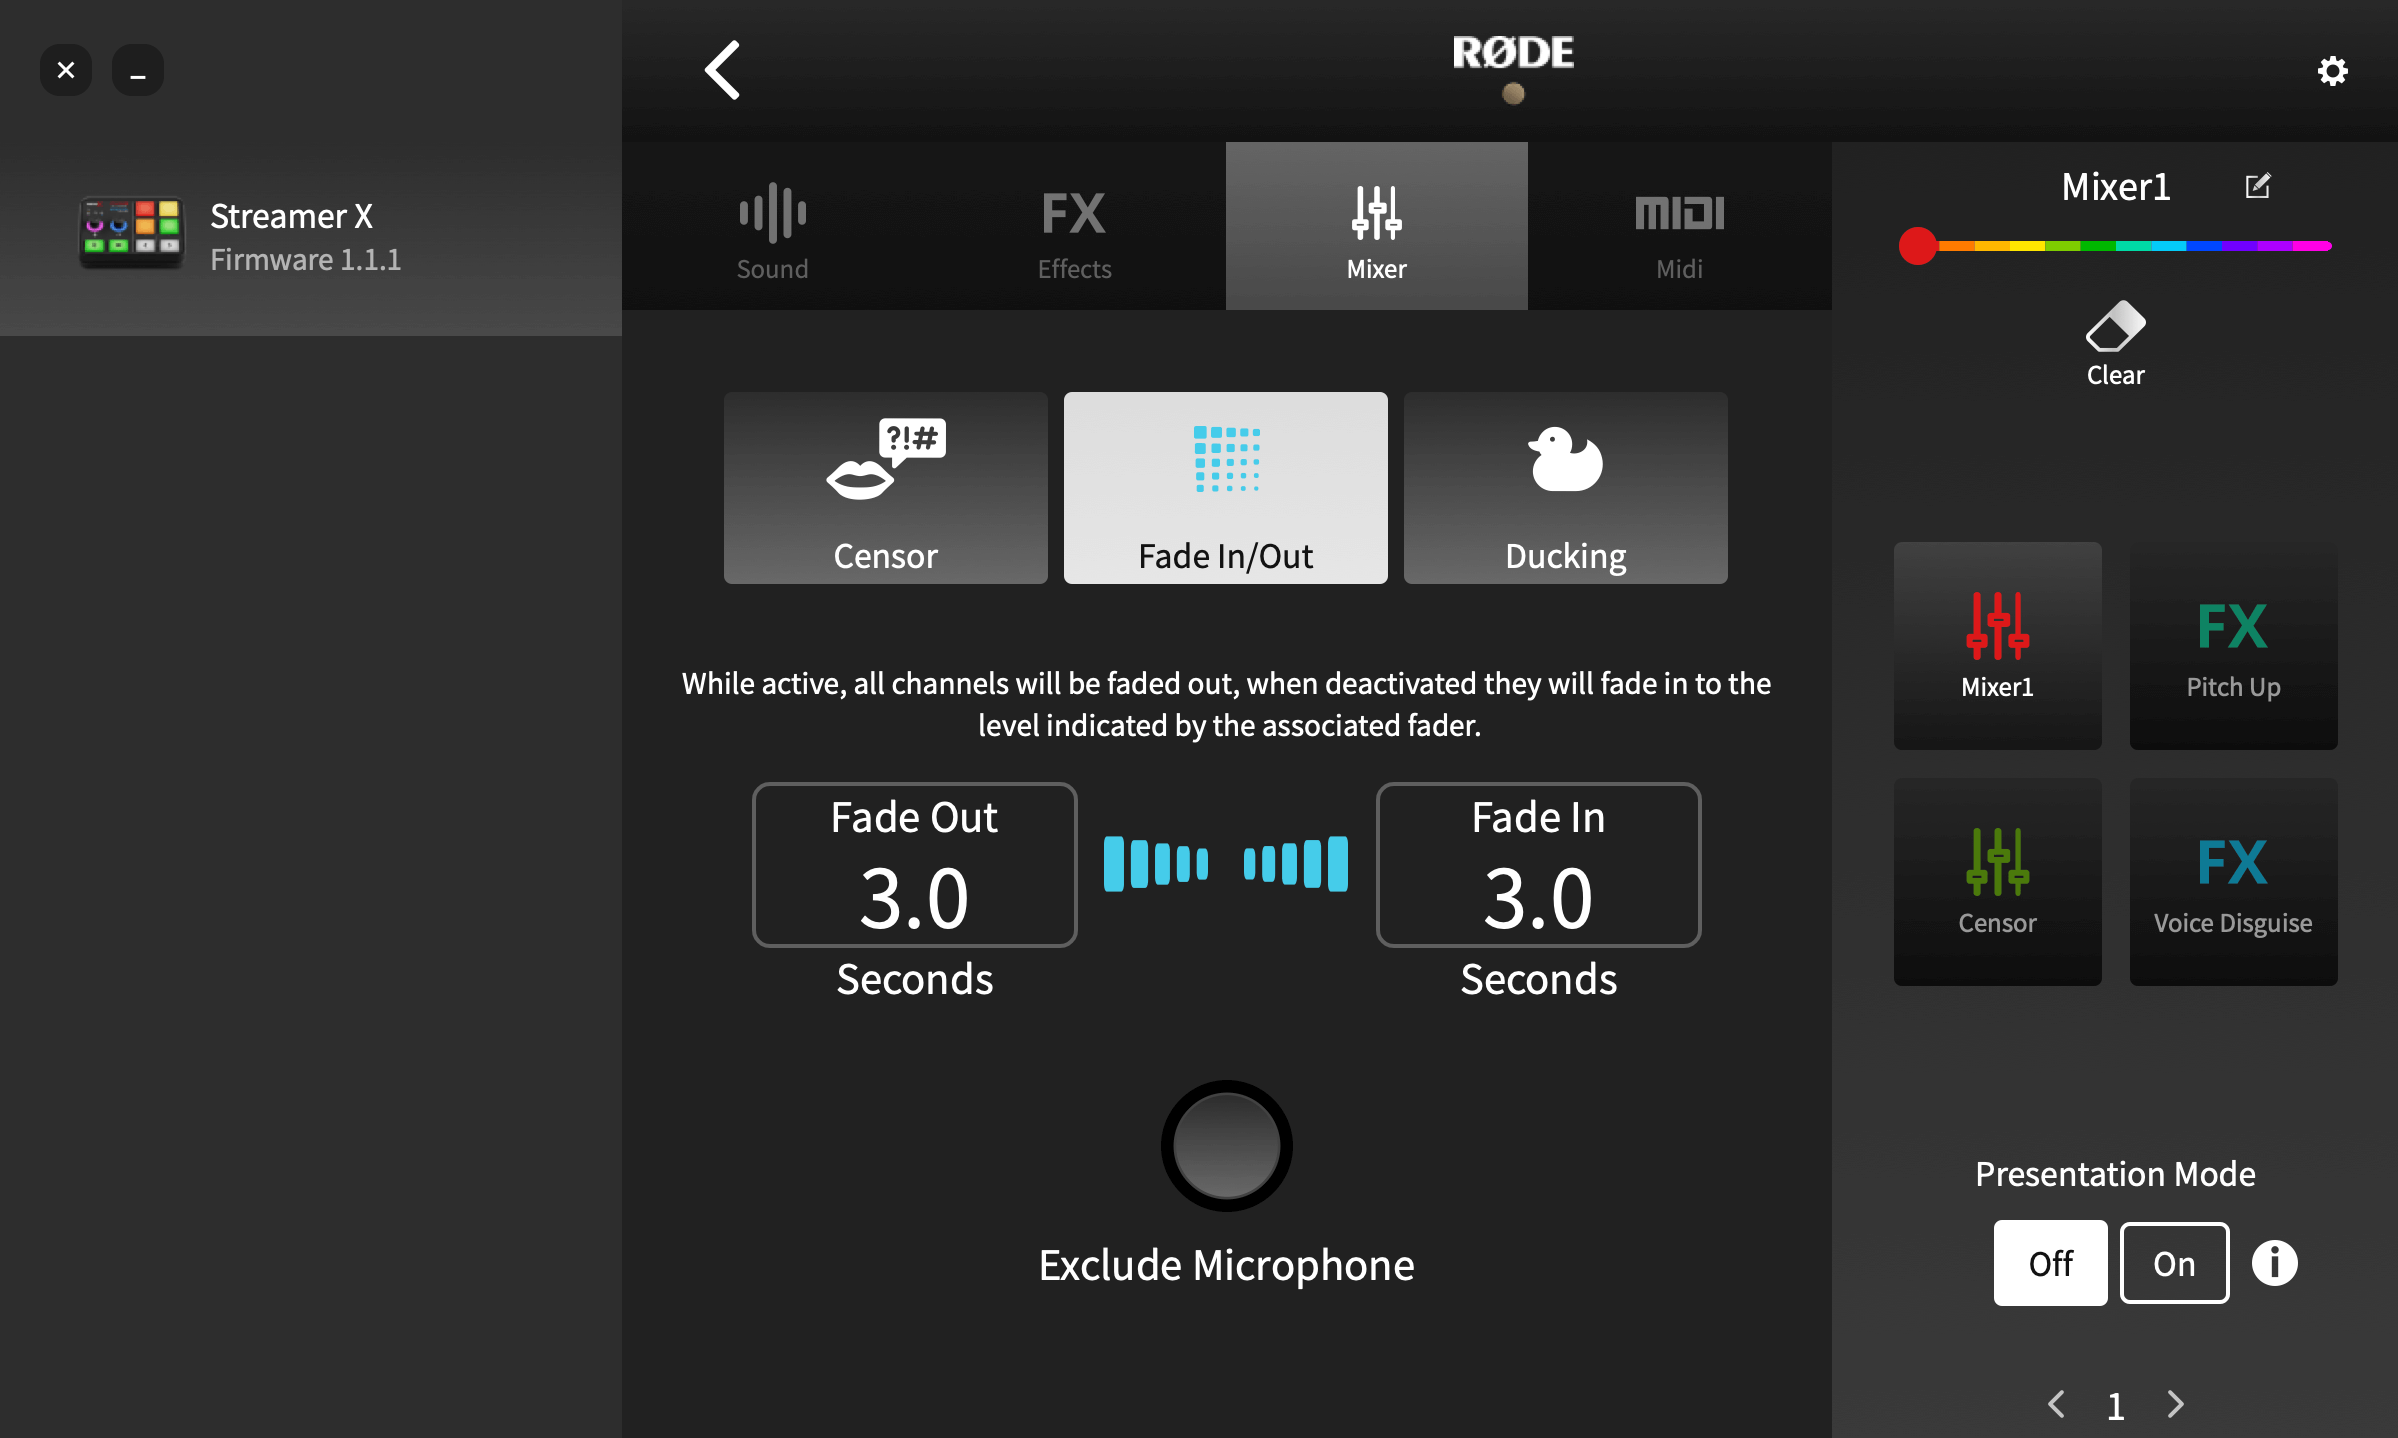
Fade In/Out
The ‘Fade In/Out’ function allows you to fade your entire audio mix in or out at a predetermined rate. You can set the speed of both the fade in and the fade out by clicking-and-dragging the values up or down. Clicking ‘Exclude Host’ means microphone channel 1 will be excluded from the fade, meaning you can fade down the rest of the audio whilst the host continues to talk. In ‘Latching’ mode, tapping the pad will activate the fade. Tapping the fader again will cause the sound to fade back in. In ‘Momentary’ mode, tapping the pad will activate the fade out whilst the pad is being pressed; if it is released the audio will immediately fade back in again.
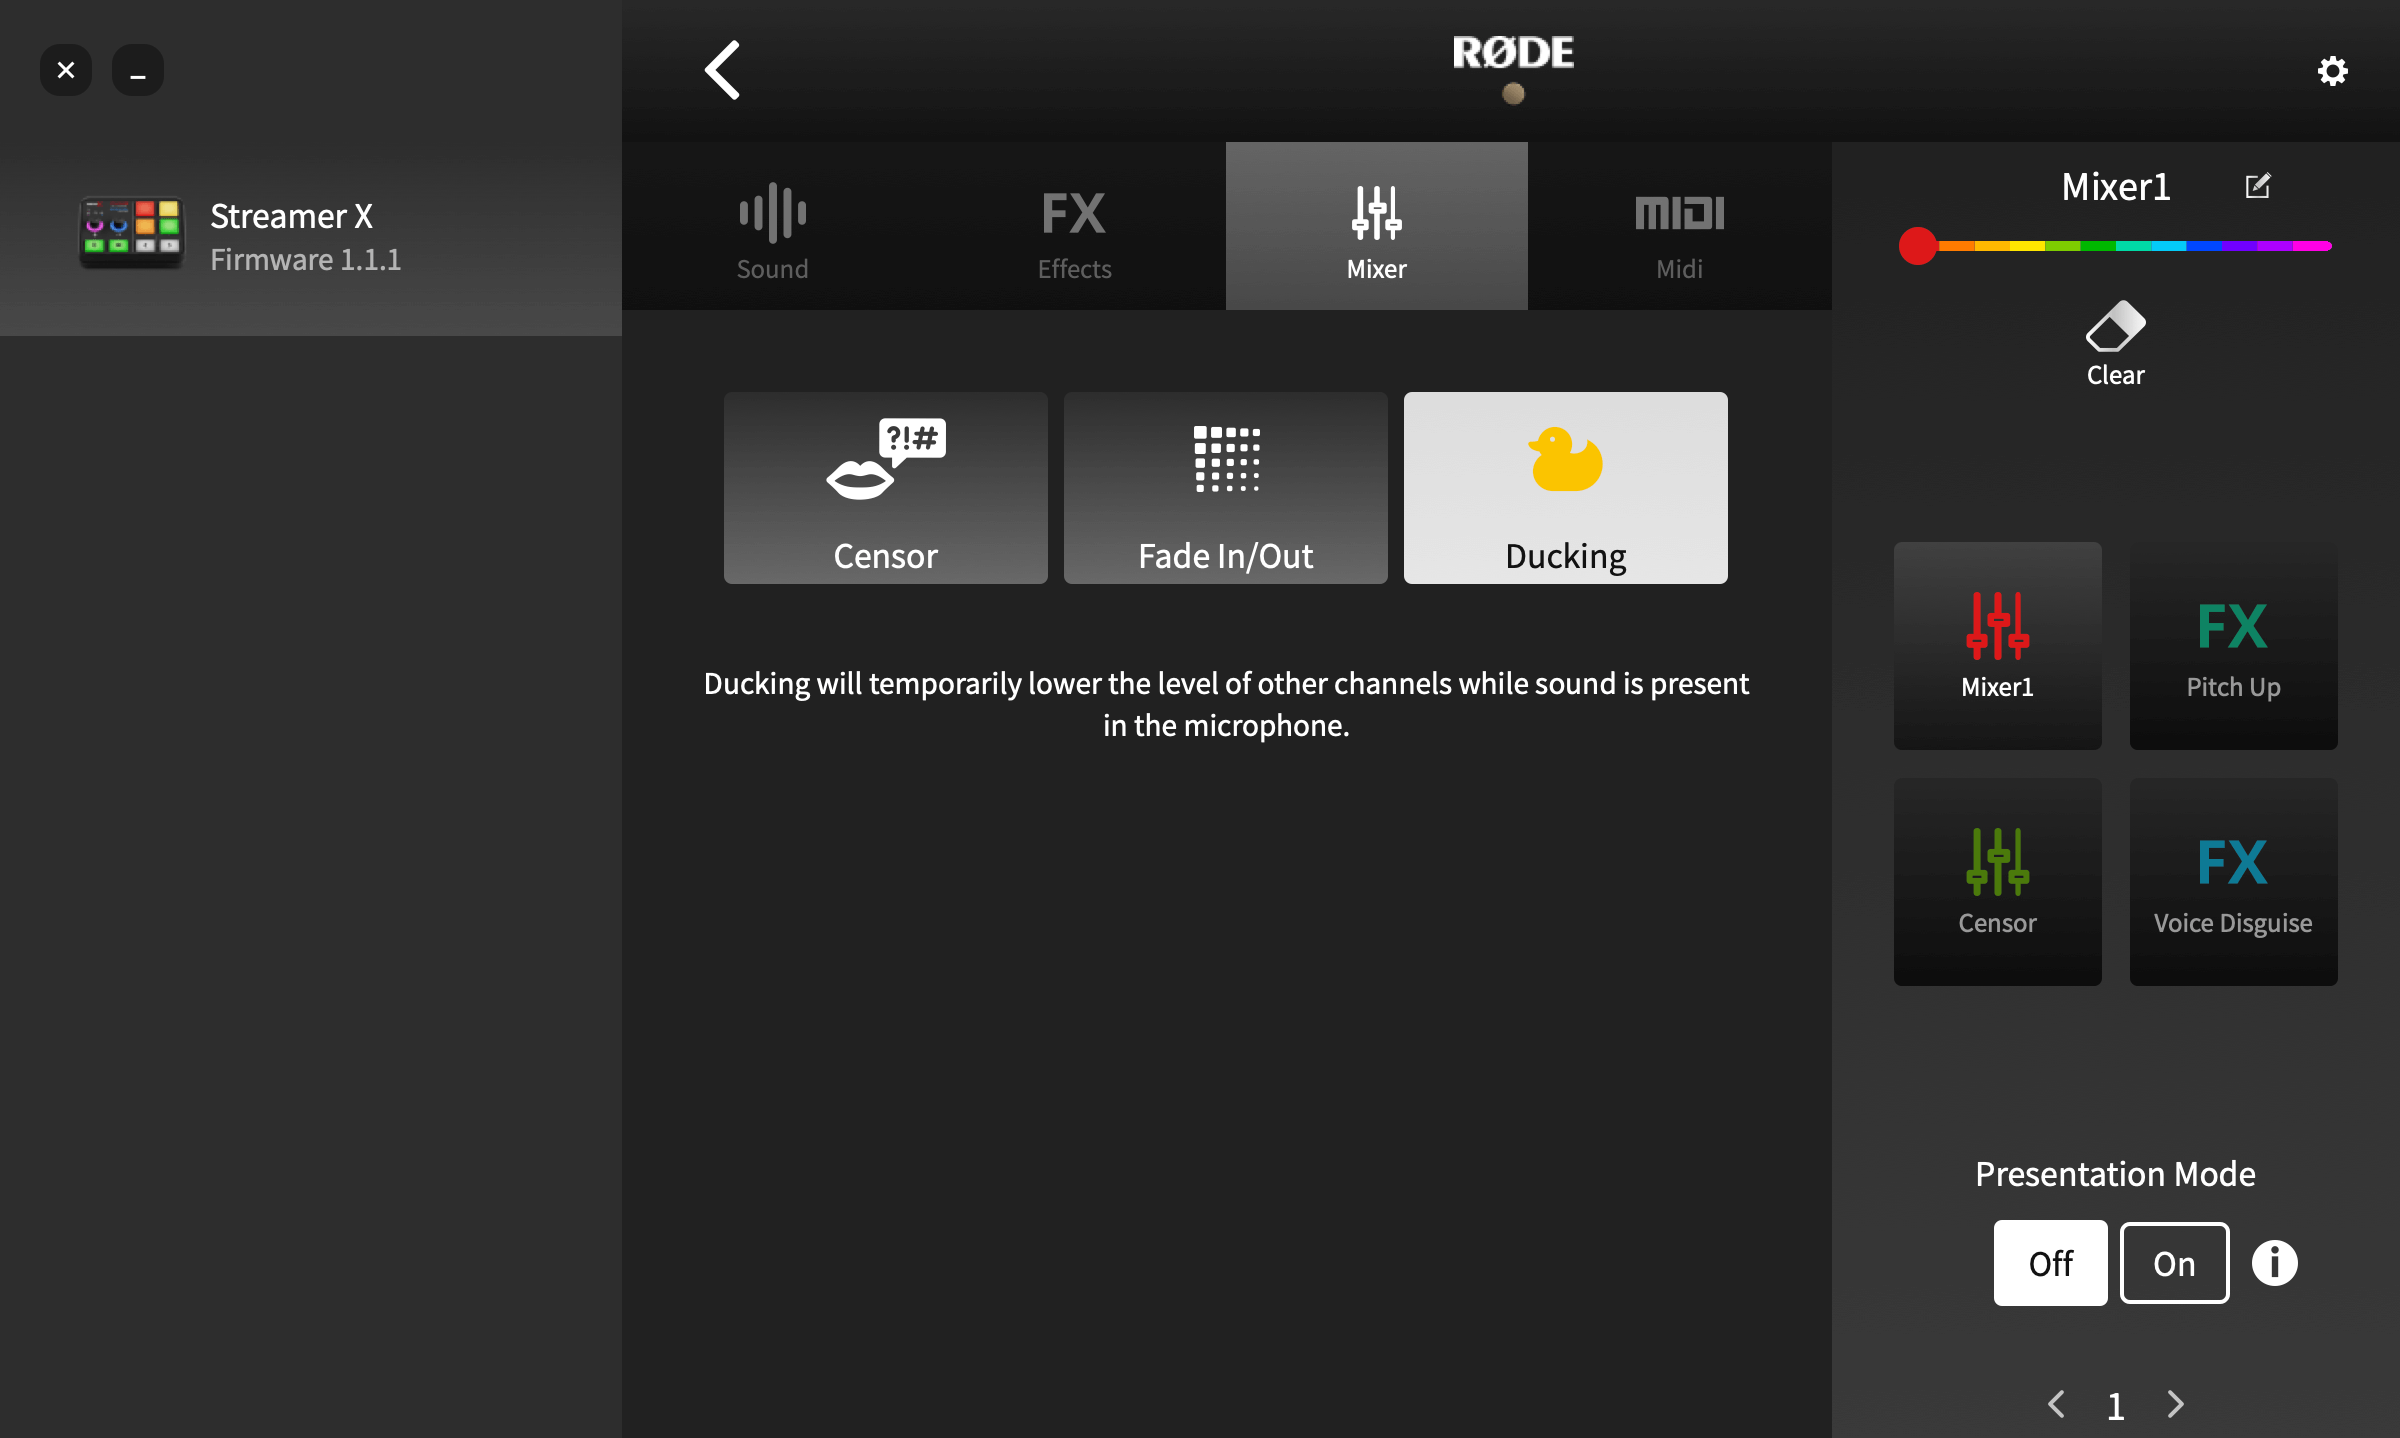
Ducking
‘Ducking’ is a function that lowers the volume of all the audio sources except the microphone when activated. This is useful for allowing your voice to allowing a host to get control of a discussion or talk over a music bed without having to adjust the fader levels. The pad mode can be set at the top of the screen. In ‘Latching’ mode, the ‘Ducking’ function will lower the volume of all other channels when the pad is pressed and raise them again when the pad is pressed again. In ‘Momentary’ mode, the function will only be enabled whilst the pad is pressed.
Using the SMART Pads for MIDI Triggers
The pads can also be used to send MIDI messages to software on a computer. This can be used for a wide variety of functions, depending on the software you are using, from vision switching on streaming software to triggering samples in a DAW.
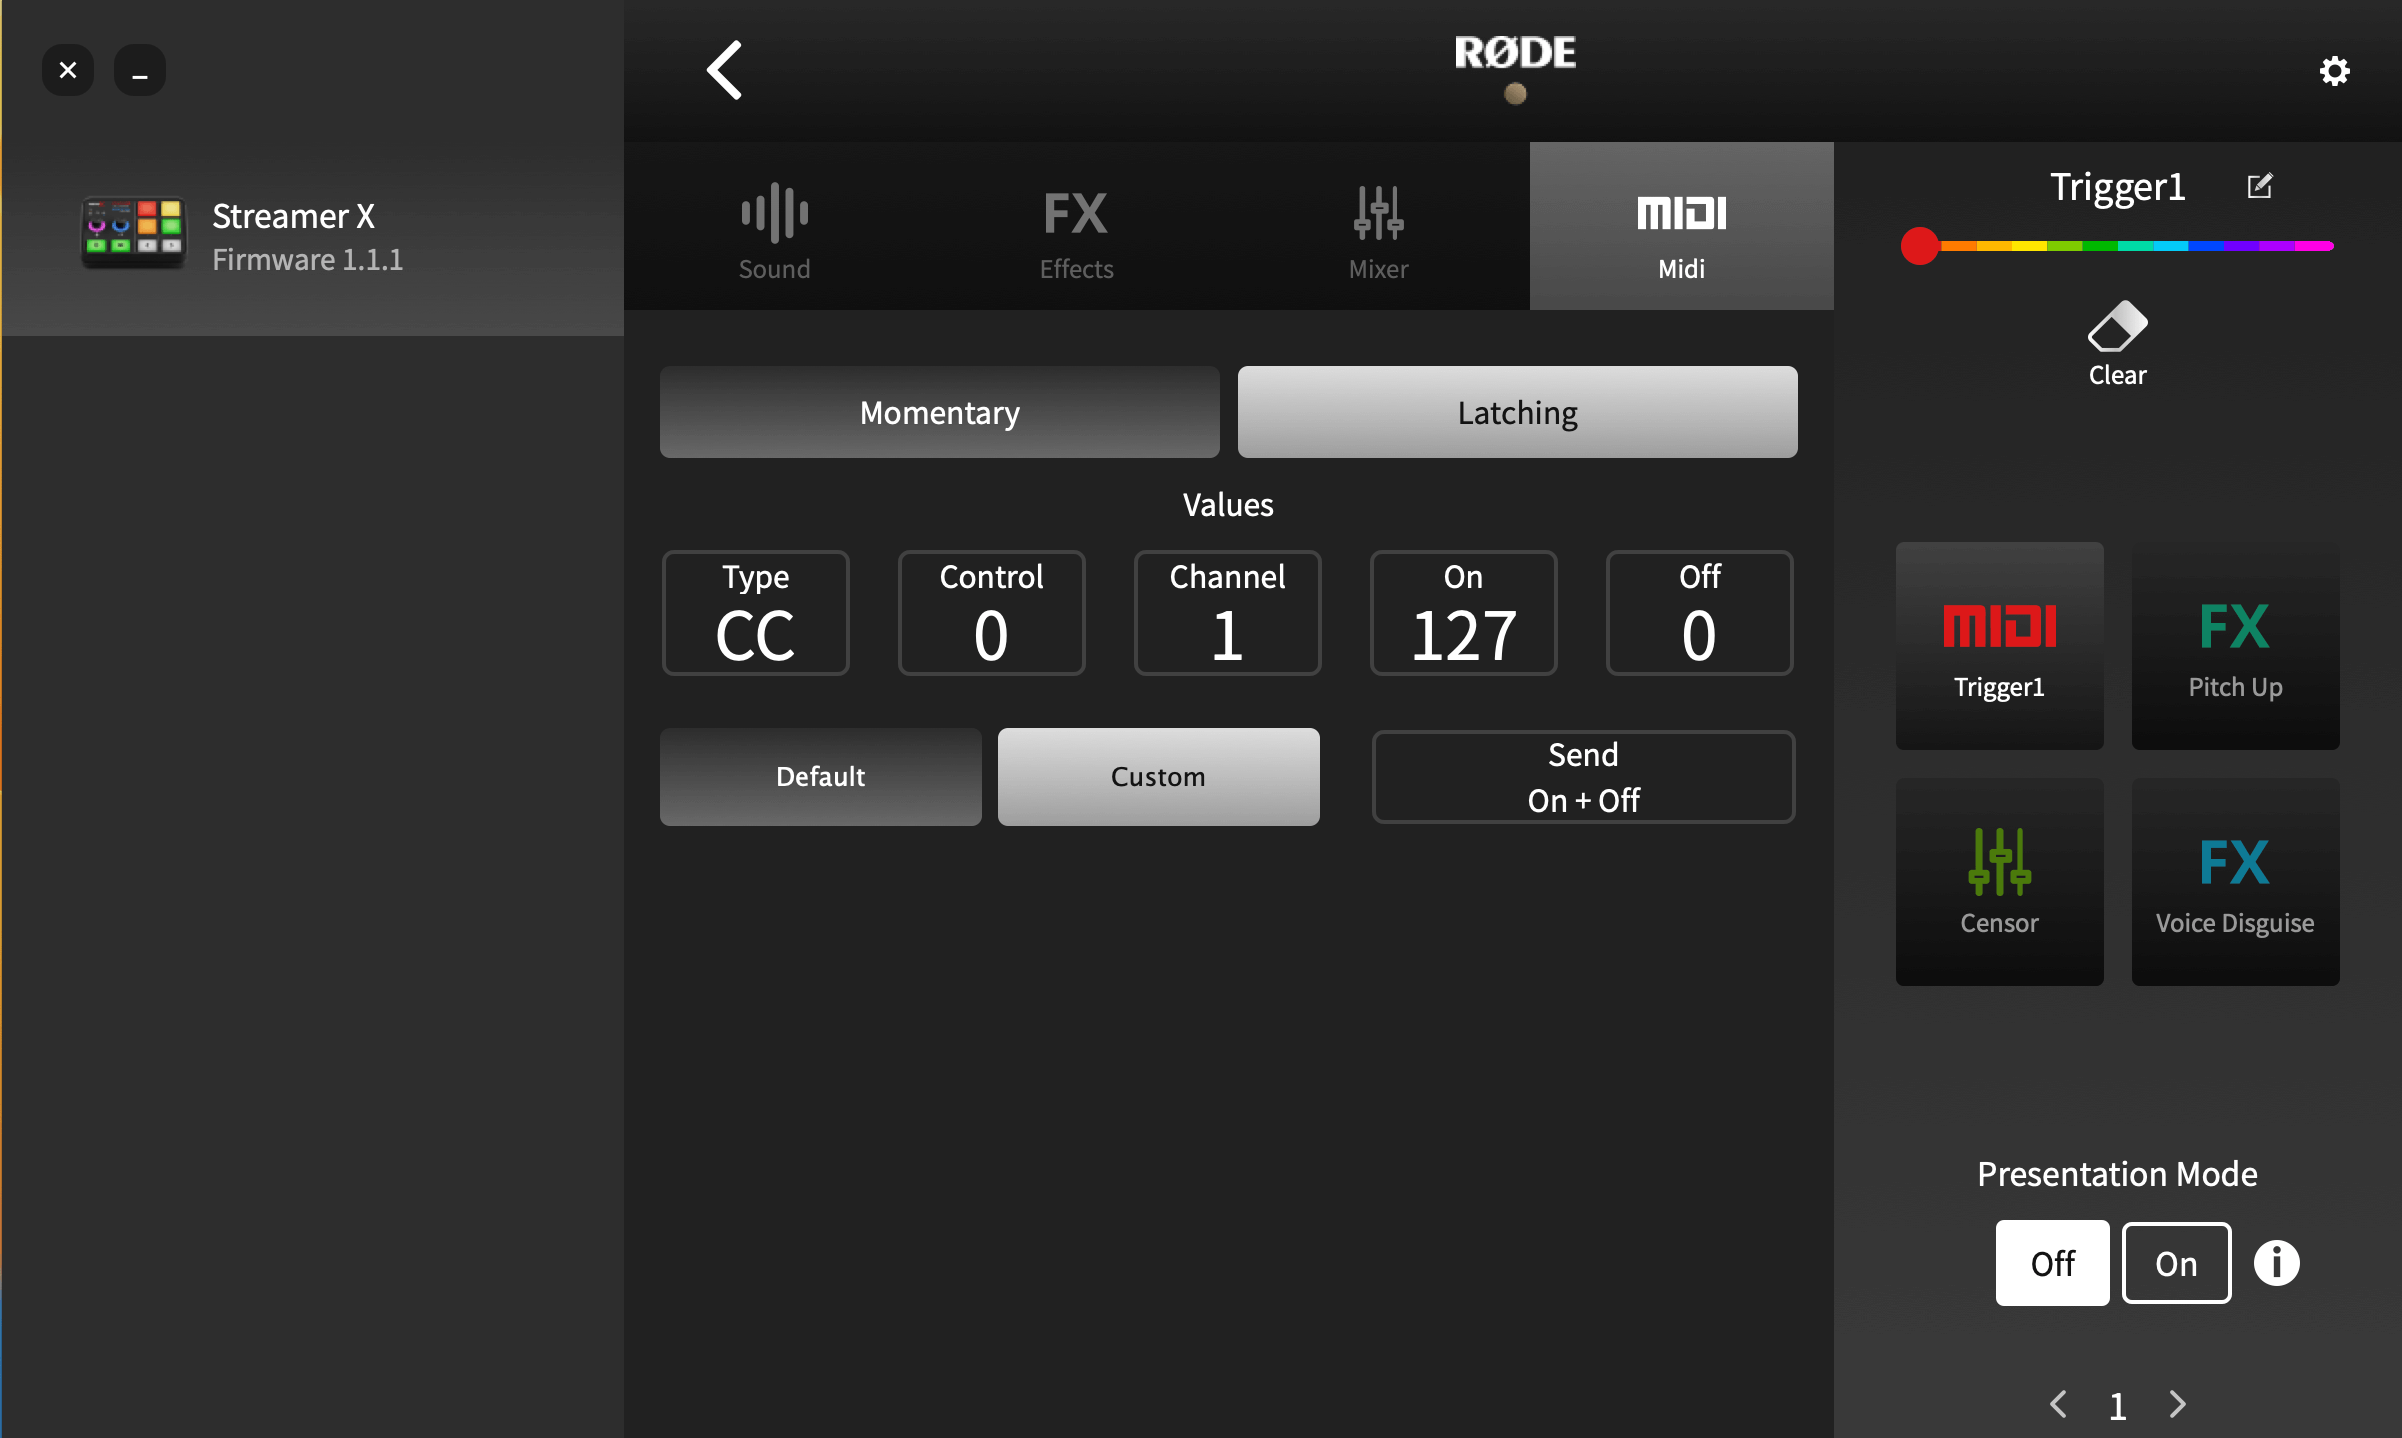
Configuring MIDI Triggers
By default, each pad sends an ‘On’ Control Change (CC) message to MIDI Channel 1: pad 1 on bank 1 sends CC #0, the one below CC #1, and so on down the first column, and then the second up to CC #3; this continues across the pad banks, with pad 1 of bank 2 activating CC #4, the pad below CC# 5, and so on.
Alternatively, you can set the pad to send any custom MIDI message by clicking ‘Custom’. You can then adjust the type of message (Control Change [CC] or Note), the control number or note, the MIDI channel the message is sent to, and the value. You can also set the pad to send just an ‘On’ message, just an ‘Off’ message or to send both ‘On’ and ‘Off’ messages – in which case the ‘On’ message is sent when the pad is pressed, and the ‘Off’ message is sent when the pad is released.
You can use MIDI messages to control a wide number of commands and settings in a wide range of programs. In order to convert MIDI messages to keyboard shortcuts, you will need to use third-party software, such as MIDI KEY2KEY for Windows or MIDI Shortcut for Mac.
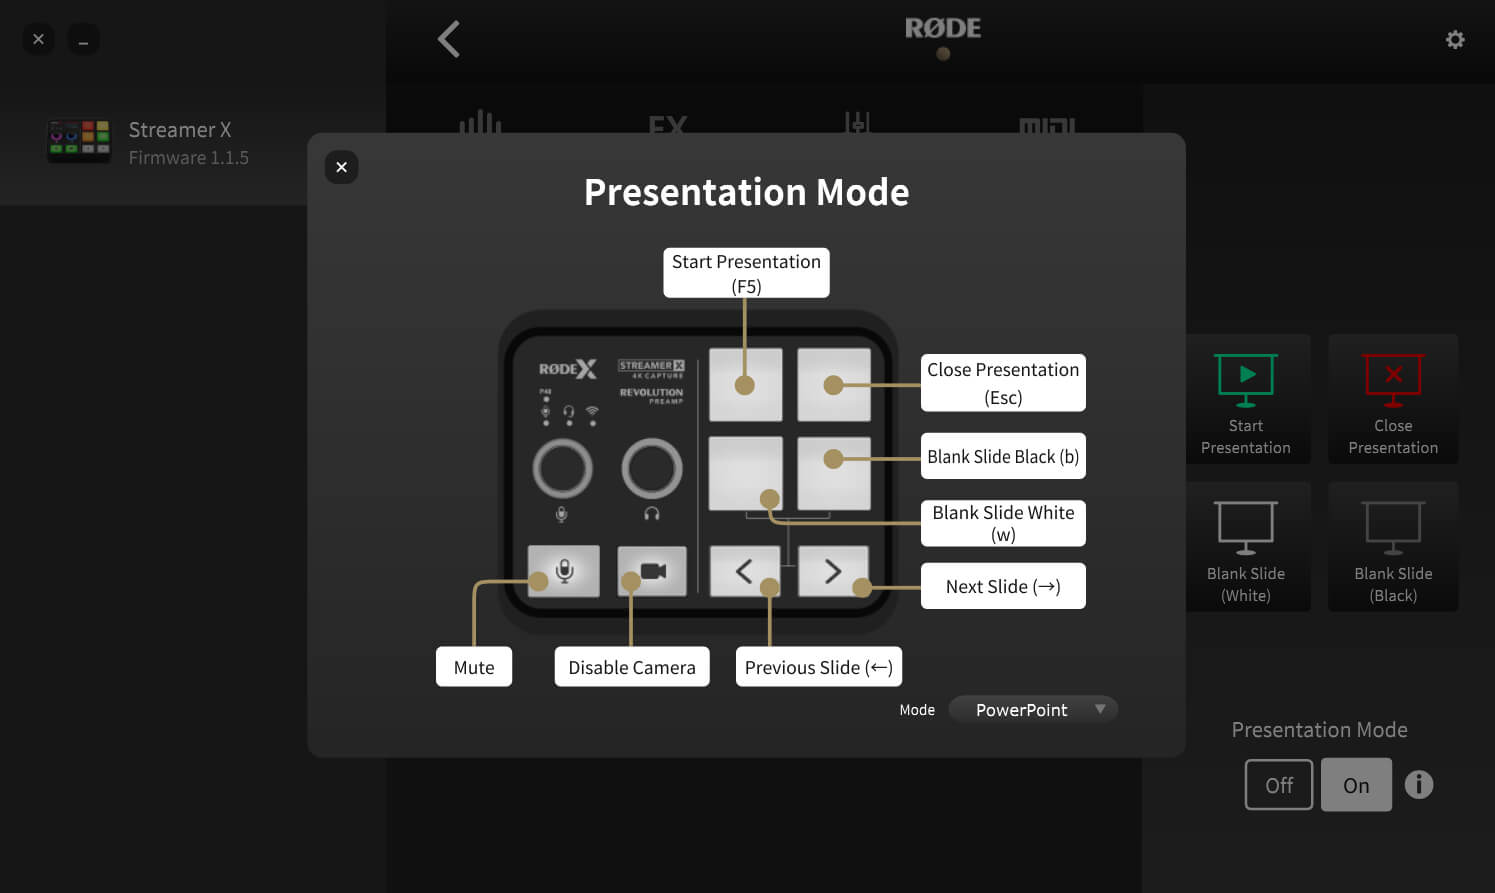
Presentation Mode
You can toggle Presentation Mode on or off on the right-hand side of the SMART pads page. This mode is useful for when you’re presenting a slideshow as it gives you hands-on control of the most commonly used keyboard shortcuts for presentation software. Press the information ‘i’ button and click on the ‘Mode’ dropdown to select which presentation software you will be using and to see a visual representation of the button mapping.
This mode changes the functions of the SMART pads and bank-switching arrow buttons as follows:
Top-left SMART pad: Start your presentation
Top-right SMART pad: Start your presentation at the current slide
Bottom-left SMART pad: Blank white slide
Bottom-right SMART pad: Blank black slide
Bank-switching arrow (left): Previous slide
Bank-switching arrow (right): Next slide