RØDE Connect
RØDE Connect is a simple and powerful software solution for podcasters and streamers. With its straightforward recording interface, easy access to high-quality audio processing, one-touch recording, and the ability to seamlessly integrate remote callers and external audio, this is all you need to make incredible podcasts, even if you have no prior experience.
Learn everything you need to know about RØDE Connect here.
The RØDE Connect Recording Interface
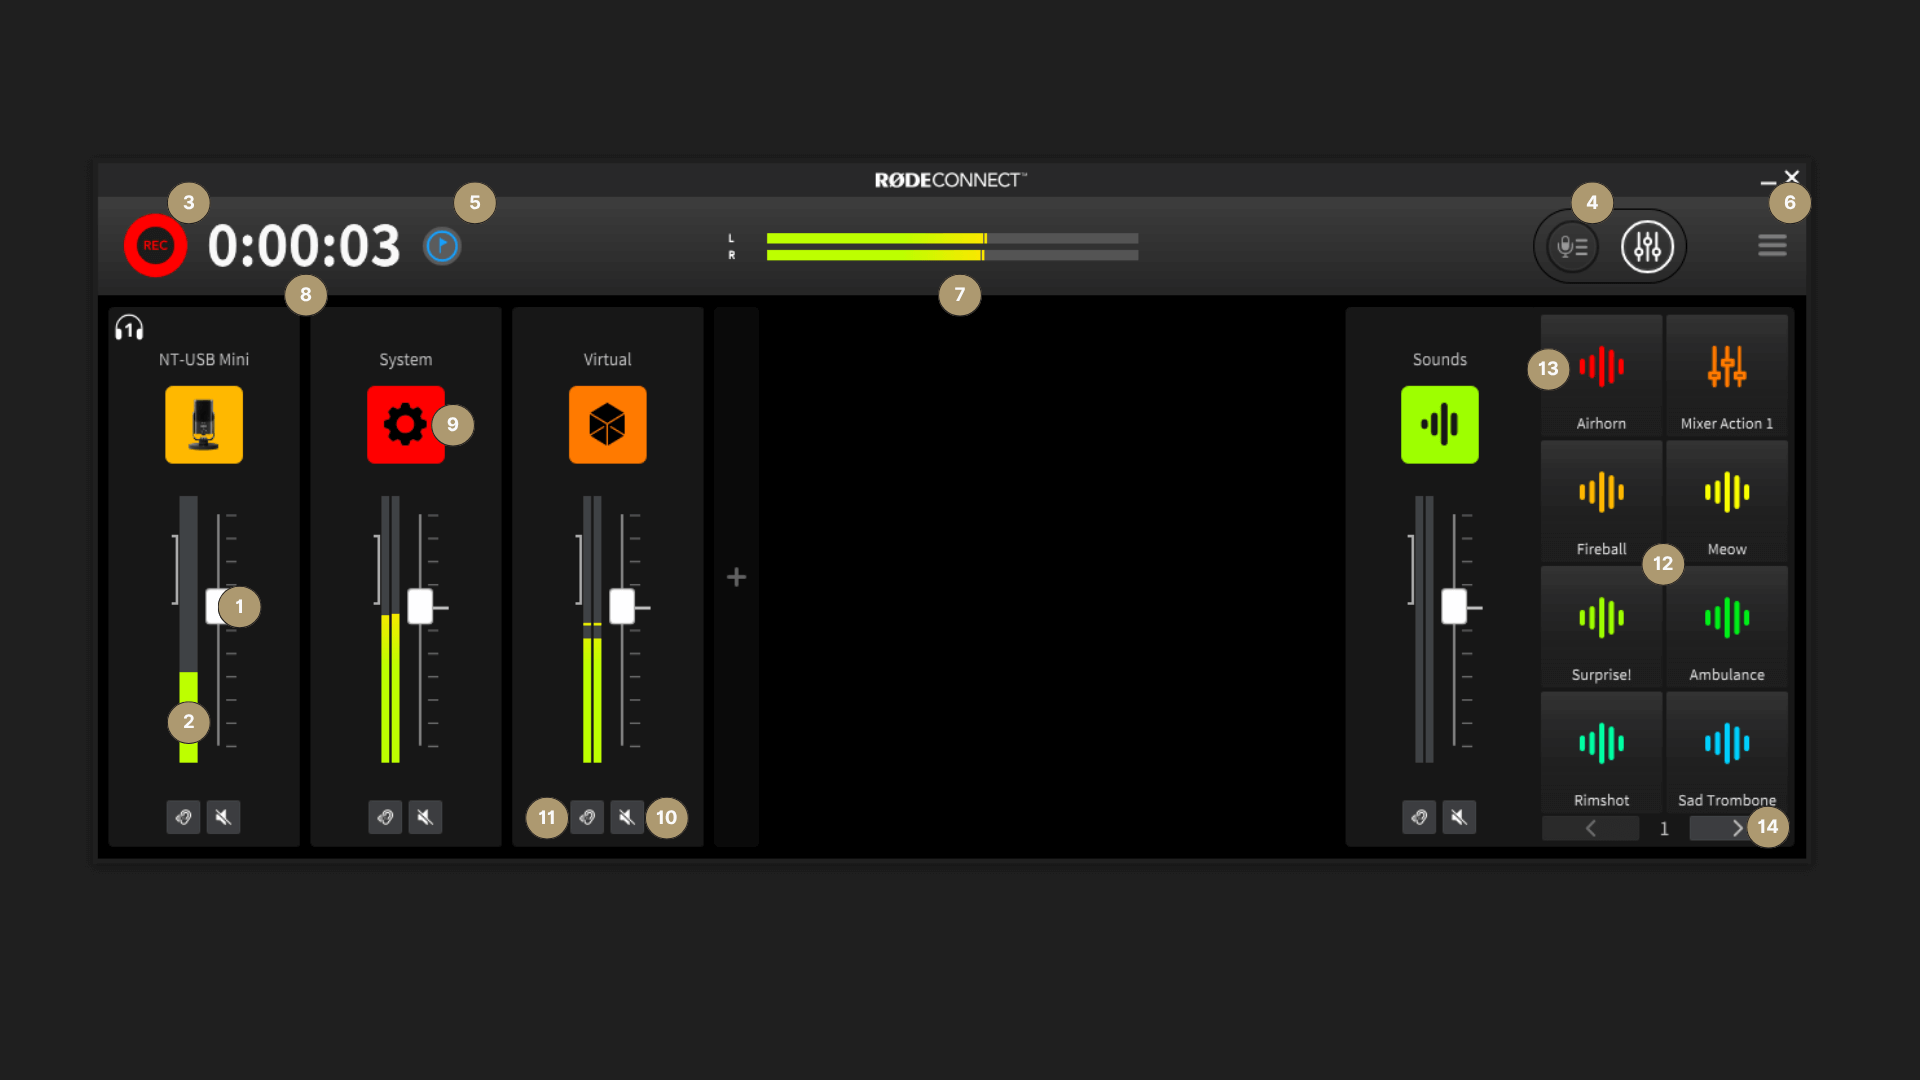
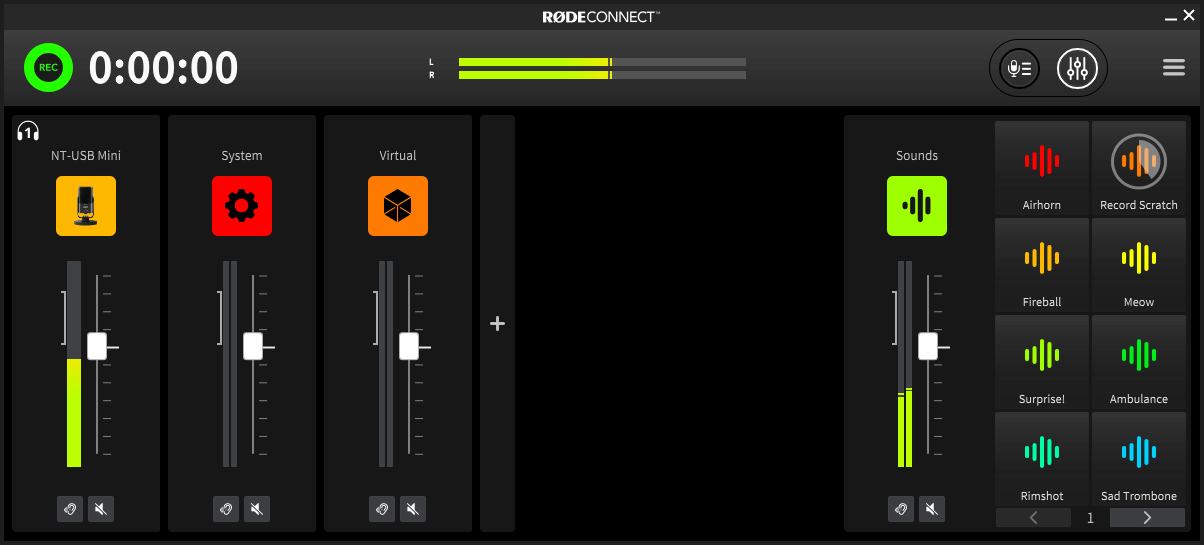
1Level Fader: Controls the input level of the microphone. Use this to balance the volume of you and each of your guests.
2Channel Level Meter: Indicates the level of each channel. Aim to have your level ‘peaking’ around the middle of the marker on the left. If you need to tweak your level, simply adjust the level slider as required.
3Record Button: Click to start and stop recording.
4Saved Recordings Tab: Click this to access your recordings. Here you can listen back to your podcasts, delete recordings, and customise and export your podcasts.
5Marker Button: Click this to place a marker in your recording. This is useful for indicating where edits need to be made, skipping forward to important sections of your recording and more.
6Advanced Controls: Click this to access the Setup Assistant and preferences for RØDE Connect.
7Master Output Level Meter: Indicates the level of all your channels combined.
8Recording Timer: Indicates the total recording time of your podcast.
9Channel Settings Button: Click to access the advanced controls for each channel, including effects, processing and input gain.
10Mute Button: Click to mute the channel.
11Solo Button: Click to Solo the channel in the hosts headphones.
12Sound Pads: Click these to fire off pre-recorded sounds, beep out swear words or access 'Trash-Talk' mode. Right click a sound pad to quickly access settings.
13Sound Pads Channel Settings: Click to adjust the Sound Pad settings.
14Sound Pads Bank Switcher: Click to switch beetween 8 available banks of sounds.
Getting Started
Before you can start recording, you'll need to do a few things:
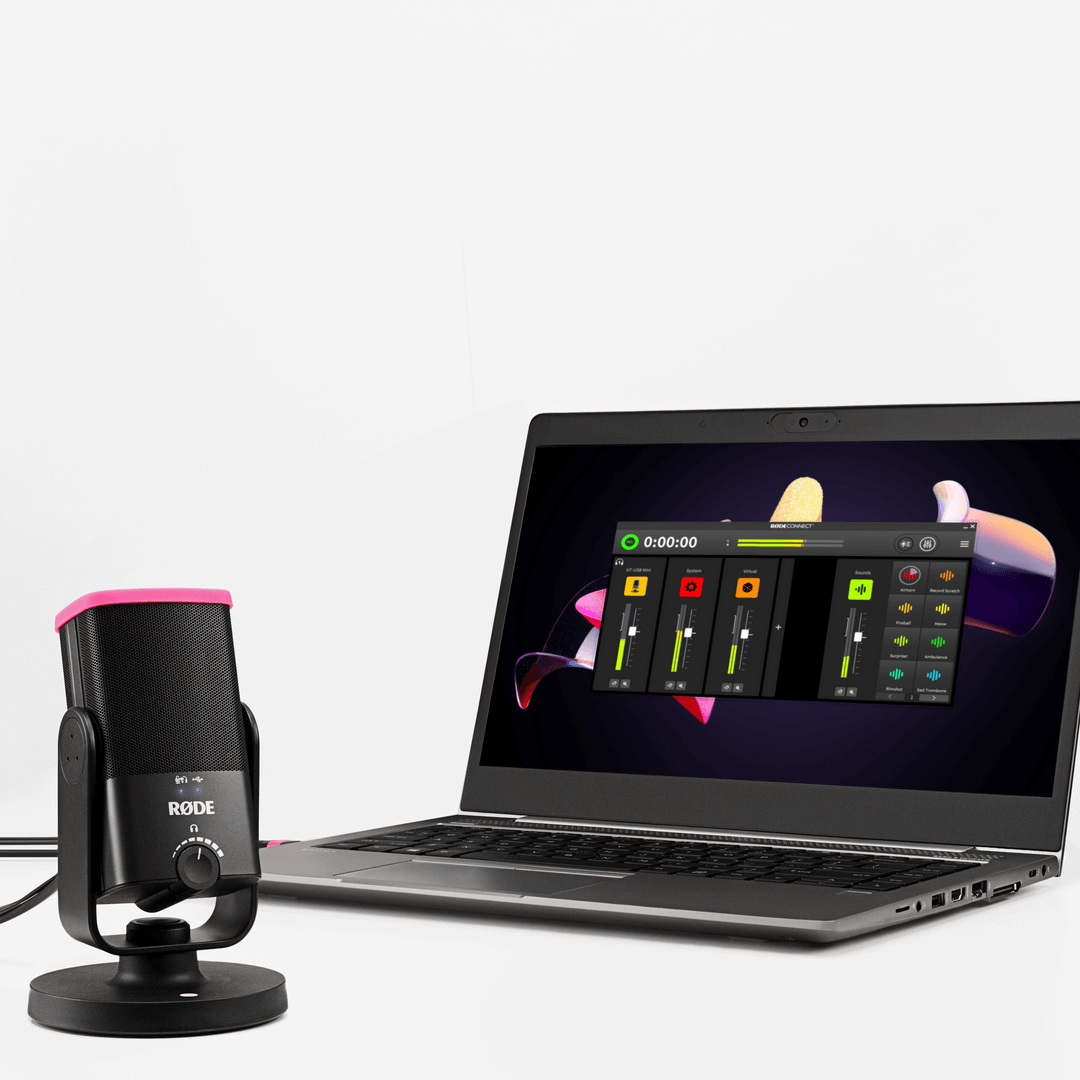
- Download and install RØDE Connect to your computer.
- Plug your NT-USB Mini(s), NT-USB+, VideoMic NTG(s) or AI-Micro(s) into your computer. If you're using the Wireless GO II, see the walkthrough section here.
- Plug your headphones into the 3.5mm connector on your microphone.
- Open RØDE Connect and click 'Get Started' to run through the Setup Assistant. Here you can allocate your microphones to the channels in RØDE Connect and add virtual channels (you can return to the Setup Assistant at any time).
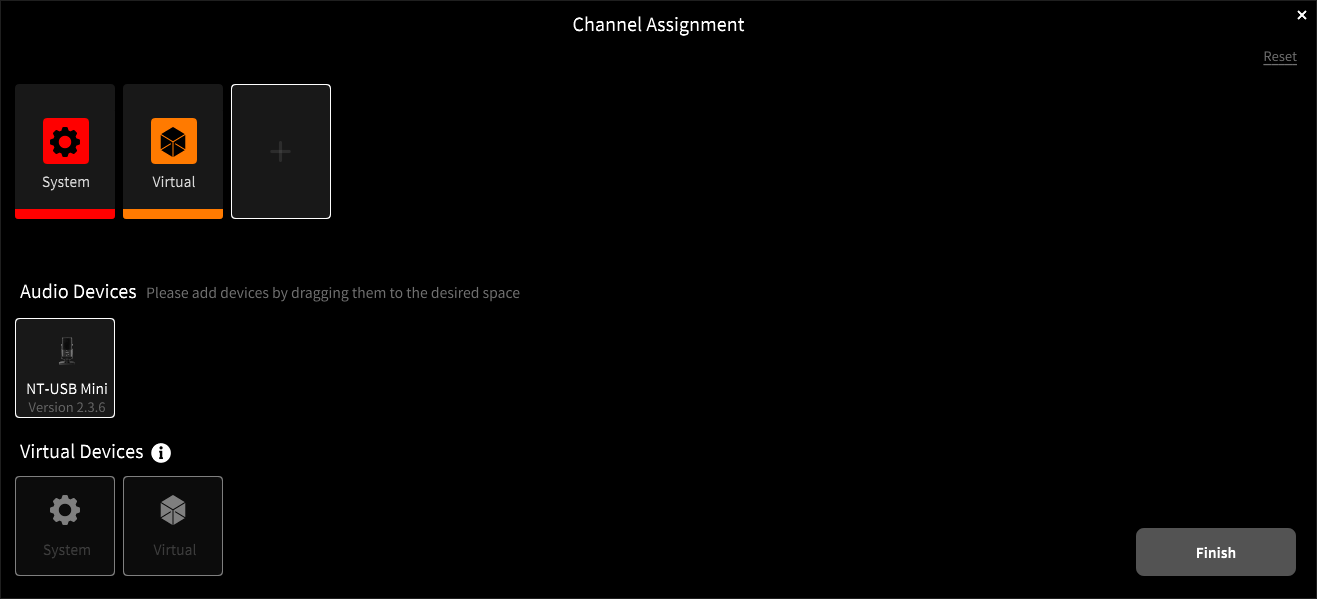
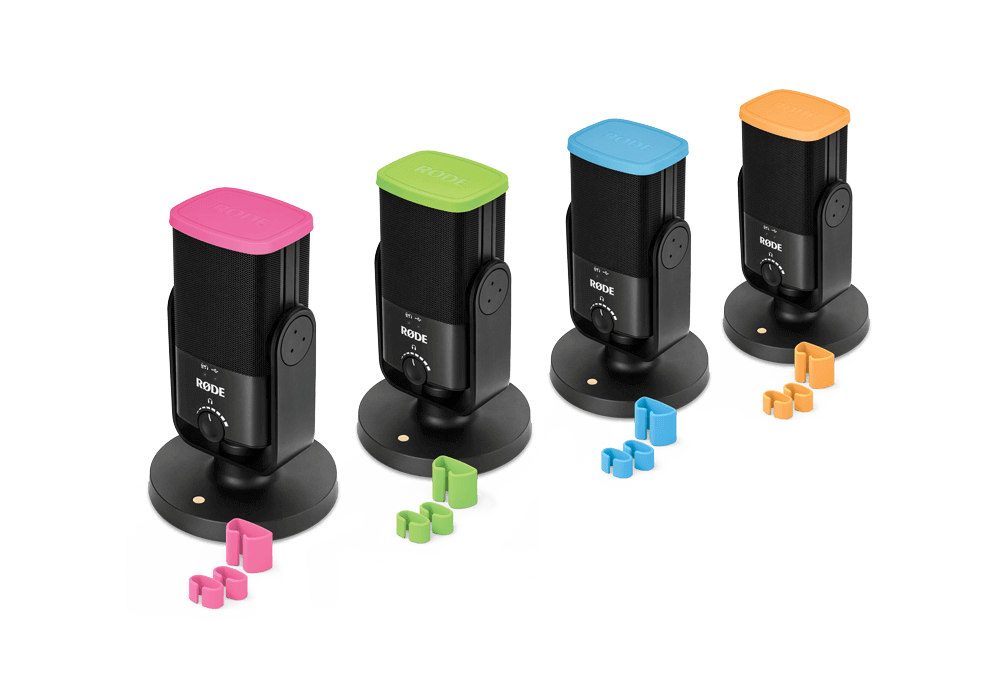
Once you have allocated your microphones to the four channels in RØDE Connect, you can use the RØDE COLORS identification tags to easily keep track of who is connected to which channel.
Adjusting Microphone Levels
Once you've gone through the Setup Assistant process, you'll arrive at the recording interface. Clicking the microphone icon above each channel will give you access to its level controls.
Setting the microphone level is as simple as speaking into the microphone at a natural volume and pressing the '+' and '-' buttons until the meter is bouncing around the green area.
To get the cleanest possible signal, position your microphone less than six inches from your mouth. If you're using the VideoMic NTG, you can position the microphone further away from your mouth while retaining presence and clarity, due to its directional supercardioid polar pattern. If you're using the AI-Micro, the connected Lavalier microphone can be clipped to the lapel of the podcasters clothing.
Using a microphone stand or boom arm, such as the RØDE PSA1, PSA1+ or DS1, can be helpful for placing the microphone in the ideal position.
Adding Effects and Processing to Your Voice
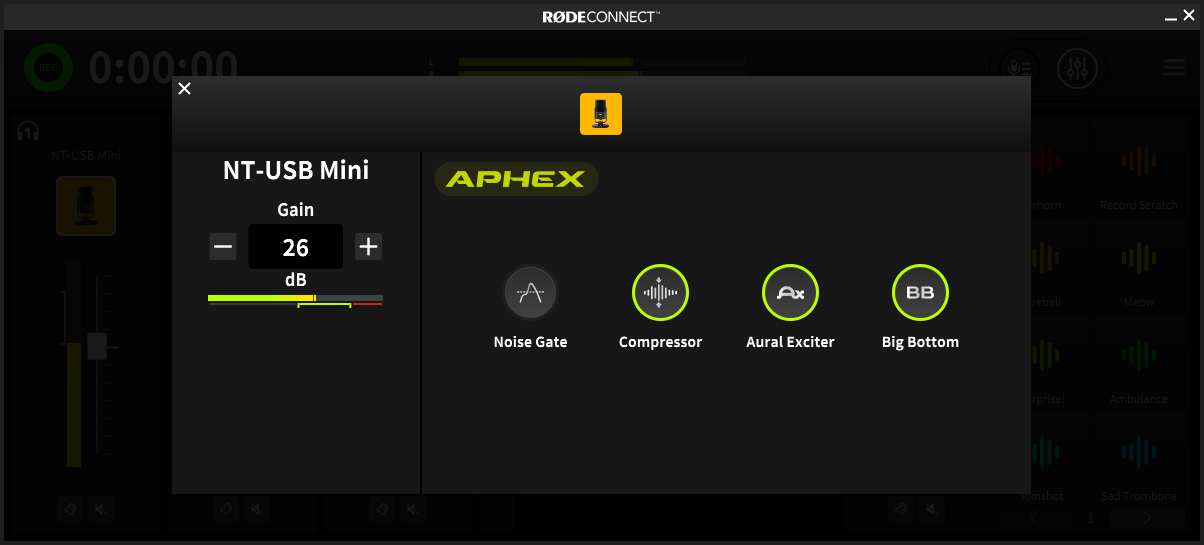
RØDE Connect unlocks powerful digital signal processing power available within the NT-USB Mini, the NT-USB+, the VideoMic NTGand the AI-Micro, which gives you access to a noise gate and compressor, plus the legendary APHEX Aural Exciter and Big Bottom audio processors, which are found in the world’s top recording studios, as well as the RØDECaster Pro. These are only accessible when you connect your microphone to the software and is an easy way to give your voice a rich, professional quality.
These are all enabled by default when you connect your microphone to RØDE Connect. You can turn them on/off individually by clicking the microphone icon above each channel and clicking the toggle next to each processor.
Note that as you turn each processor on and off, you will be able to hear these changes directly in your headphones. See descriptions for each processor below. Before recording, try talking into your microphone while toggling each one to hear their effect on the sound of your voice and your recording environment.
- Compressor – This will help make your voice more balanced and consistent.
- Noise Gate – This will reduce background noise in your audio signal, such as air conditioners or traffic, giving your recording a cleaner, more professional sound.
- APHEX Aural Exciter – This will enhance the higher frequencies of your voice, giving it more clarity and presence.
- APHEX Big Bottom – This will enhance the low-end frequencies in your voice, adding richness and depth.
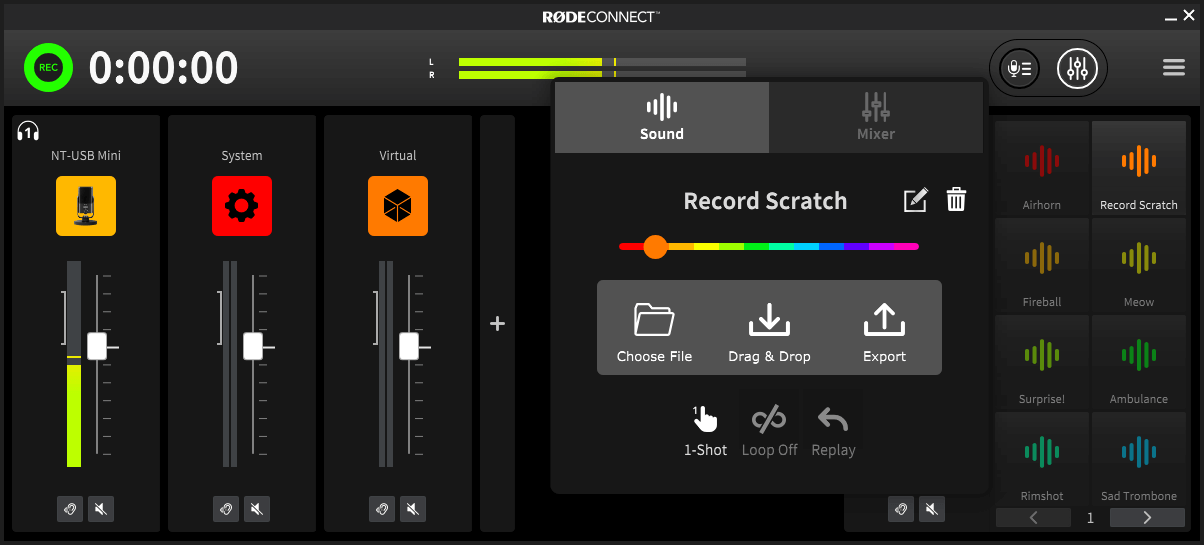
Using Sound Pads
The Sound Pads section of RØDE Connect is incredibly useful for quickly adding extra audio elements to your podcast or stream. Each pad comes pre-loaded with classic sound effects and can be fired by simply clicking one of the coloured pads. Replacing a sound is as simple as clicking and dragging a new audio file from your computer to one of the pads. There are 8 banks of 8 sound pads available, giving you access to up to 64 sounds in total.
You can easily rename each pad, change its colour, replace the audio, or change its playback style by right-clicking a pad or clicking on the sound pad channel button and then clicking the pad you want to edit.
Changing the Playback Styles and Modes
There are three different sound pad styles available: 'Toggle', 'Hold' or '1-shot'.
Toggle Mode - This is the default mode. When you click the pad, the audio will play and continue playing until you click it again. A handy timer will appear on the pad, so you know exactly how long until the audio ends.
Hold Mode - When in hold mode, click and hold the pad to play the sound. Once you let go, playback will stop.
1-shot Mode - This mode allows you to quickly fire off a sound multiple times in quick succession.
In ‘Toggle’ and ‘Hold’ modes, you can select to either play the sound once or loop it indefinitely until you click the pad again. You also have the option to either replay ('Replay') the audio when the sound pad is paused and resumed or continue from the point at which it was paused ('Continue').
In addition to the standard ‘Sound’ mode, there are two extra sound pad modes available: ‘Swear Button’ (‘!@#$’) and ‘Trash Talk’.
When in ‘Swear Button’ mode, pressing the pad will mute all outputs from all channels and trigger a classic bleep tone. You can choose to replace this with whatever you want.
When a sound pad is set to ‘Trash Talk’ mode, clicking and holding the pad will mute all audio from the ‘Virtual’ and ‘System’ channels, meaning anyone dialing in remotely will not be able to hear you or your guests – essentially putting your caller on “hold” while you chat to other guests. This can be handy for hosting trivia or if you have contestants on a call.
Adding External Audio Sources
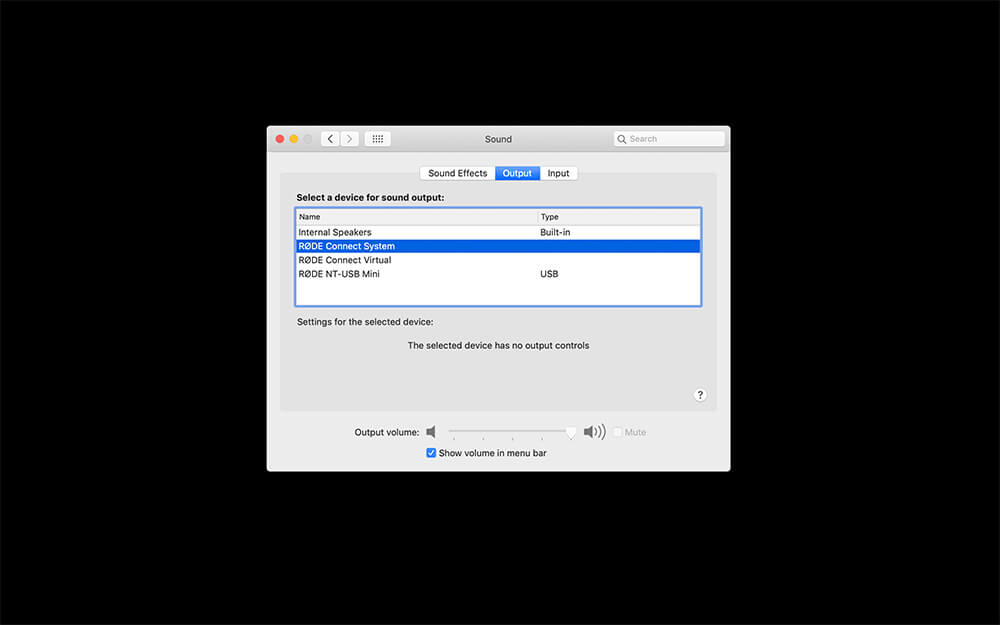
The System Audio channel is essentially a mix of any audio coming from other applications or your computer system. This includes apps such as Spotify or iTunes, internet browsers, or any programs you have on your computer.
To route your system audio into RØDE Connect, go to your computer’s audio preferences and select ‘RØDE Connect System’ as your output device. On a Windows computer, this will be labelled 'System Output (RØDE Connect)'. Now do a quick test to ensure audio is feeding into the mixer by playing some music from an app. You should see your level meter jumping up and down and hear the audio in your headphones, indicating that the System Audio channel is receiving audio.
The System Audio channel is great for giving your podcast some personality and flair by adding intro or outro music, stings or sound effects, or even playing entire pre-recorded interviews.
You can adjust the level of the System Audio channel using the level fader on the mixer, or by clicking the icon above the channel and pressing the '+' and '-' buttons.
Connecting Remote Guests
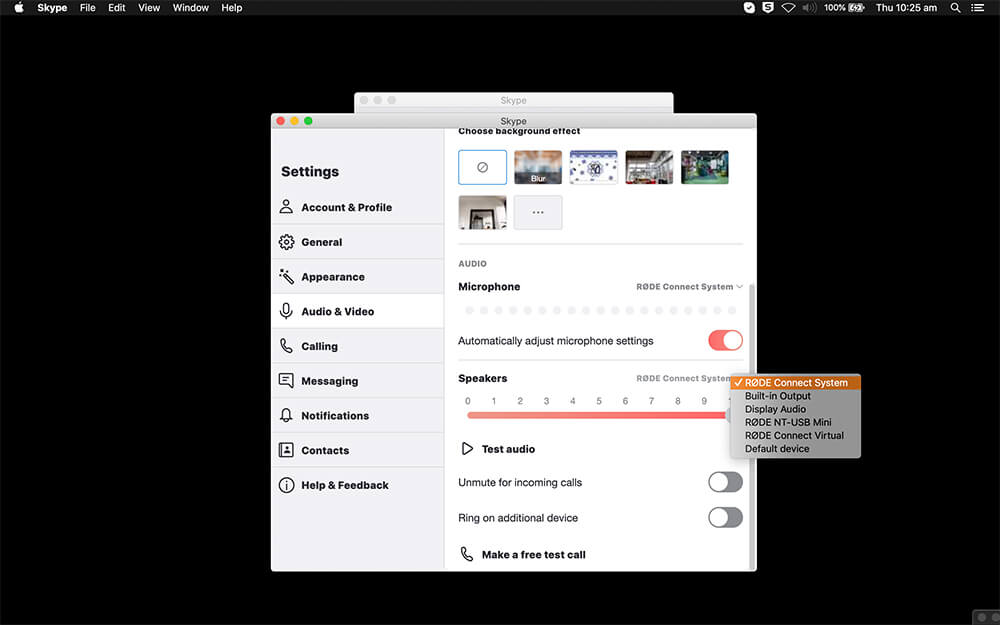
The Virtual channel is for connecting remote callers via a communications app such as Zoom or Skype. This is great if you need to interview somebody or if you and your co-hosts can’t record together.
Getting set up is extremely easy. Simply go to the audio settings or preferences in the communications app you are using and set both the input and output device to ‘RØDE Connect Virtual’. On a Windows computer, this will be labelled 'Virtual Input/Output (RØDE Connect)'.
Now when you connect with your remote guest, your communications app will use your connected microphone as the input source (complete with signal processing) and the output from the app will be sent back to the Virtual Device channel. RØDE Connect also automatically applies mix-minus to the virtual channels, ensuring crystal-clear, echo free communication when chatting to guests.

Note
The input and output device fields may be labelled differently from app to app. For example, in Zoom, these are called ‘Microphone’ (input device) and ‘Speaker’ (output device).
What is Mix-Minus?
Mix-minus is a specialised mixer configuration commonly used in radio and broadcast production. The audio signal is routed so that phone callers hear everything but their own voices when they’re speaking with a host and/or other guests. This prevents feedback or echo, which can be particularly annoying when recording a phone call. RØDE Connect automatically applies mix-minus to each channel.
If you want to connect multiple remote guests using two different communications apps, you can use the System Audio channel. Simply select ‘RØDE Connect System’ as the output device in the second app; this will be labelled 'System Input (RØDE Connect)'. This means you can podcast with up to six different people using RØDE Connect! If you need help with connecting Zoom or Skype to your computer, use the walkthroughs below:
If you need help with connecting Zoom or Skype to your computer, use the walkthroughs below:
Connecting Zoom to RØDE Connect - Windows
Connecting Zoom to RØDE Connect - Mac
Advanced Settings
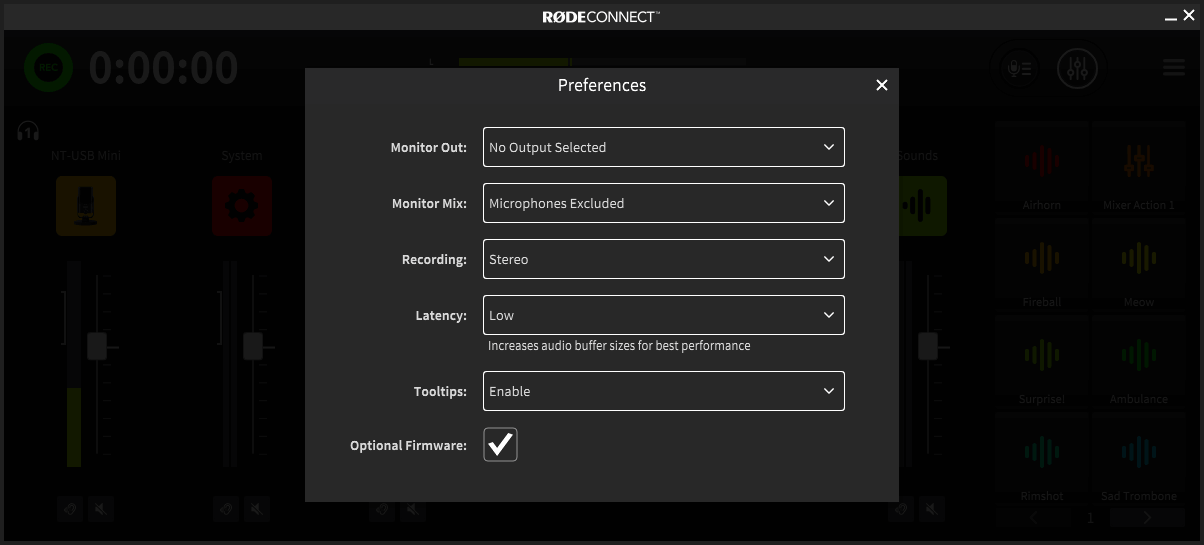
To access the advanced settings in RØDE Connect, click the icon next to the output level meter, then click ‘Preferences’ (this also where you can access the Setup Assistant if you need to add extra microphones or virtual channels).
Monitor Out: This allows you to send the output of RØDE Connect to external devices, such as speakers or an audio interface or recorder.
Monitor Mix: This allows you to either include or exclude the microphone audio from the monitor output, which is useful for ensuring you don’t create a feedback look when using speakers in the same room as the microphones.
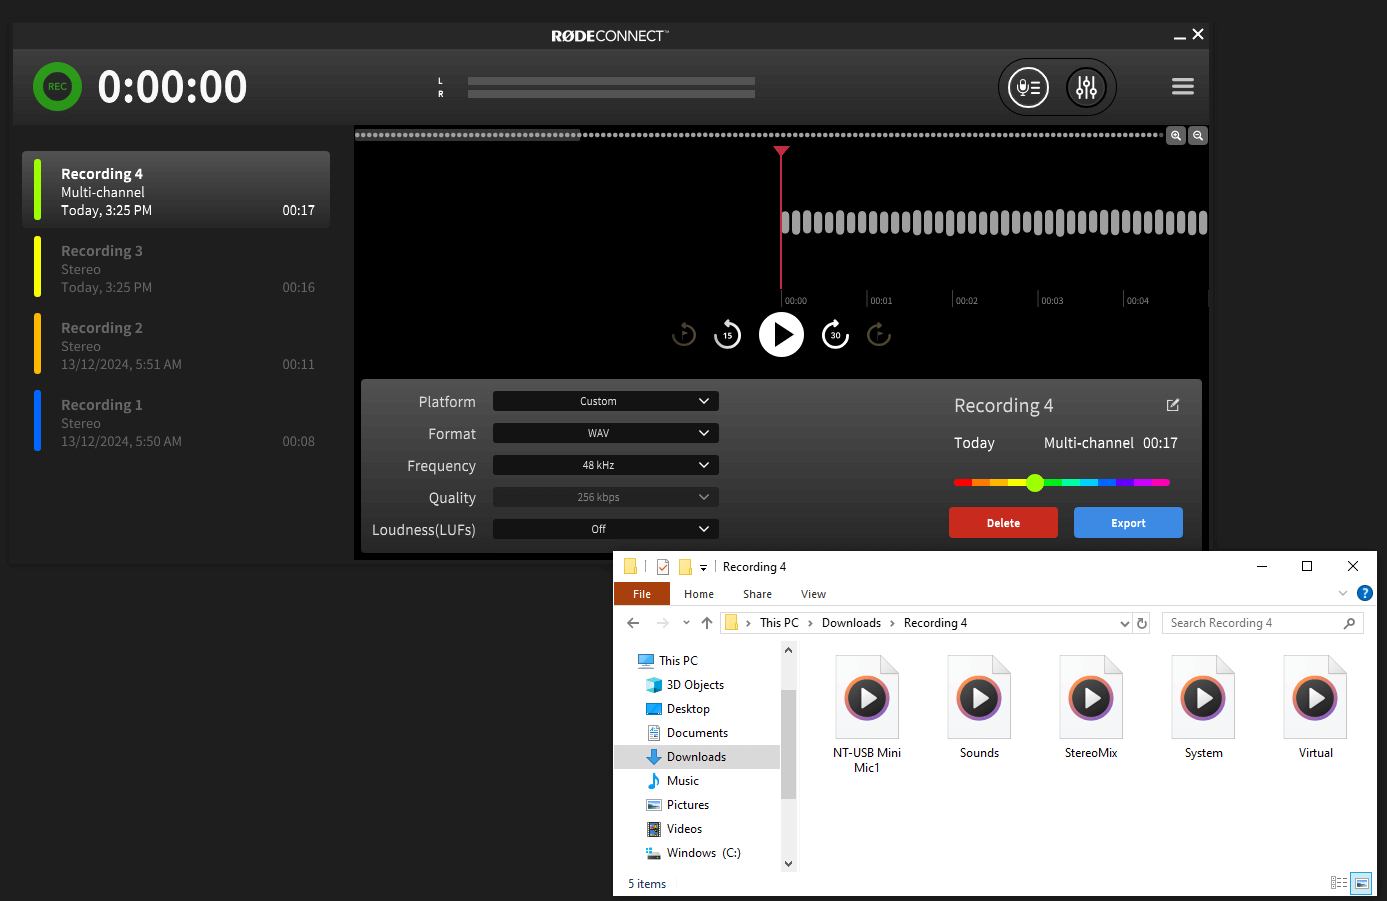
Recording: You can either record your podcast as a stereo file or in multitrack. Recording in ‘Stereo’ is useful if you just want a complete mix of your podcast that is ready to use once you’ve finished recording. In ‘Multi-channel’ mode, your podcast will be exported in a folder that contains each individual track you recorded. This is handy if you want to edit your podcast after recording as you have access to every single track, which can be edited separately.
Latency: This allows you to select between ‘Low’ and ‘Ultra-Low’ latency. ‘Ultra-Low' will give you the lowest possible latency, however, it may noticeably affect the performance of lower spec computers. In most cases, you should not notice any latency while in ‘Low’ mode.
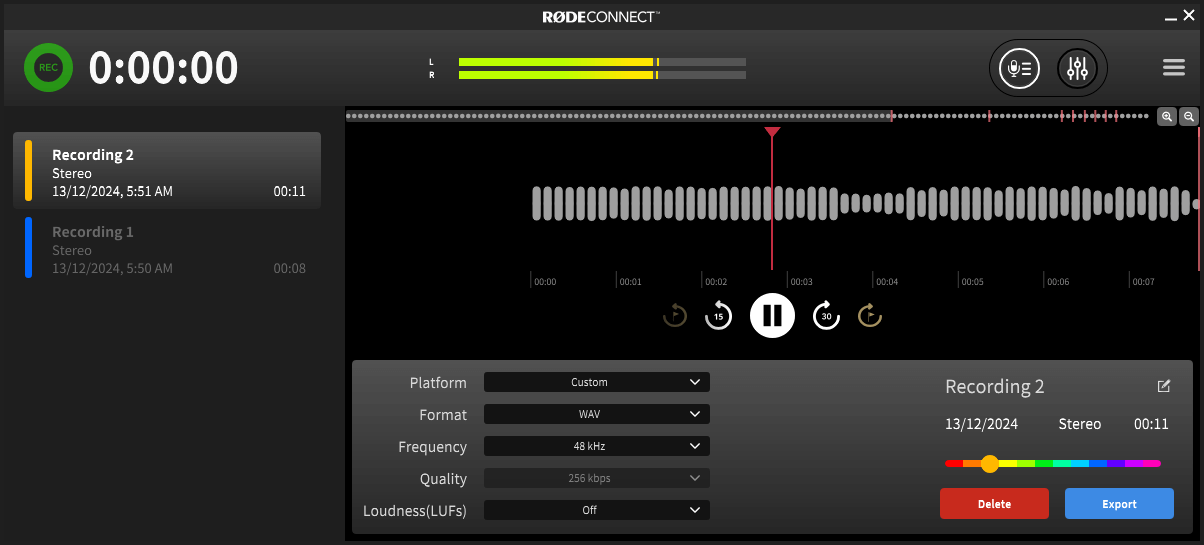
Exporting Your Recordings
RØDE Connect gives you access to a variety of exporting options that allow you to optimise your recordings and get them ready to be shared and listened to. Click the recordings tab and click the share icon on the podcast you want to export to access the options menu. Here you can edit the name and colour of your podcast and choose a variety of export options.
Click the first drop-down menu and select the platform you wish to upload your podcast to, such as Spotify or Anchor. This will automatically optimise the file for that platform. Then click ‘Export’, select a save location and click ‘Save’. If you need to upload your podcast to multiple platforms, simply repeat this process as many times as necessary (remember to label your files so you know which is which!).
Selecting ‘Custom’ from the drop-down menu will allow you to manually adjust each parameter, including file type (MP3 or WAV), sample rate (48 KHz or 44.1 KHz) and LuFS (loudness).
Exporting Multitrack Recordings
When a multitrack recording is exported, it will appear in a folder in your chosen save location. This will contain separate files for each of the tracks you recorded, including the microphones channels and virtual channels, plus a complete stereo mix of your podcast. These files can be imported into your digital audio workstation (DAW) of choice where you can remove unwanted parts of your recording, adjust levels, insert extra audio elements like music beds or stings, and add further audio processing to your voice. This process is known as “post-production”.
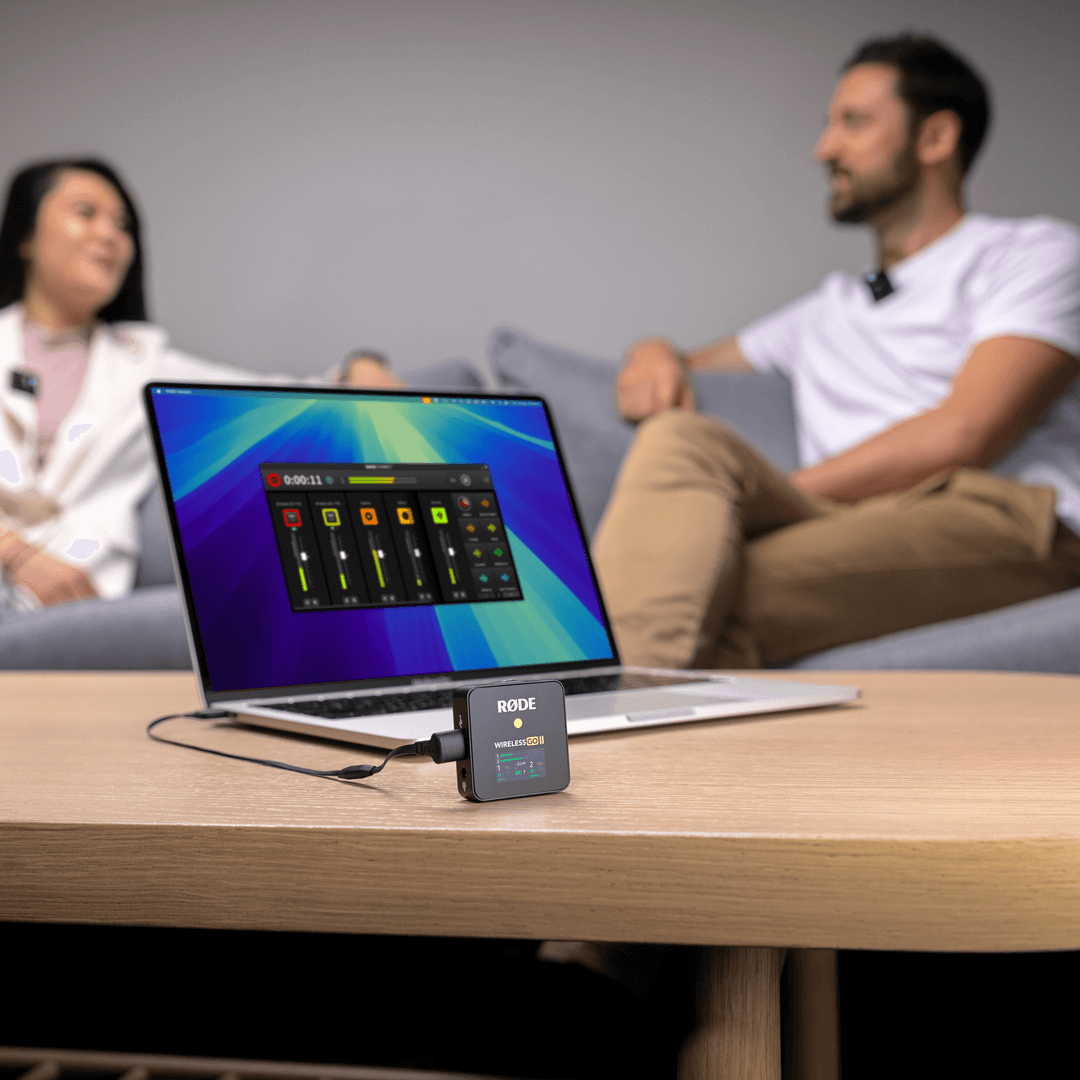
Using the Wireless GO II to Podcast with RØDE Connect
You can also use the Wireless GO II with RØDE Connect. Simply turn on your Wireless GO II and make sure your receiver and transmitter are paired, then connect the receiver to your computer and launch RØDE Connect. Older versions of RØDE Connect are not compatible with the Wireless GO II, so ensure you are using the latest software.
Run the Setup Assistant. You will now be able to allocate the Wireless GO II transmitters to separate channels in RØDE Connect, allowing you to record four microphones in total. This is handy for recording casual, interview-style podcasts or any recording scenario where you need the freedom of wireless audio.
Note
Audio playback is not possible via the Wireless GO II receiver. Audio can only be monitored using an NT-USB Mini or another audio output on your device.
Using the AI-Micro to Podcast with RØDE Connect
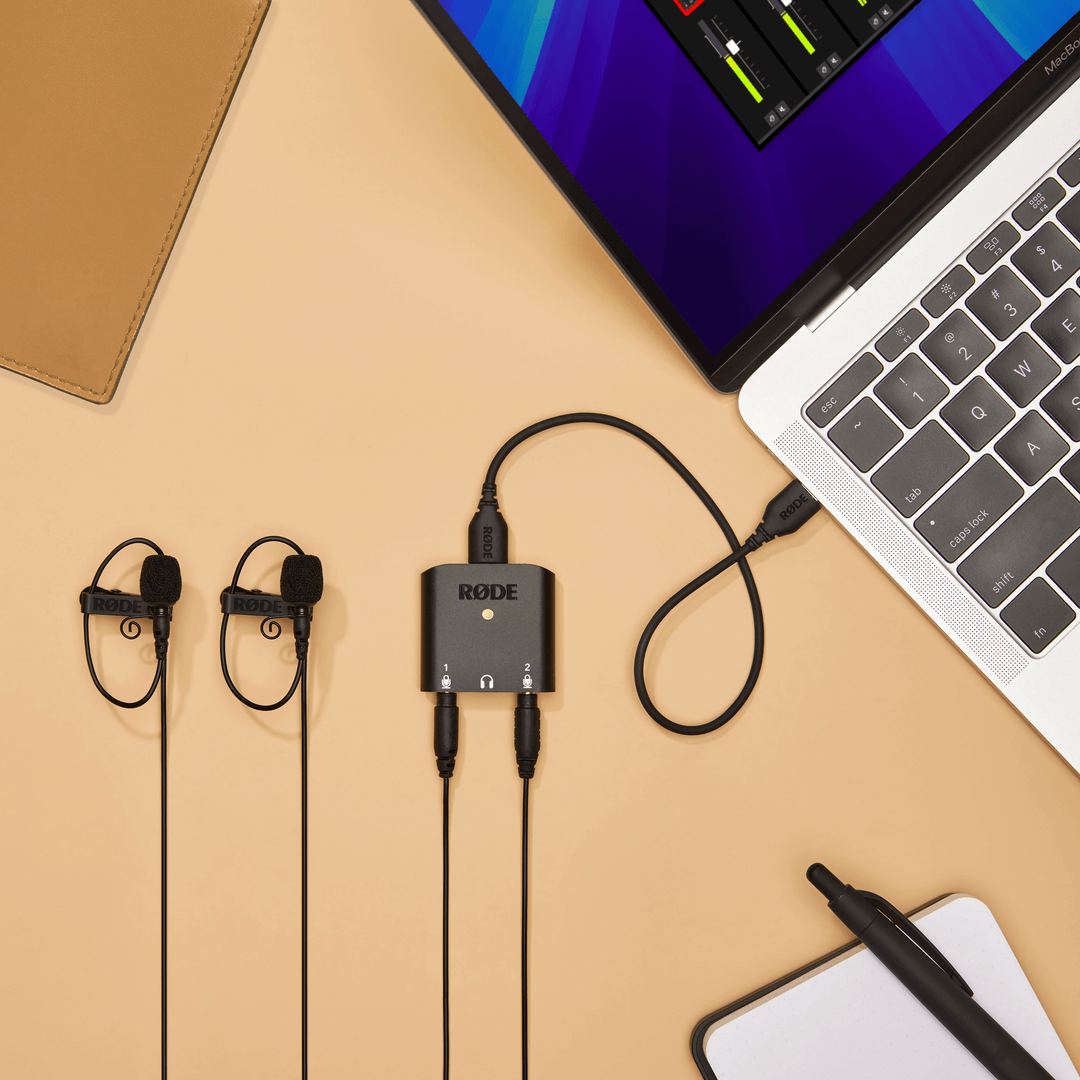
With its ultra-compact and lightweight form factor, the AI-Micro is perfect for on-the-go podcasting. It features two inputs for connecting virtually any microphone with a 3.5mm output – including lavaliers, RØDE VideoMics and wireless systems like the Wireless GO – and a headphone output for audio monitoring and playback.
The AI-Micro is fully compatible with RØDE Connect, with full control over the input level of each microphone, access to the compressor, noise gate and APHEX processing, as well as a high-pass filter. Two AI-Micros can be connected to the software and each input can be allocated to its own channel for a total of four audio streams.