USER GUIDE & SUPPORT
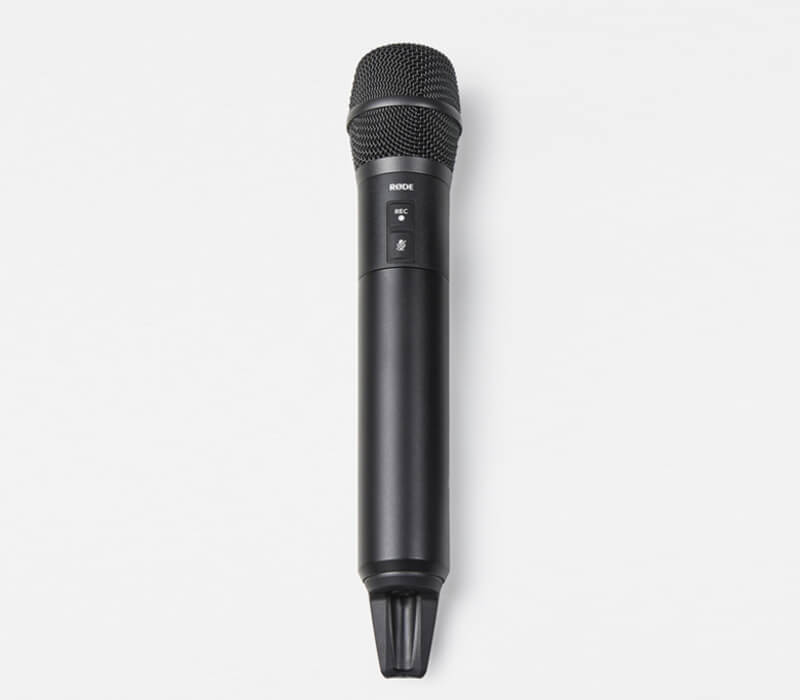
The Interview PRO is a broadcast-grade wireless handheld condenser microphone that pairs with a range of RØDE wireless systems for incredible versatility, making it ideal for media, presentation and content creation applications.
Discover everything you need to know about using your Interview PRO here.
USER GUIDE & SUPPORT
The Interview PRO is a broadcast-grade wireless handheld condenser microphone that pairs with a range of RØDE wireless systems for incredible versatility, making it ideal for media, presentation and content creation applications.
Discover everything you need to know about using your Interview PRO here.
Features
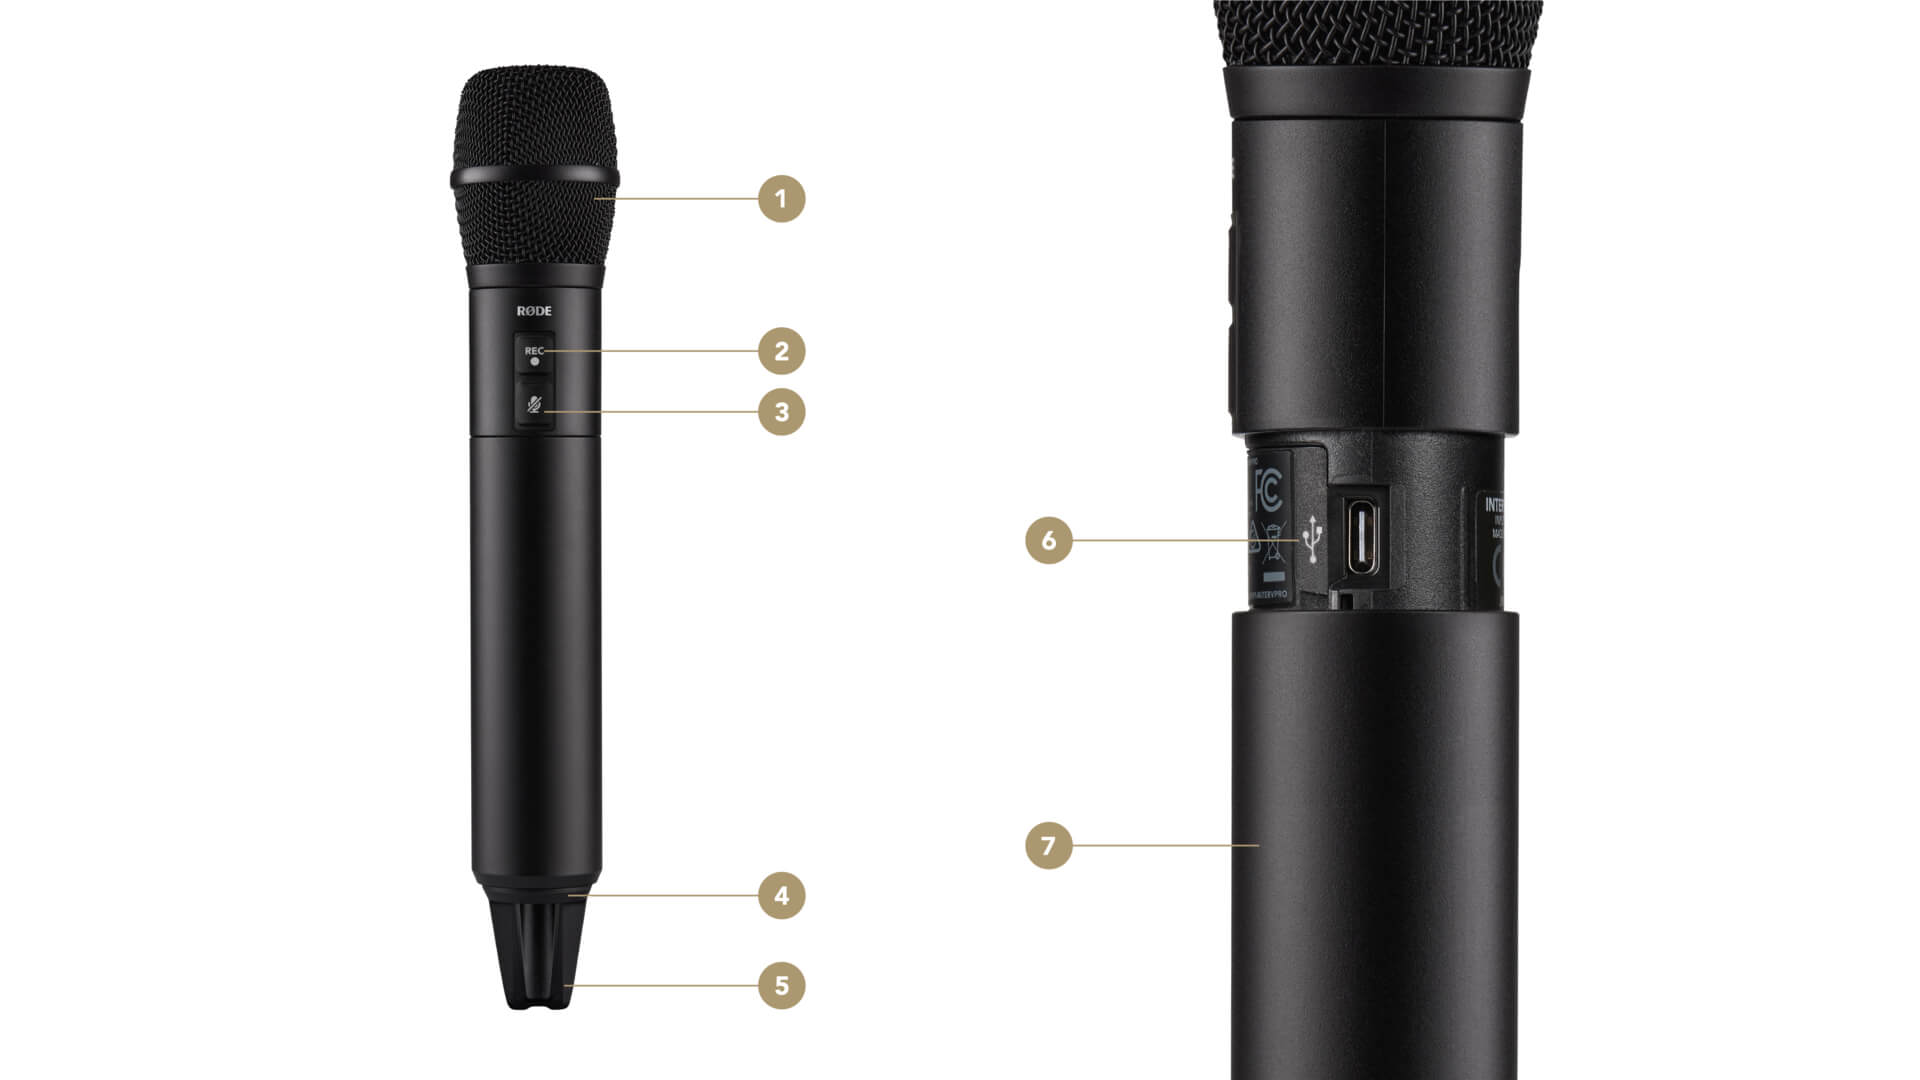
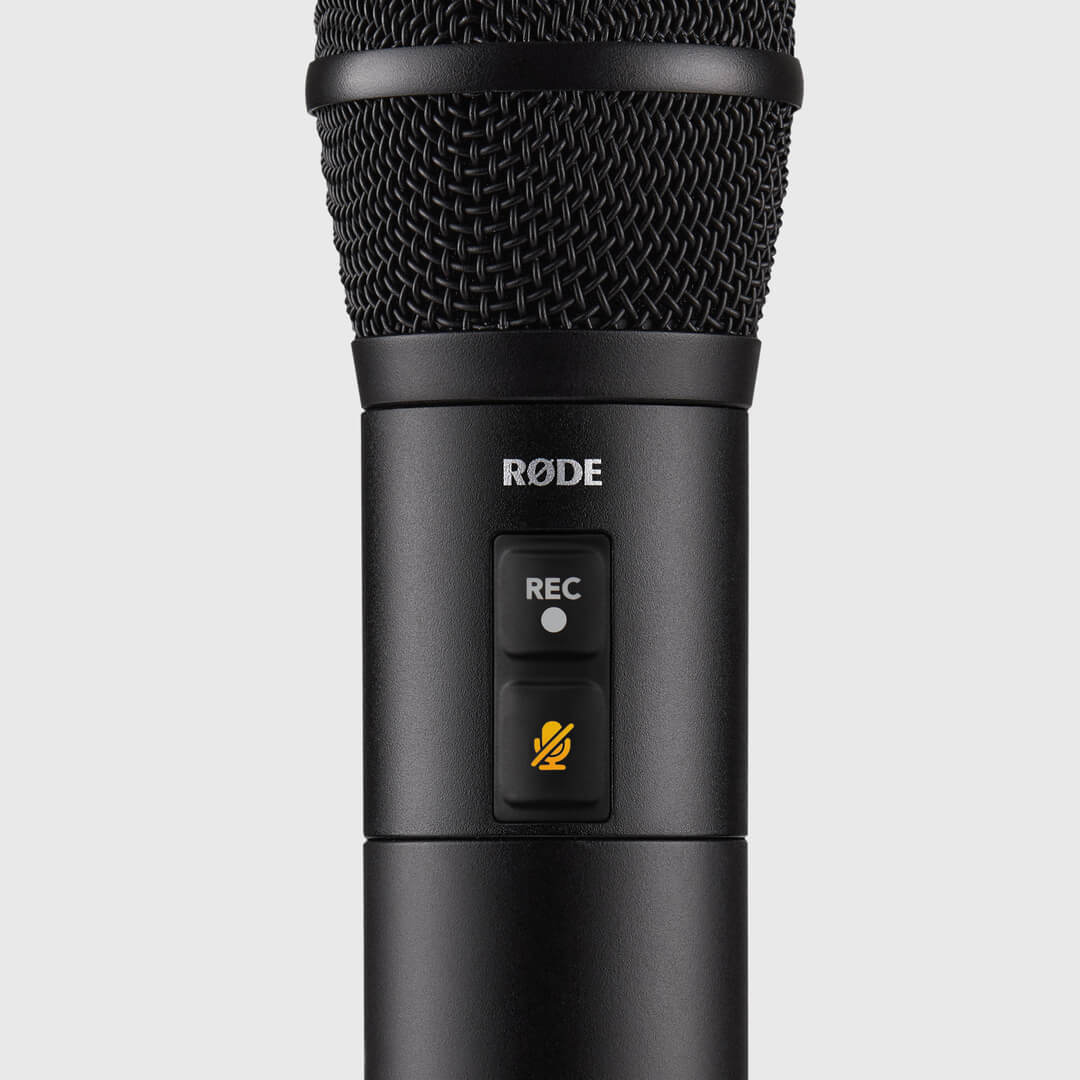
1Capsule
2Record Button
3Mute Button
4Power Button
5Antenna
6USB-C Port
7Sleeve
Getting Started
The Interview PRO is a wireless microphone that pairs with RØDE Series IV wireless systems, including the Wireless PRO, Wireless GO II, Wireless ME, RØDECaster Pro II, RØDECaster Duo and Streamer X. This means you’ll need a RØDE Series IV product for the Interview PRO to function as a wireless microphone (although you can still use the on-board recording functionality without pairing your microphone).
Charging the Interview PRO
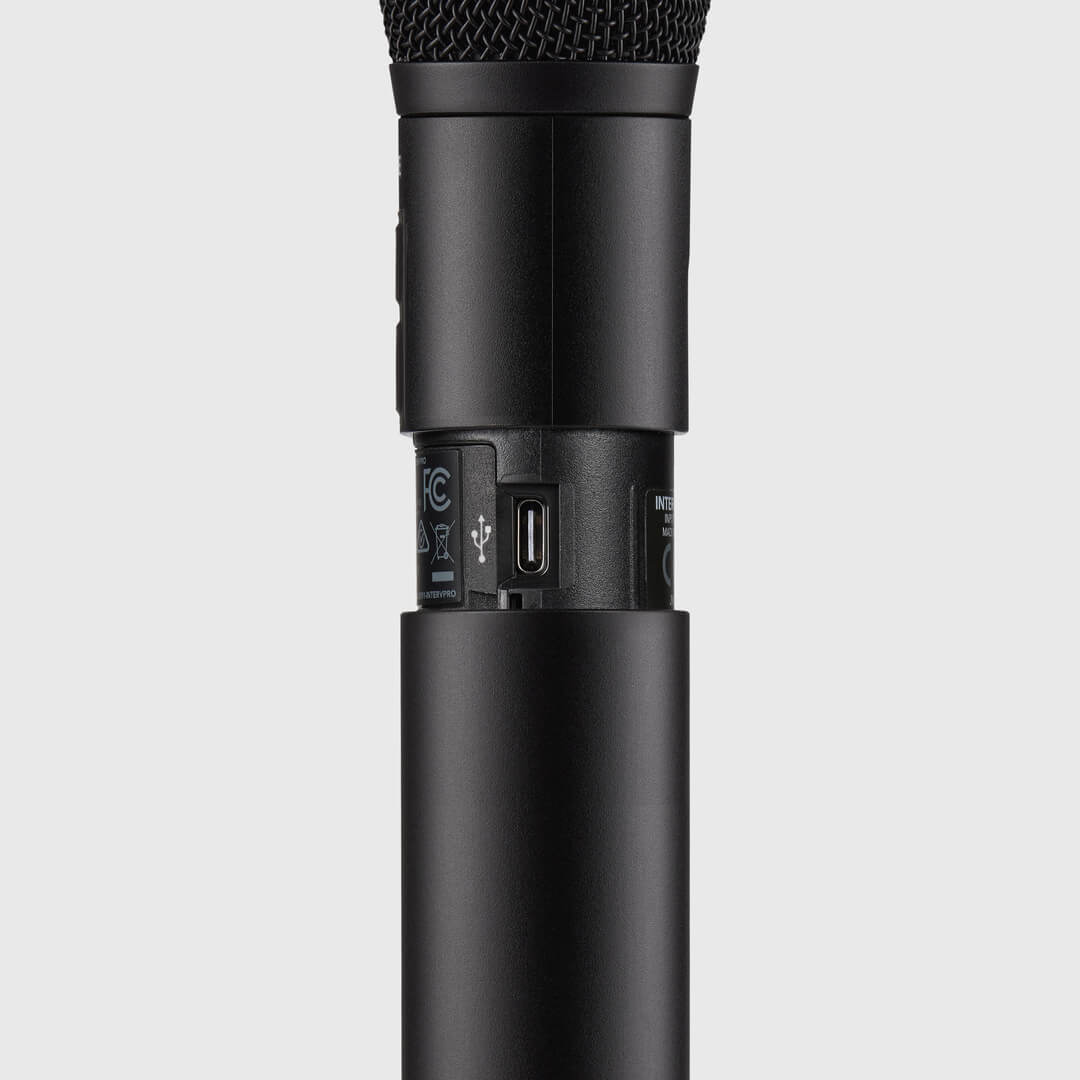
You can charge the Interview PRO’s integrated lithium-ion battery directly via USB-C. Twist the handle of your Interview PRO counterclockwise until the securing thread is released, pull down the sleeve to reveal the USB-C port and plug it into a power source such as a laptop or wall charger. The power button’s LED will flash green while charging, and turn solid green when fully charged.
Note: We recommend fully charging the Interview Pro before first using it.
Powering On the Interview PRO
To power on the Interview PRO, simply press and hold the power button located on the base of the microphone – the LED on the button will start flashing green to indicate it is powered on but not paired.
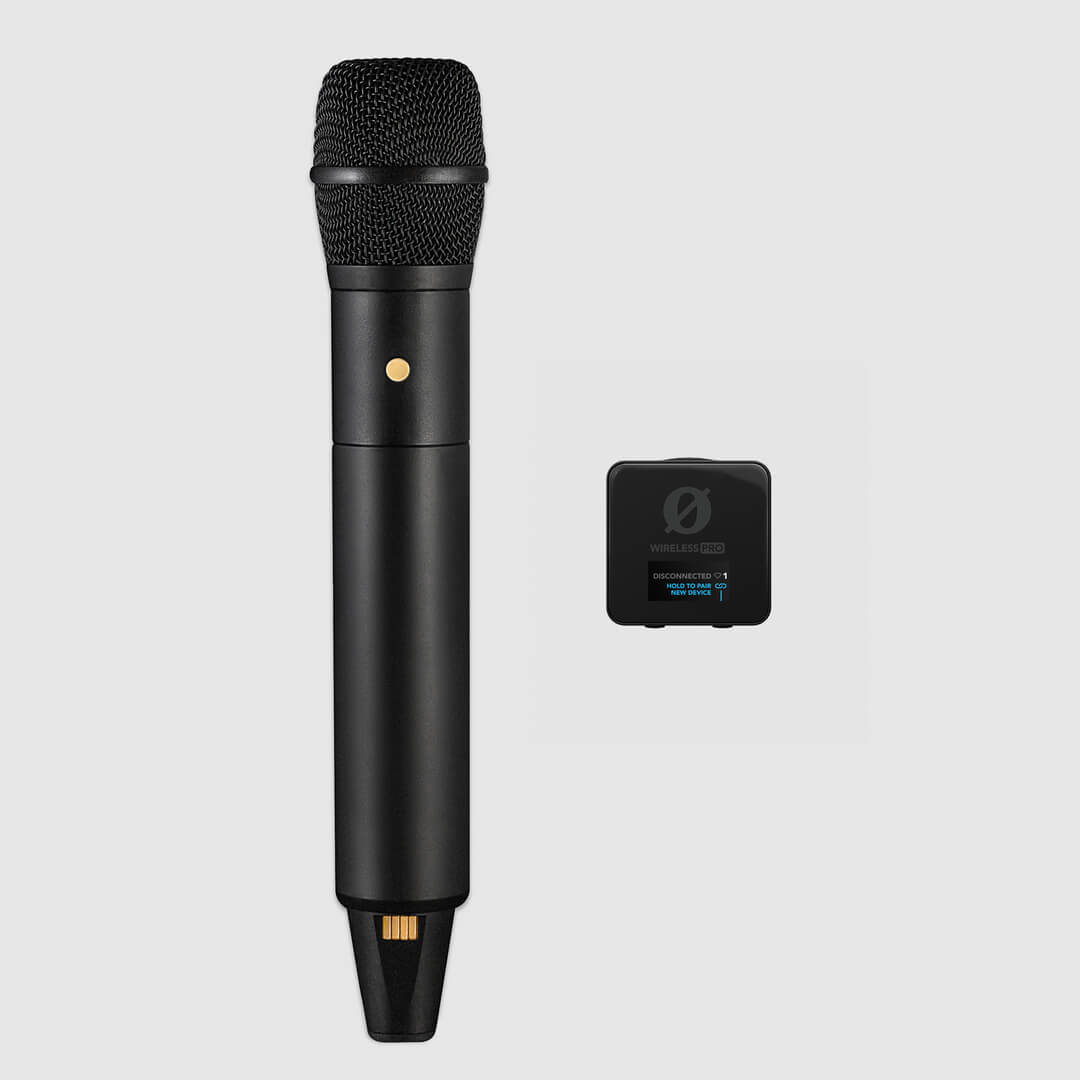
Pairing with the Wireless PRO and Wireless GO II
Power on your Wireless PRO or Wireless GO II receiver and press the right navigation button until the TX1 or TX2 screen is displayed (on Wireless PRO), or TX1 or TX2 is selected (on Wireless GO II). Press-and-hold this same right navigation button until your wireless receiver enters pairing mode. Power on the Interview PRO and short-press its power button again – the LED on the button will briefly turn blue, indicating it is attempting to pair and will turn solid green when successful.
To unpair the Interview PRO, repeat the same process on your wireless receiver. To pair a second Interview PRO, repeat this process but on the wireless receiver’s other TX channel. Check out the Wireless PRO user guide or Wireless GO II user guide for more information, including split and merged recording mode, and more.
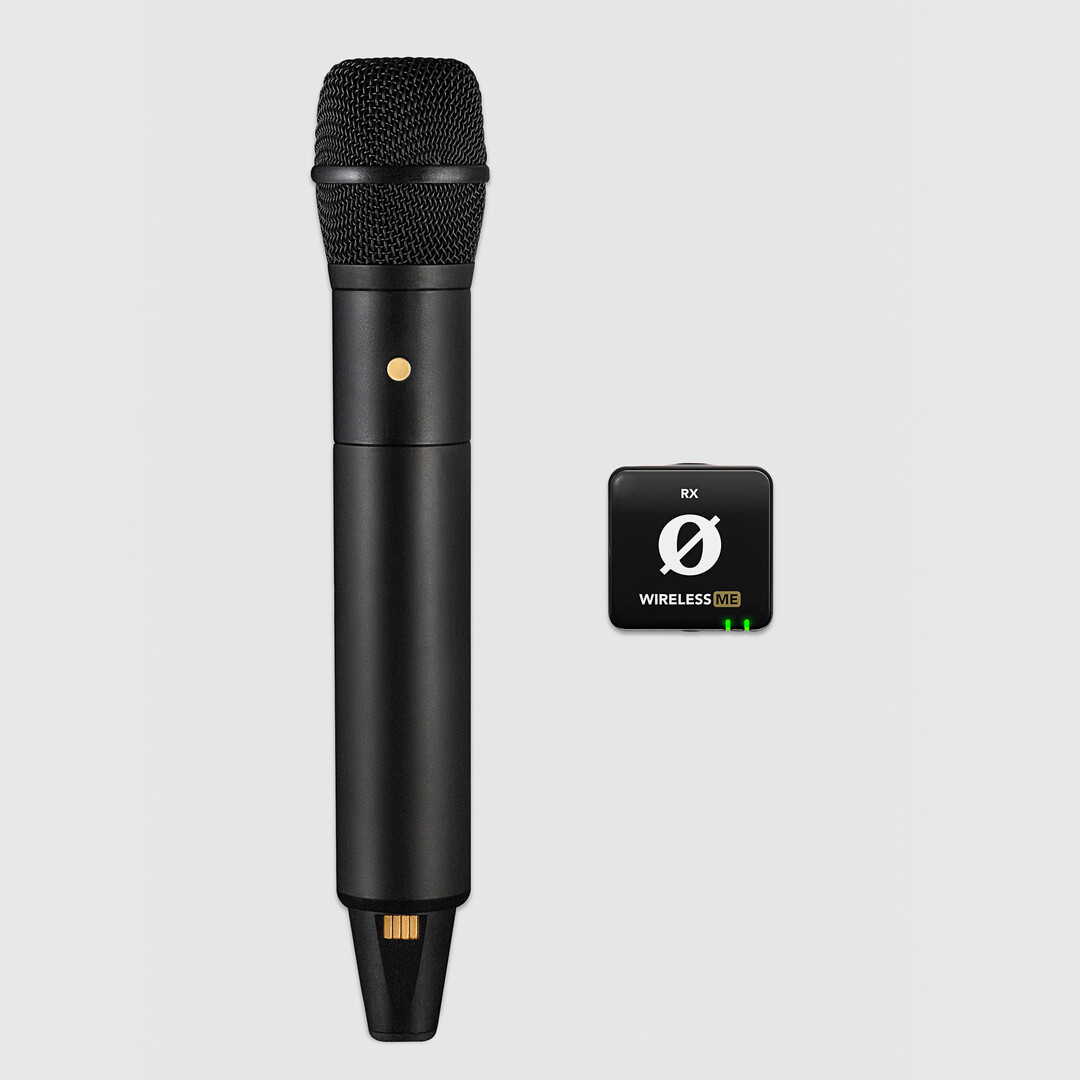
Pairing with the Wireless ME
With your Interview PRO and Wireless ME receiver both powered on, short-press the button on the Wireless ME receiver and the power button on the Interview PRO. The Wireless ME receiver’s connectivity LED will stop flashing and turn solid and the Interview PRO's button LED will briefly turn blue while pairing, then solid green when paired.
Check out the Wireless ME user guide for more information, including split and merged recording, and more.
Pairing with the RØDECaster Pro II and RØDECaster Duo
With your RØDECaster Pro II or RØDECaster Duo powered on, press the channel button above the fader you wish to assign your Interview PRO and select the ‘Wireless’ option from the microphone preset menu. Tap the on-screen ‘pair’ button, power on your Interview PRO and short-press its power button – its LED will briefly turn blue while pairing and then solid green when paired.
Check out the RØDECaster Pro II user guide and RØDECaster Duo user guide for more information.
.png)
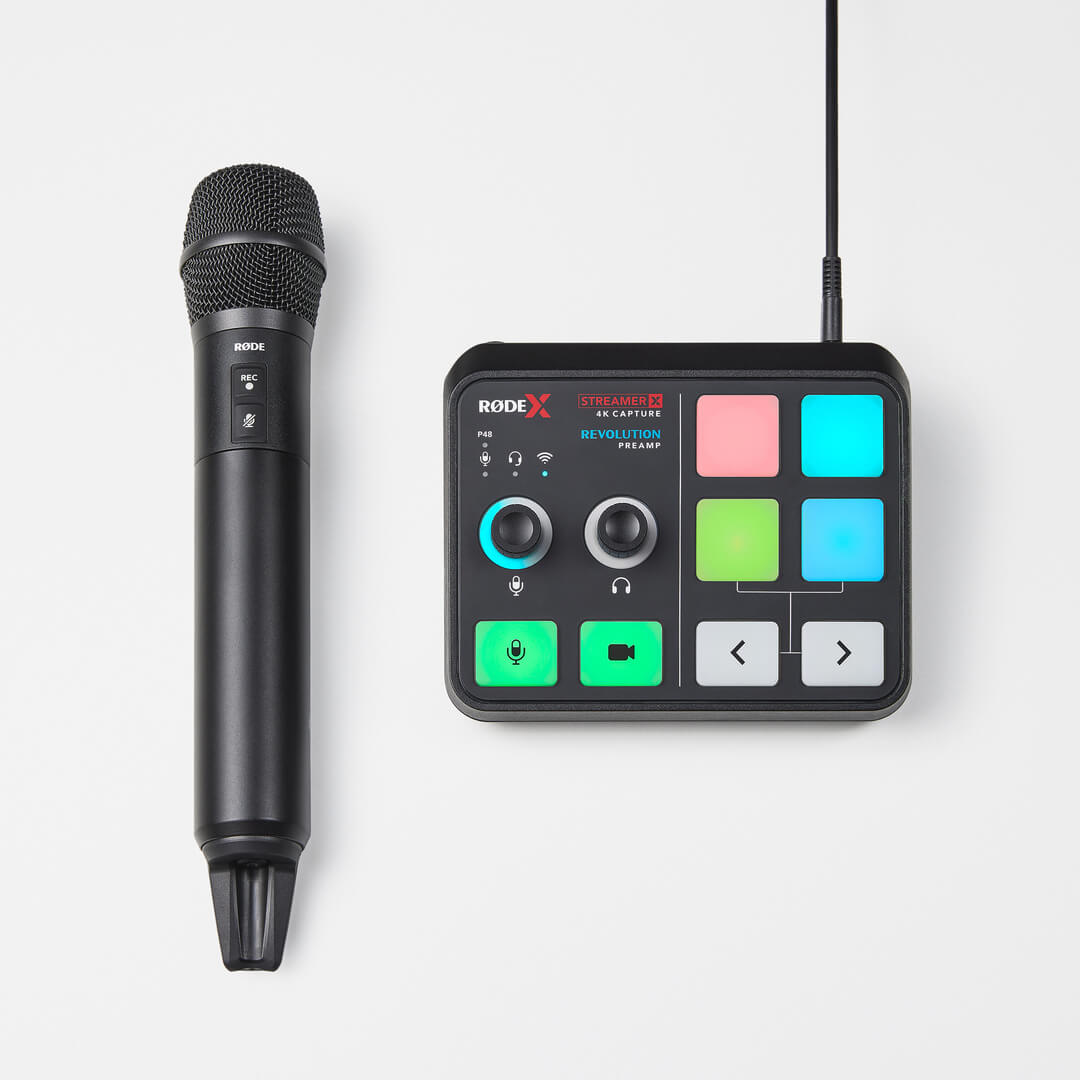
Pairing with the Streamer X
With your Streamer X powered on, press the left encoder knob until the wireless channel (teal) is selected. Press-and-hold this encoder until the teal LED above it begins flashing. Power on your Interview PRO and short-press its power button – its LED will briefly turn blue while pairing and then solid green when paired.
Check out the Streamer X user guide for more information.
Handling and Microphone Technique
Be sure to hold the Interview PRO by gripping its centre, around the sleeve. This provides the best performance in reducing handling noise and also ensures you won’t be obstructing the antenna and potentially reducing transmission capabilities.
The Interview PRO is an end-address microphone with a professional-grade omnidirectional condenser capsule, designed to pick up sound from all around in great detail. Being end-address, its capsule is directed out of the end of the grille, parallel to the microphone body, but its omnidirectional design means your voice will sound consistent even if you talk into it at an angle.
Using the Pop Filter
When recording outdoors or in windy environments, it’s recommended you use the supplied pop filter to mitigate wind noise. This filter is also great at reducing unwanted plosive sounds from your voice. Simply slide the pop filter over the top of the microphone to attach it, and slide it back off to remove it.
.jpg)
Using the Mute Button
The lower button on the body of the Interview PRO will mute the microphone when engaged, without disconnecting the wireless signal or powering it off. Simply press this button and the LED will turn amber, indicating the mute is engaged, and press again to unmute. If you wish, you can disable the mute button via RØDE Central.
Note: Muting the Interview PRO only affects wireless audio, it doesn’t mute the on-board recording.
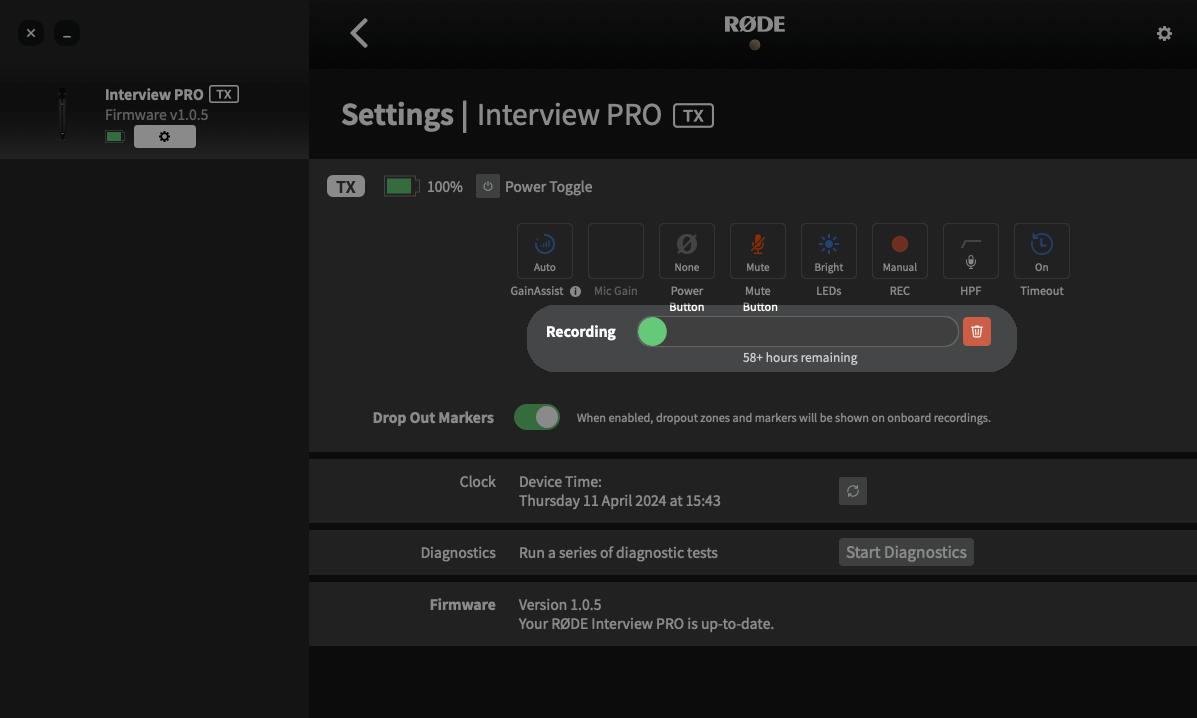
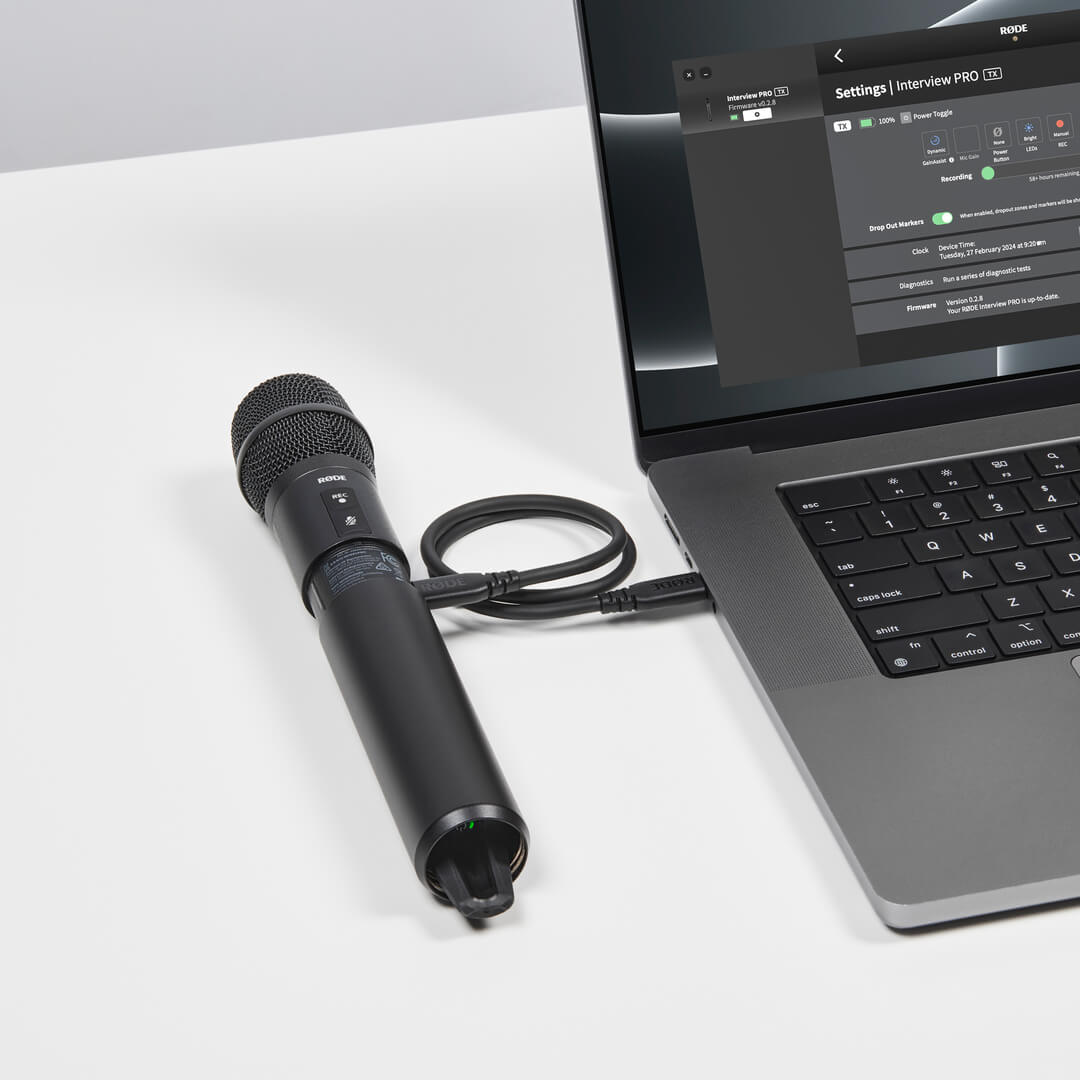
Configuring the Interview PRO with RØDE Central
RØDE Central is an easy-to-use desktop and mobile companion app for the Interview PRO that allows for complete device configuration anywhere, including:
- Setting the GainAssist mode, or manual input gain
- Configuring and exporting on-board recordings
- Engaging the two-stage high-pass filter
- Adjusting LED brightness
- Enabling or disabling the automatic timeout (15 minutes or off)
- Updating to the latest firmware
RØDE Central (desktop) is also used to access and export your on-board recordings. See the below ‘Using On-board Recording’ section to learn more.
Download RØDE Central for free to unlock the full potential of your Interview PRO.
Note: OS Requirements – MacOS 10.14 or later; Windows 10 Version 1803 or later; iOS 14 or later; Android 9.0 or later.
Updating Interview PRO Firmware with RØDE Central
To update the firmware on your Interview PRO, connect it to your computer or phone, and open RØDE Central. If a new firmware version is available, you will be prompted to update. Simply click ‘Update All’ to begin the process and follow the prompts.
Note: The Interview PRO will need to have at least 15% battery to initiate the update process.
High-Pass Filter
The Interview PRO features a two-stage high-pass filter (also known as a ‘low-cut’) that removes lower frequencies in an audio signal, which can be useful for adding clarity to your audio and helping to tame any rumble caused by wind noise.
With your Interview PRO connected to RØDE Central, you can toggle the filter between 75Hz, 100Hz and off.
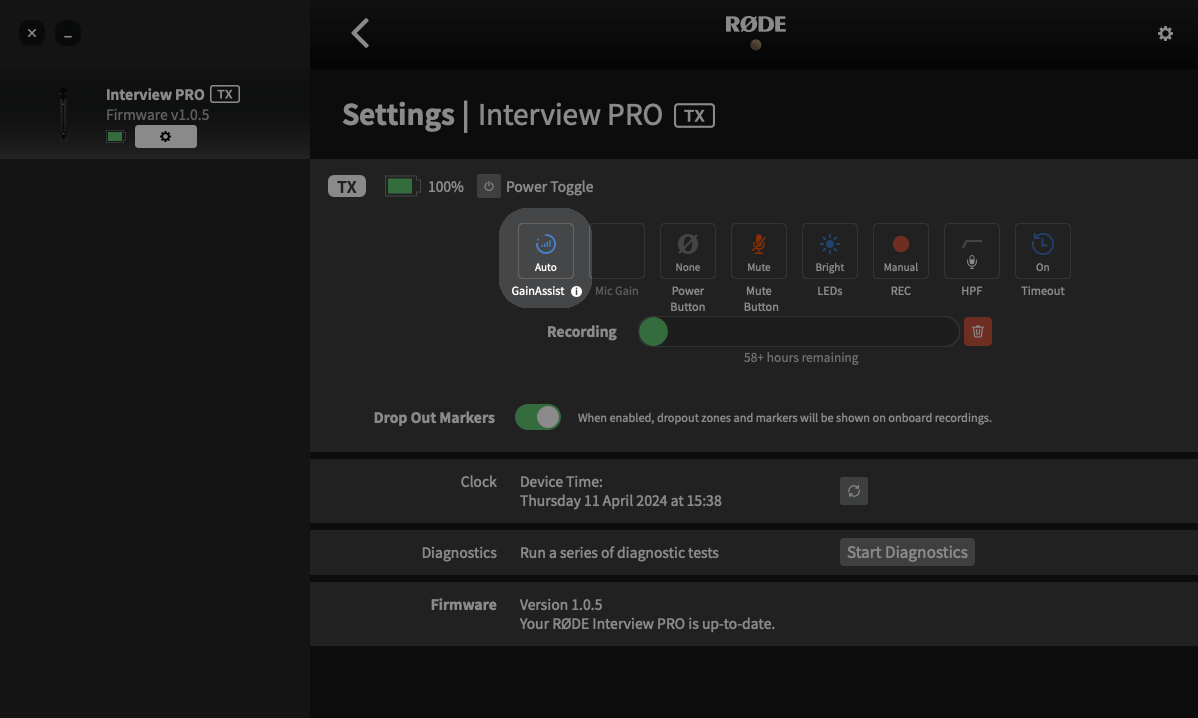
GainAssist
The Interview PRO features intelligent GainAssist technology, which automatically controls the microphone levels to ensure they are perfectly balanced. To configure the GainAssist mode, connect your Interview PRO to a computer or phone running RØDE Central and click the settings cog under “Interview PRO”.
Auto
The Auto GainAssist mode will give you a smoother, more consistent sound, which can be better in a recording scenario like an interview where your audio levels are jumping around a lot.
Dynamic
The Dynamic GainAssist mode balances your audio while maintaining dynamics, resulting in a more “natural” sound. This can be better in a controlled recording environment where the sound you’re recording is more even.
Off
With GainAssist switched off, you can manually increase or decrease the Interview PRO’s input gain (by increments of 1dB) using the ‘Mic Gain’ setting.
Note: GainAssist does not apply to on-board recordings.
Timecode
Timecode is a media synchronisation system that is designed to perfectly synchronise all your audio and video recordings. Not only does timecode save you time in the editing process, especially when working on shoots using multiple cameras and audio recorders, but it also becomes a single source of truth for referencing specific scenes, moments or timestamps within your project.
To make use of timecode on the Interview PRO, you will need to pair it with a compatible receiver that supports timecode, such as the Wireless PRO. For more information on what timecode is, how it works, and how you can use it, view the relevant section in the Wireless PRO user guide below.
On-Board Recording and 32-bit Float
The Interview PRO features an on-board recording function capable of recording over 40 hours of 32-bit float audio. This means that if your wireless signal momentarily drops out or if the device recording your wireless signal clips, you’ll always have clean backup audio available. You could also use the on-board recordings as your primary audio source, making the Interview PRO a powerful and flexible field recorder.
Note: GainAssist does not apply to on-board recordings.
What is 32-bit Float Audio?
The Interview PRO captures its on-board recordings in a 32-bit float file format. Audio files with a 32-bit float bit depth are able to represent a very wide range of volume levels without the issues that are typically associated with recording very loud or quiet audio.
Your recording will not distort or clip when capturing loud sounds, even if it goes above 0dB, and the 32-bit float format boasts incredible clarity to allow you to boost quieter recordings in post-production without introducing noise. This means you just get great audio every time, with no need to set the gain or adjust settings.
Note: 32-bit float only applies to the Interview PRO’s on-board recordings, which means that these benefits won’t apply to audio transmitted wirelessly and recorded to another device.
On-board Recording Modes
There are two different modes for recording on your Interview PRO that you can configure using RØDE Central – Manual and Always. You can also disable on-board recording in this menu.
Manual: In this mode, on-board recordings are started and stopped when you press the record button.
Always: In this mode, on-board recordings will always be running if the Interview PRO is powered on, even if it’s not paired or connected to a receiver.

How to Export On-board Recordings
There are two methods for exporting your on-board recordings onto your computer from your Interview PRO. You can either quickly copy the files directly (direct export) or use RØDE Central. While it’s faster to directly export your recordings to your desktop, using RØDE Central gives you access to placed markers along with a variety of export options, such as the ability to normalise your audio and change its file format, sample rate, bit depth and loudness.
Direct WAV Export
To export recordings directly, connect your Interview PRO to your computer using the included SuperSpeed USB-C cable. Your Interview PRO will show up as a removable device on your computer, just as any other hard drive or USB storage device would. Here, you can quickly copy your recorded files to your computer.
Note: When exporting recordings using this method, your files will be saved in their original 32-bit float WAV format (see the ‘How to Adjust or Normalise 32-bit Float Files’ section for more information).
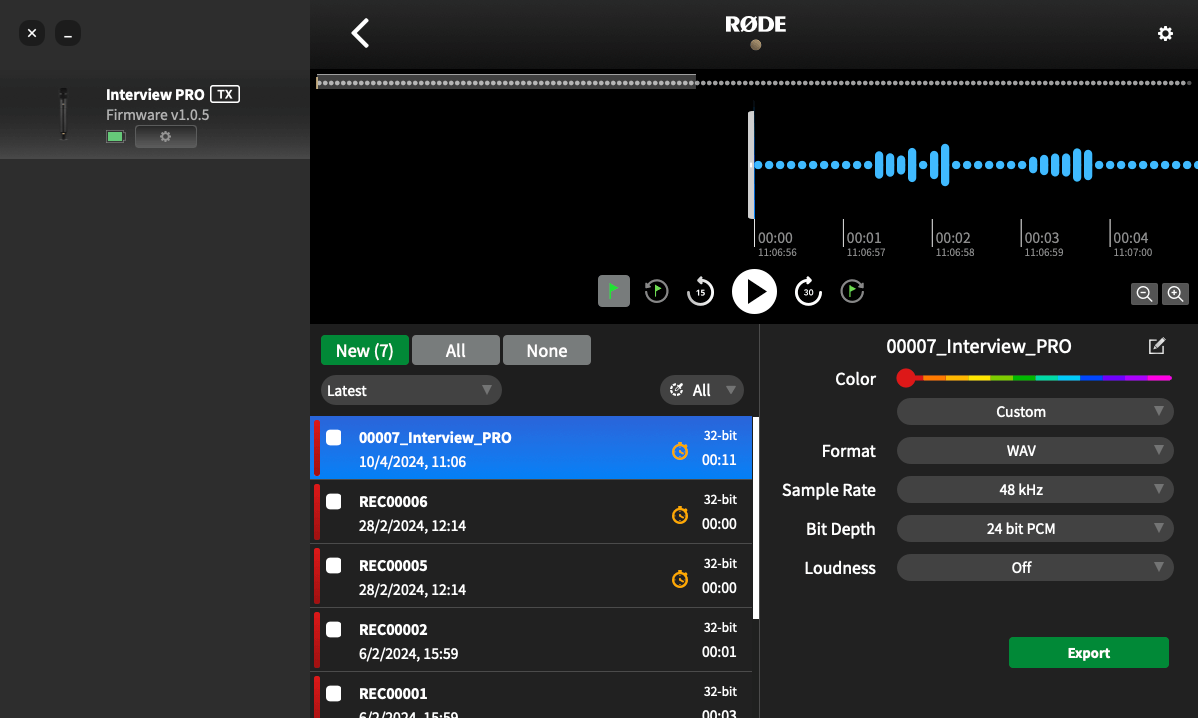
Exporting On-board Recordings Using RØDE Central
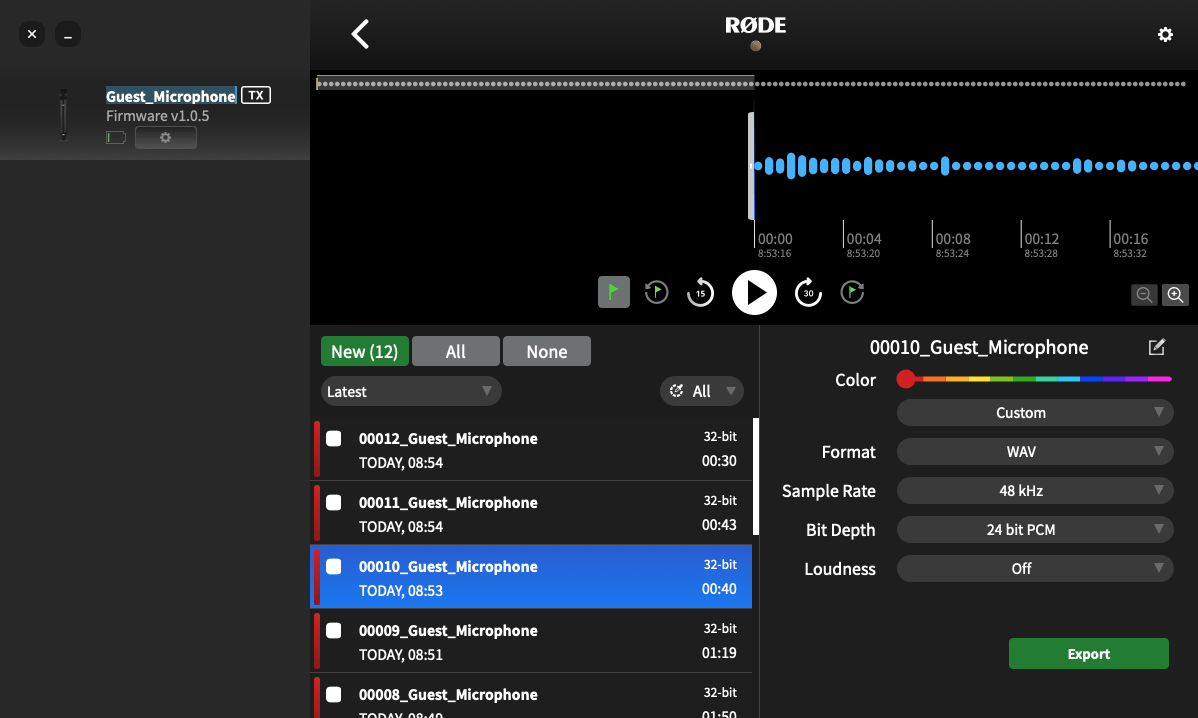
To export recordings via RØDE Central, connect the Interview PRO to your computer using the included SuperSpeed USB-C cable. Open RØDE Central and click on ‘Interview PRO’ from the left-hand side of the software. Your recordings will be listed chronologically in the left-hand column from newest to oldest.
Click on a recording and you’ll see its waveform data, as well as information on any audio dropouts or markers (more on that shortly) in the timeline at the top of the software. In the bottom-right corner you’ll see a number of export settings for your selected recording(s), which you can adjust before clicking the export button.
Note: See the ‘Batch Export and Export Selection’ section to learn how to export multiple recordings or portions of recordings simultaneously.
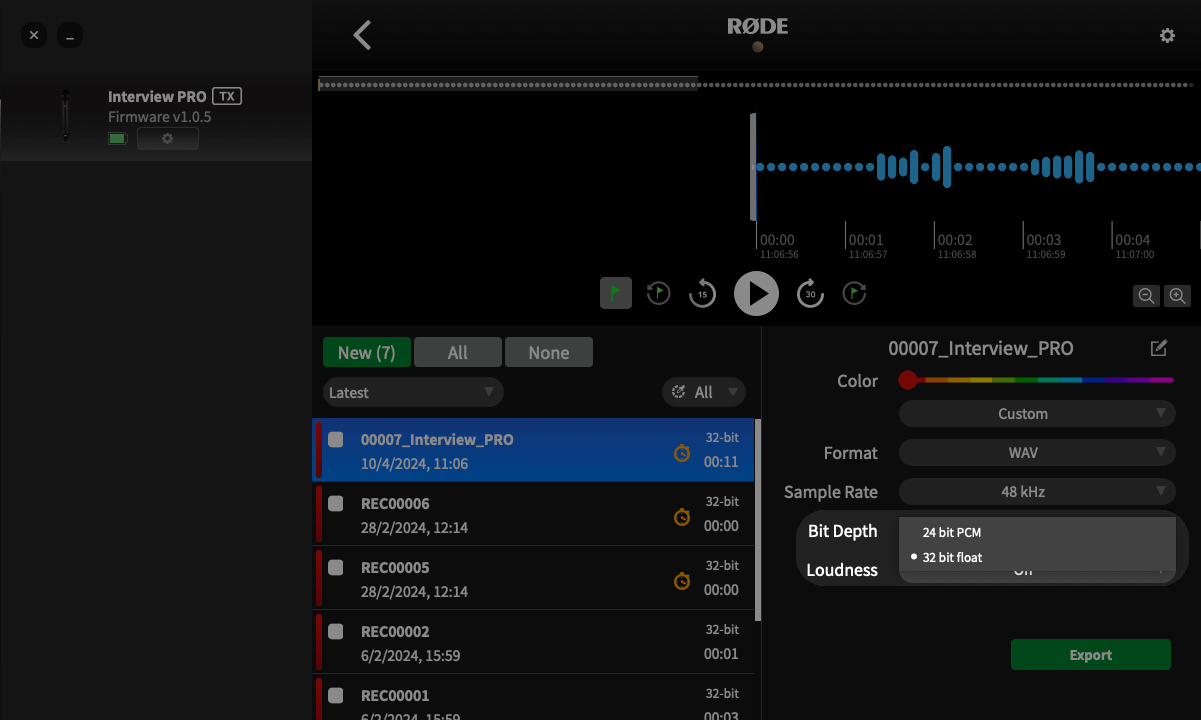
How to Adjust or Normalise 32-bit Float Files
Normalising audio is a process that adjusts the volume level of your entire recording so that its loudest point sits at a particular volume level (typically, at or below 0dB, to avoid clipping or distortion). Most editing software can normalise your audio using an automatic function.
There are two ways you can normalise your 32-bit float audio files if the audio is too quiet or has clipped: within RØDE Central or within your editing software.
Using RØDE Central
When exporting using RØDE Central, select “Custom” from the first dropdown menu in the export settings, and then choose “24 bits PCM” from the 'Bit Depth’ dropdown and then click ‘Export’ – this will automatically normalise your 32-bit float files and export them as 24-bit files, ready for use.
Using Your Editing Software
Whether you’ve directly copied your recordings from the Interview PRO or exported them as 32-bit float files from RØDE Central, you’ll need to normalise them in your editing software. Once imported into your software, you can simply adjust the volume of the audio clip or use your software’s normalise function to raise or lower your recording’s volume.
32-bit Float Compatible Video and Audio Software
- DaVinci Resolve
- Adobe Premiere Pro
- Final Cut Pro
- Reaper
- Ableton Live
- Adobe Audition
- Audacity
- Pro Tools
Markers and Dropouts
The waveform of your recorded audio will display any markers and dropouts. These signify user markers that you have manually dropped (green markers), dropouts (red markers) and dropout regions (red sections). This is useful for pinpointing exactly what section of audio you need to export.
- Markers: If you set the ‘Power Button’ to ‘Marker’ in RØDE Central, you can manually drop a marker in your recording at any time by short-pressing the Interview PRO’s power button. User markers are displayed as green flags in RØDE Central. In addition to appearing in the waveform, user markers are indexed in a drop-down menu under each recording. Click a marker to jump to that section of the recording.
- Dropouts: If the quality of the wireless signal between a transmitter and the receiver falls below the acceptable range during recording, a marker will be automatically dropped into the internal recording to signify a signal dropout. These are displayed as red flags.
- Dropout Regions: If several dropouts occur within 10 seconds of each other, this will be displayed as a dropout region rather than multiple marker lines clumped together.
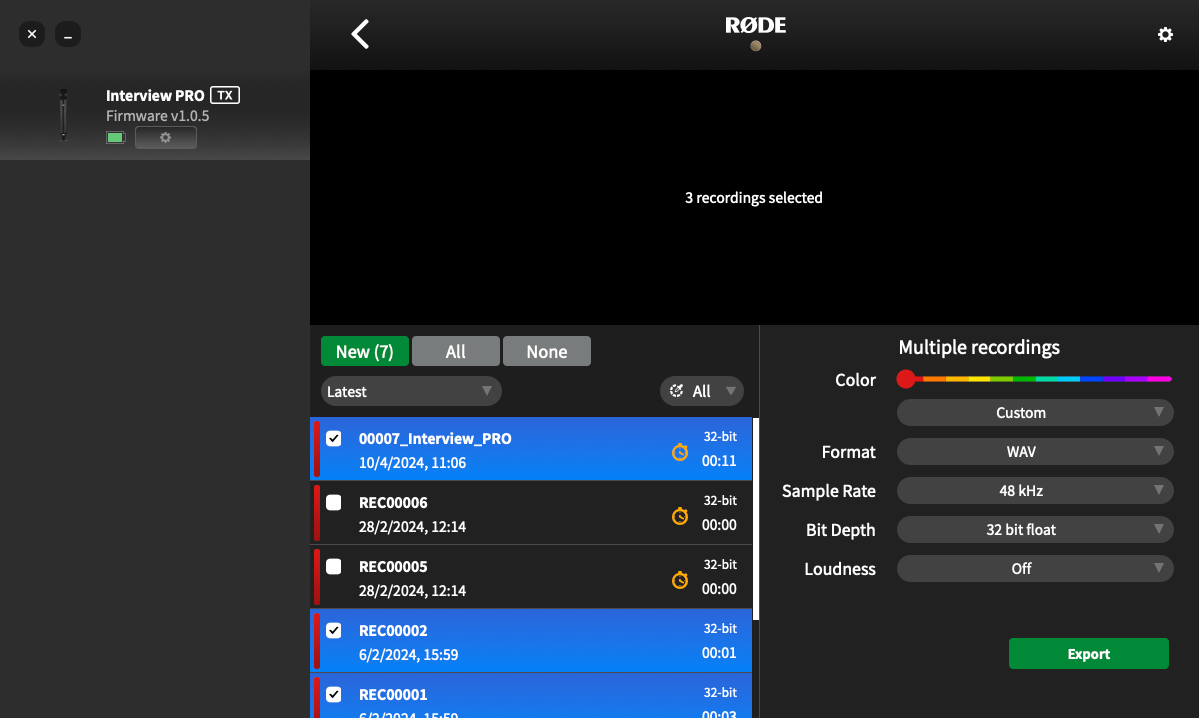
Batch Export and Export Selection
In addition to being able to export individual recordings, you can export multiple files simultaneously by checking the box next to any recording and clicking ‘Export Selection.’
You can also export a specific section of a recording by right-clicking and dragging the selection tool anywhere on the waveform to highlight the region you need, then clicking ‘Export Selection’. You can also export a section between two markers by clicking the dropdown arrow next to a recording that contains markers, selecting one of its markers, and then clicking ‘Export Selection’.
Setting Default File Names for On-board Recordings
Once connected to a computer running RØDE Central, you can rename your Interview PRO by double-clicking on it in the left-hand side of RØDE Central and typing in your preferred name.
You can enter any name containing letters, numbers and underscores [a-z, A-Z, _, 0-9] and then confirm the new name by simply clicking away or hitting “Enter” / “Return”. Once you have renamed your Interview PRO, all recordings it captures from that point onwards will include this name in the filename, following a sequential number.
Deleting Your Recordings
When storage in a transmitter is full, new recordings will begin overwriting the oldest recordings. After a recording session, it’s a good idea to export all of your audio then delete the files from the Wireless PRO to ensure you don’t lose any audio you haven’t saved.
Clicking the transmitter settings cog in RØDE Central will allow you to see how much storage space you have left and mass delete all recordings on the transmitter.
Note: You cannot individually delete recordings.