ビデオ切り替えと自動切り替え
ビデオ切り替えとは?
ビデオ切り替えとは、いくつかの異なることを指しますが、その核心は、視聴者が見るものを正確にコントロールするために、異なるビデオフィードを切り替えるプロセスです。これはライブストリームやブロードキャストのシナリオで非常に便利ですが、強力な「ライブ」編集ツールでもあります。
複数のカメラアングルを使用することで、よりダイナミックで魅力的な体験を視聴者に提供することができ、その時々に最も適切なビジュアルを視聴者に見せるのに理想的です。
また、ビデオ切り替えを使って、グラフィック、画像、ビデオ、その他のメディアを番組に追加することもできます。ピクチャーインピクチャー、分割画面、その他のレイアウトを使用して、複数のビデオフィードを一度に表示することもできます。
RØDECaster Videoを使用してビデオ入力、シーン、メディアを切り替えるには、Inputボタン(1〜6)、Sceneボタン(A〜G)、Mediaボタン、Overlay機能ボタンを使用します。
フレームレート
RØDECaster Videoのグローバルフレームレートは、ストリーム、録画、HDMI AおよびHDMI B出力のフレームレートを決定します。プロジェクトで使用するフレームレートを1つだけ選び、すべてのカメラやその他のビデオデバイスをこのフレームレートで出力するように設定することが、最良の結果を得るために重要です。
RØDECaster Videoのグローバルフレームレートを設定するには、設定コグをタップし、Video> Frame Rateに移動し、エンコーダーを使用して選択します。
フレームレート: 23.98、24、25、29.97、30、50、59.94、60
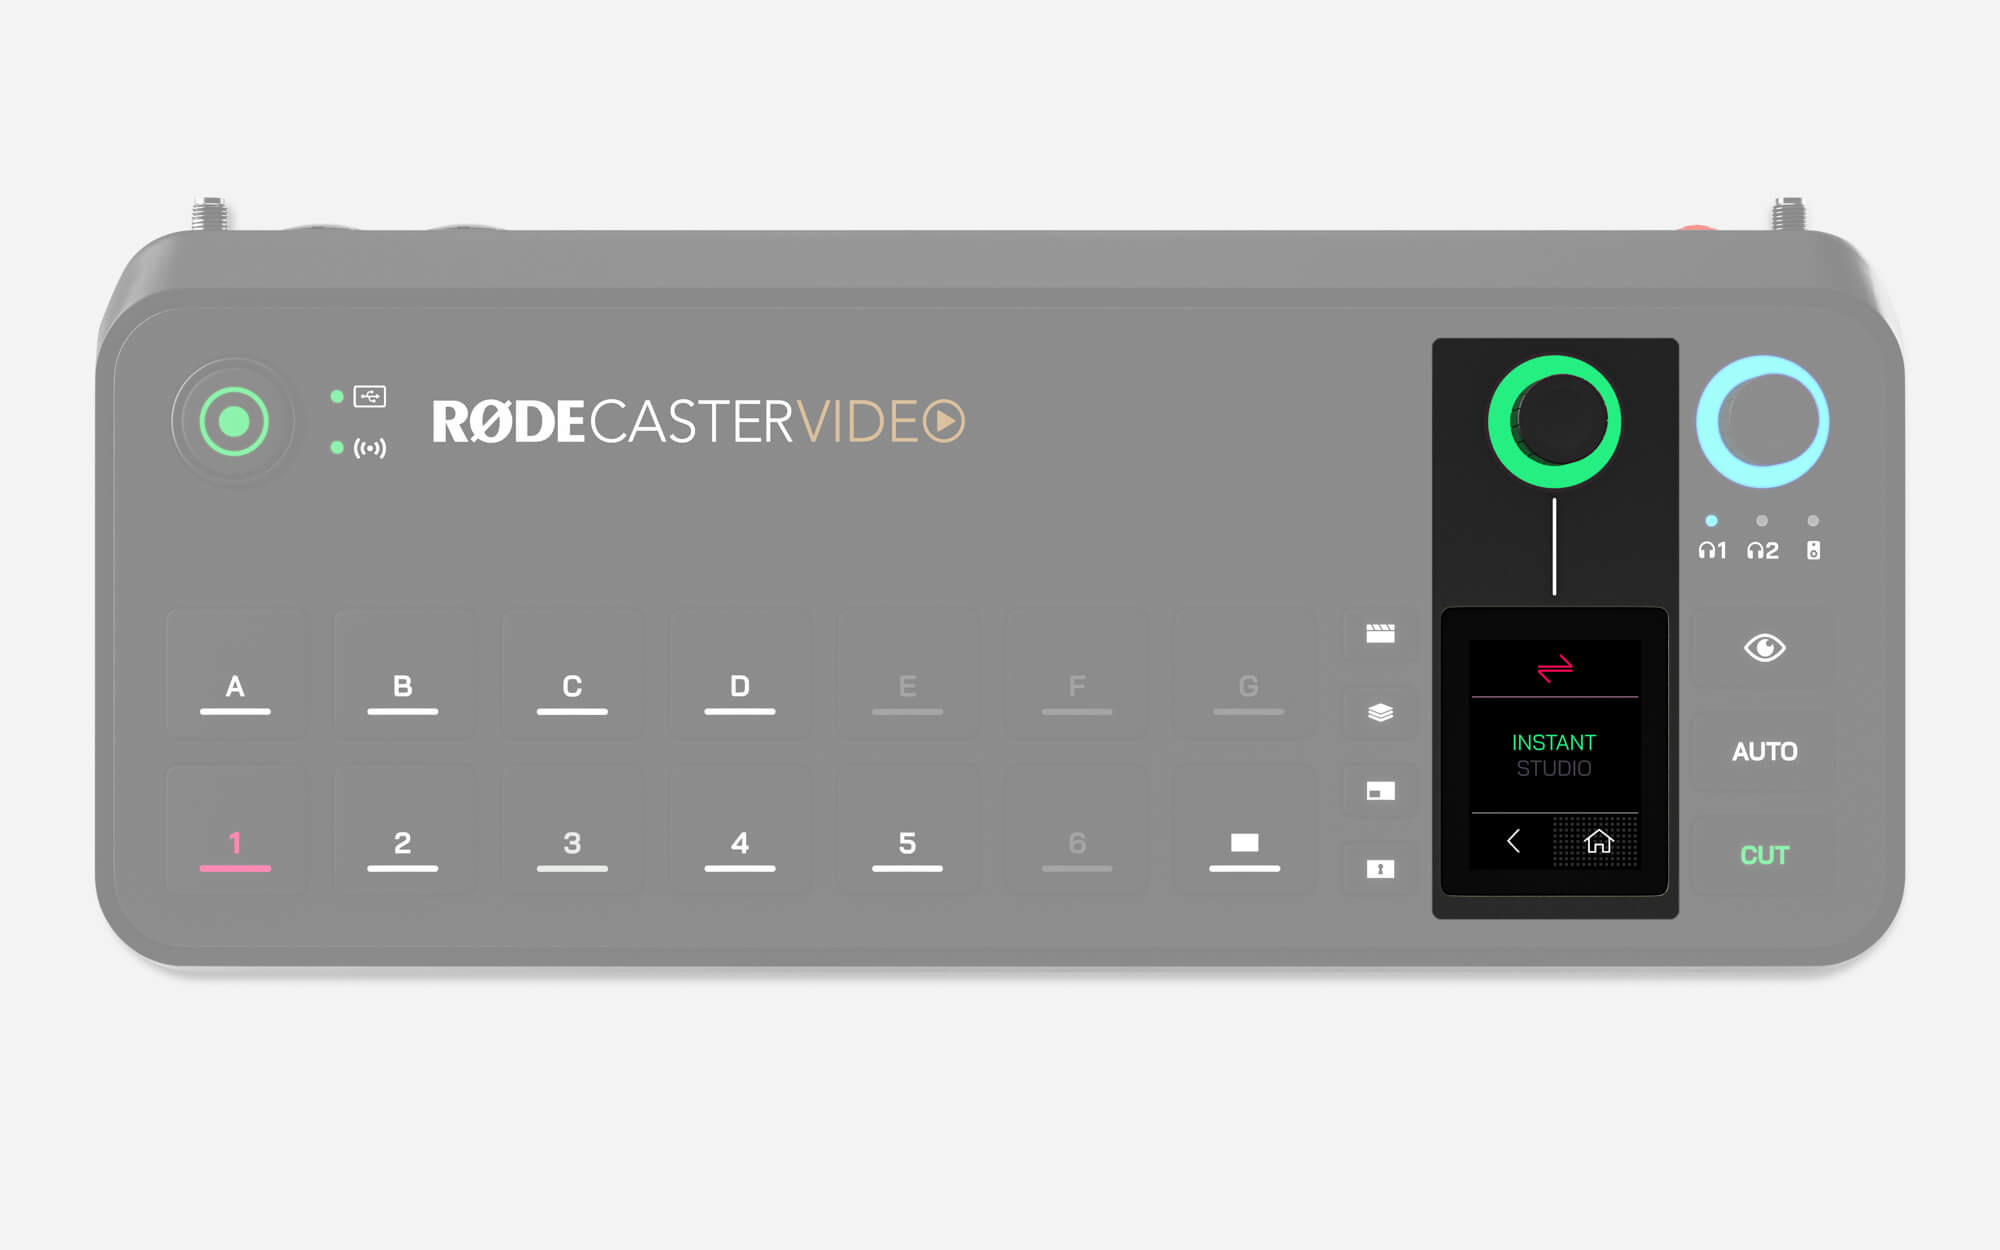
インスタントとスタジオの切り替えモード
RØDECaster Videoには2つの切り替えモードがあり、ビデオ切り替え時の操作方法が変わります。モードを変更するには、Settings > Video > Switchingに移動し、インスタントまたはスタジオのいずれかを選択するか、RØDE CentralのDevice Configuration > Video > Switchingに移動します。
インスタント切り替え
インスタントモードでInput、Scene、MediaまたはOverlayボタンを押すと、そのボタンが即座にライブ番組フィードに表示されます。「Cut」ボタンが選択されていれば、瞬時に切り替わり、「Auto」ボタンが選択されていれば、トランジション設定に基づいて切り替わります。
この2つのモードのうち、ボタンを1回押すだけでスイッチを切り替えられるより即時性の高いモードです。このため、RØDECaster Videoの操作とカメラへの出演を同時に行うソロのクリエイターや、より即時性の高いワークフローが必要な場合に最適です。
スタジオ切り替え
スタジオモードで入力、シーン、Mediaボタンを押すと、プレビューフィードに送られ、ライブのプログラムフィードは変更されません。その後、カットまたは自動のいずれかを押すと、プレビューフィードにあるものがすべて(即座に、またはトランジションを伴って)ライブプログラムフィードに送信されます。
スタジオモードは、放送局で最も一般的に使用されているモードで、入力またはシーンをライブ送信する前にプレビューできるため、専任のオペレーターがRØDECaster Videoをコントロールするプロダクションに適しています。

プログラム、プレビュー、マルチビュー出力
HDMI AとBに送信できるビデオフィード出力は3種類あります。プログラム、プレビュー、マルチビュー。これは、Settings > Videoで調整でき、HDMI AまたはHDMI Bをタップします。RØDE Centralで、この設定はDevice Configuration > HDMI Outputメニューにあります。
プログラム
これがメインのプロダクション、つまり「ライブ」ビデオフィードです。ストリーミング、レコーディング、USB 1出力に何が送られているかが正確に表示されます。
プレビュー
スタジオモードでは、プレビューフィードにより、入力、シーン、メディアをプログラムフィードに送信する前に見ることができます。これにより、ライブを開始する前にビデオソースを確認、設定、調整することができます。インスタントモードでは使用できません。
マルチビュー
マルチビューフィードは、すべてのビデオソース、シーン、メディア、グラフィックを1つの画面にレイアウトして表示します。また、録音やストリーミングのステータス、オーディオミキサー、日付と時刻、実行時間などの重要なデバイス情報も表示されます。
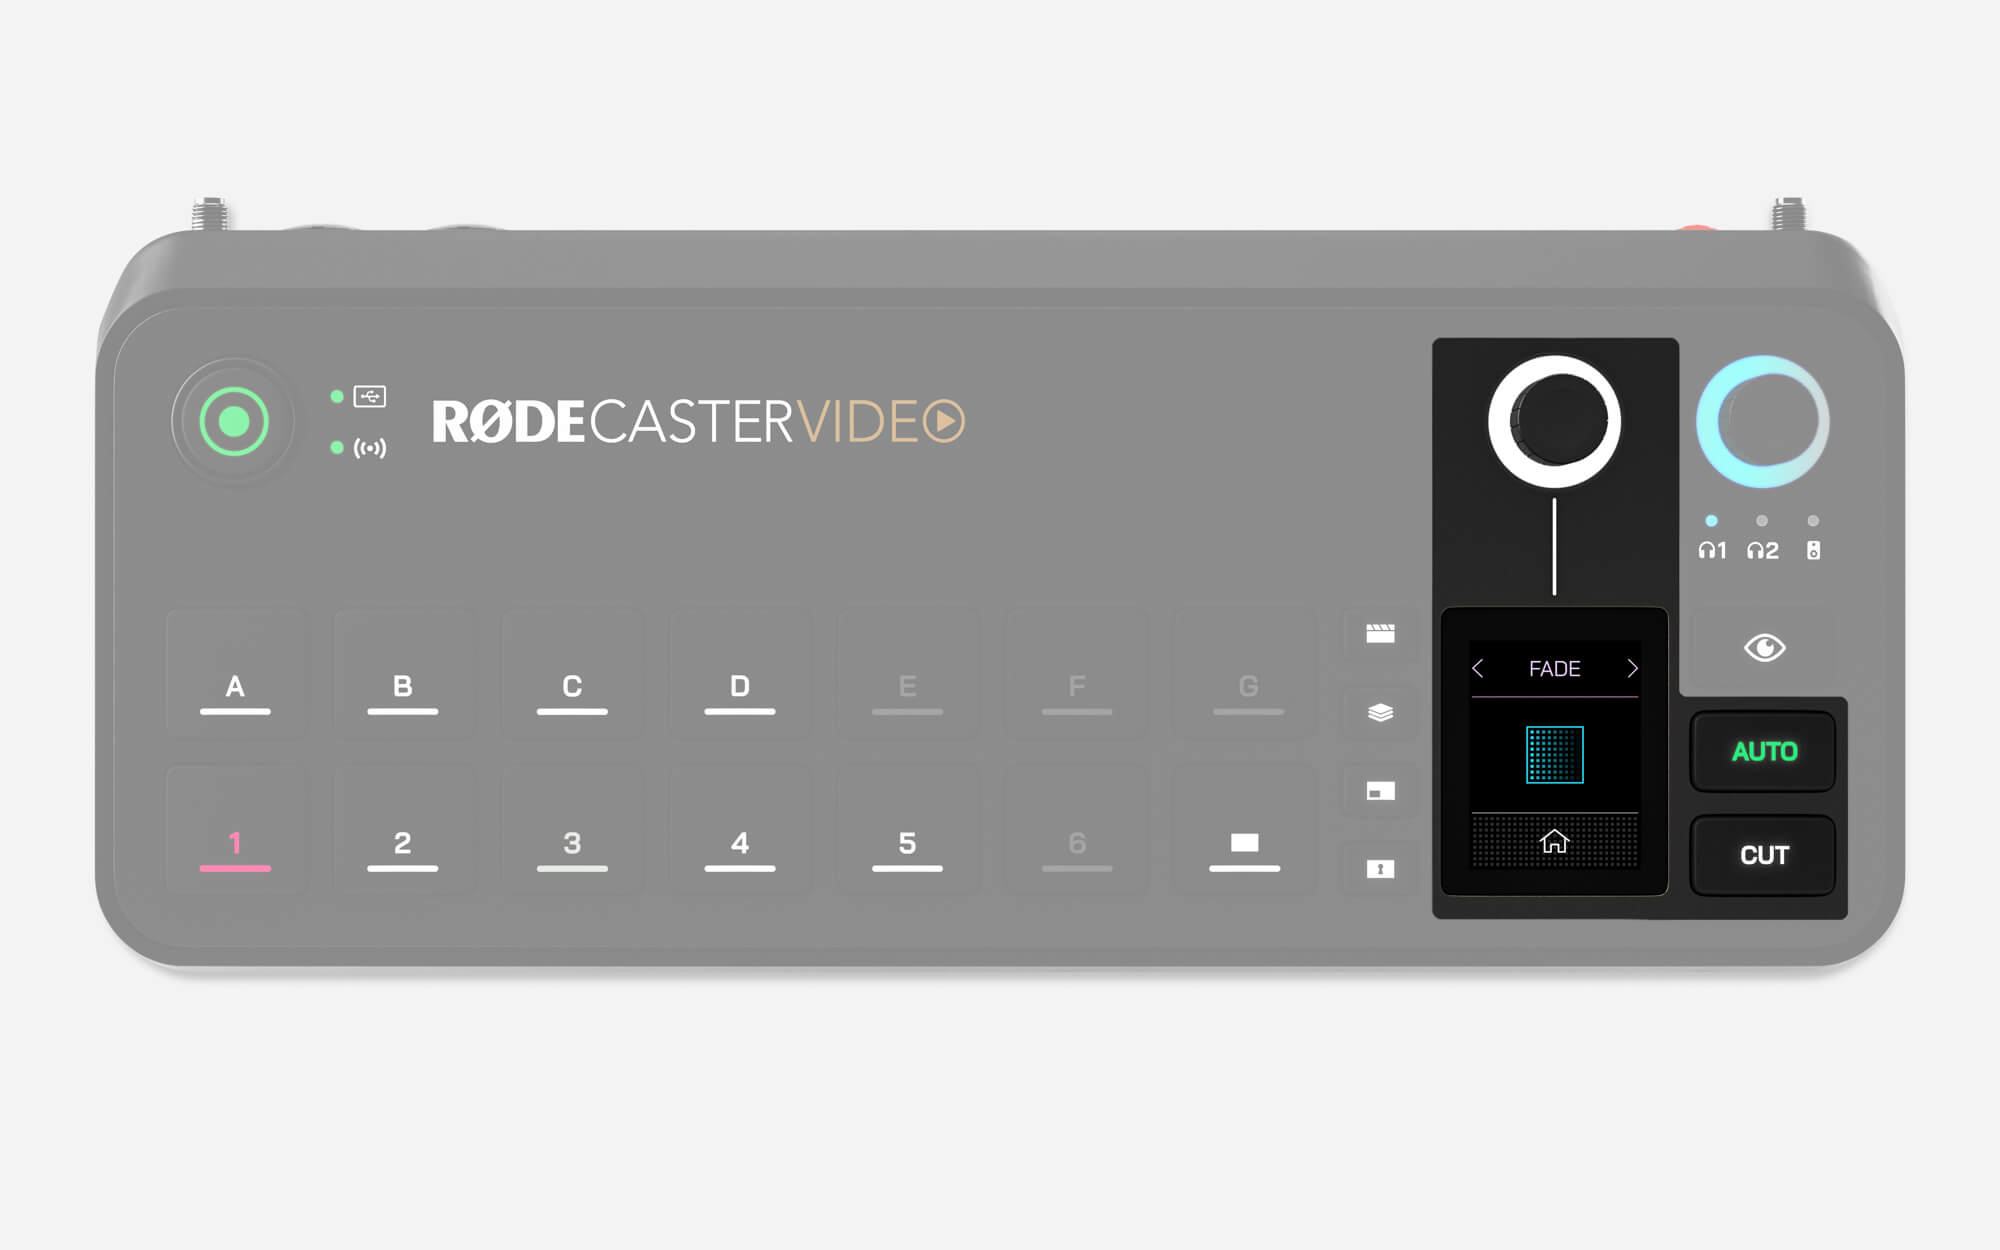
カット、自動、トランジション
CutボタンとAutoボタンは、インスタントモードまたはスタジオモードであるかに応じて、ビデオフィードを切り替える2つの異なる方法を提供します。
カット
カットはデフォルトのモードで、インスタントモードでは入力、メディア、シーンを瞬時に切り替え、スタジオモードではプレビューとプログラムビデオフィードを瞬時に切り替えることができます。
自動
インスタントモードで、自動はトランジション設定を使用して入力、メディア、またはシーン間を切り替え、スタジオモードの場合はプレビューフィードとプログラムフィード間を切り替えます。
トランジション設定
トランジションのタイミングを調整するには、ストップウォッチのアイコンをタップしてロータリーエンコーダーを調整し、エンコーダーをクリックして確定します。トランジションの種類を変更するには、ストップウォッチの左側にある画面上のアイコンをタップし、エンコーダーでフェード、ディップ、ワイプを選択します(後者には複数のサブタイプがあります)。
注記
また、トランジションのタイミングはフェードトゥブラックボタンボタンを押したときにトランジションにかかる時間も決めます。
-2395x1429-ec9dd10.jpg)
Auto-Switching
The RØDECaster Video features unique and innovative auto-switching technology that automatically switches between inputs and scenes to simulate an organic switching process, based on when it detects audio on a particular channel. For instance, it can be used to switch between shots of the interviewer and interviewee as each person talks in a video podcast.
RØDECaster App
To set up auto-switching, make sure your RØDECaster Video is connected to the same network as your computer (or directly to it via USB 2), open the RØDECaster App and open the auto switching menu.
Inputs and Scenes
With the auto-switching menu in the RØDECaster App, select one of the Input Buttons (1-6) or Scene Buttons (A-G) to link to an audio source and toggle the setting ‘On’.
Priorities
You can select a priority (low, medium or high) for each input or scene. The higher the priority, the more time an input or scene will be given in the overall production. For instance, with a video podcast or interview, you can set the close-up shots on each speaker as a higher priority than a wide-angle shot of the full conversation.
Audio Links
Click the ‘+’ button under the Audio Links section and you can assign one or more audio inputs to the currently selected input or scene button. Assigning more than one audio input is ideal for camera angles that include multiple microphones (and speakers) in a single shot, allowing your production to dynamically follow the conversation.
Linking a RØDECaster Pro II or Duo
The auto switching feature can be linked to audio channels on the RØDECaster Pro II or RØDECaster Duo. Connect your RØDECaster Pro II or Duo USB 2 port to the RØDECaster Video USB 4 or 5 ports. This is the same processes for passing audio between devices. Once connected, your RØDECaster Pro II or Duo audio channels will appear as options when linking audio.
Relaxed, Neutral or Fast
In the top-right of the Auto Switching menu, you can toggle between Relaxed, Neutral and Fast. These options allow you to tailor the feature to better suit the pacing of your show – if you find that it’s switching too frequently, or not frequently enough, this is how you can fine tune it.
Enabling Auto-Switching
Once you've set up your auto-switching using the RØDECaster App, press-and-hold the 'Auto' button on the RØDECaster Video to enable auto-switching mode. Pressing any of the input or scene buttons will exit this mode and return you to manual operation – much like cruise control in a car.