入门指南
为您的RØDECaster Video供电
将附带的电源连接到USB-C电源端口,并按下旁边的红色按钮以开启您的RØDECaster Video。RØDECaster Video将启动并显示一个二维码,链接到概览视频。点击‘主页’图标,您将进入默认的主页屏幕。
连接网络和更新固件
当您的RØDECaster视频设备连接到网络时——无论是通过Wi-Fi还是Ethernet——您都可以使用同一网络上的计算机通过RØDECaster应用程序远程控制和配置它。网络连接还允许您直接从您的RØDECaster视频设备进行流媒体播放。
首先,通过旋入的方式将外部天线连接到后面板的两侧。如果您希望使用Ethernet,请将Ethernet电缆从RØDECaster视频设备直接连接到您的路由器或其他网络设备。接下来,使用随附的USB电缆将您的RØDECaster视频设备的USB 2端口连接到您的计算机,然后下载、安装并打开RØDECaster应用程序。
从左侧菜单中选择您的RØDECaster视频设备,并按照提示更新到最新固件(如果需要)。现在,导航到高级配置 > 系统 > 网络 > Wi-Fi,并按照提示连接到Wi-Fi网络。
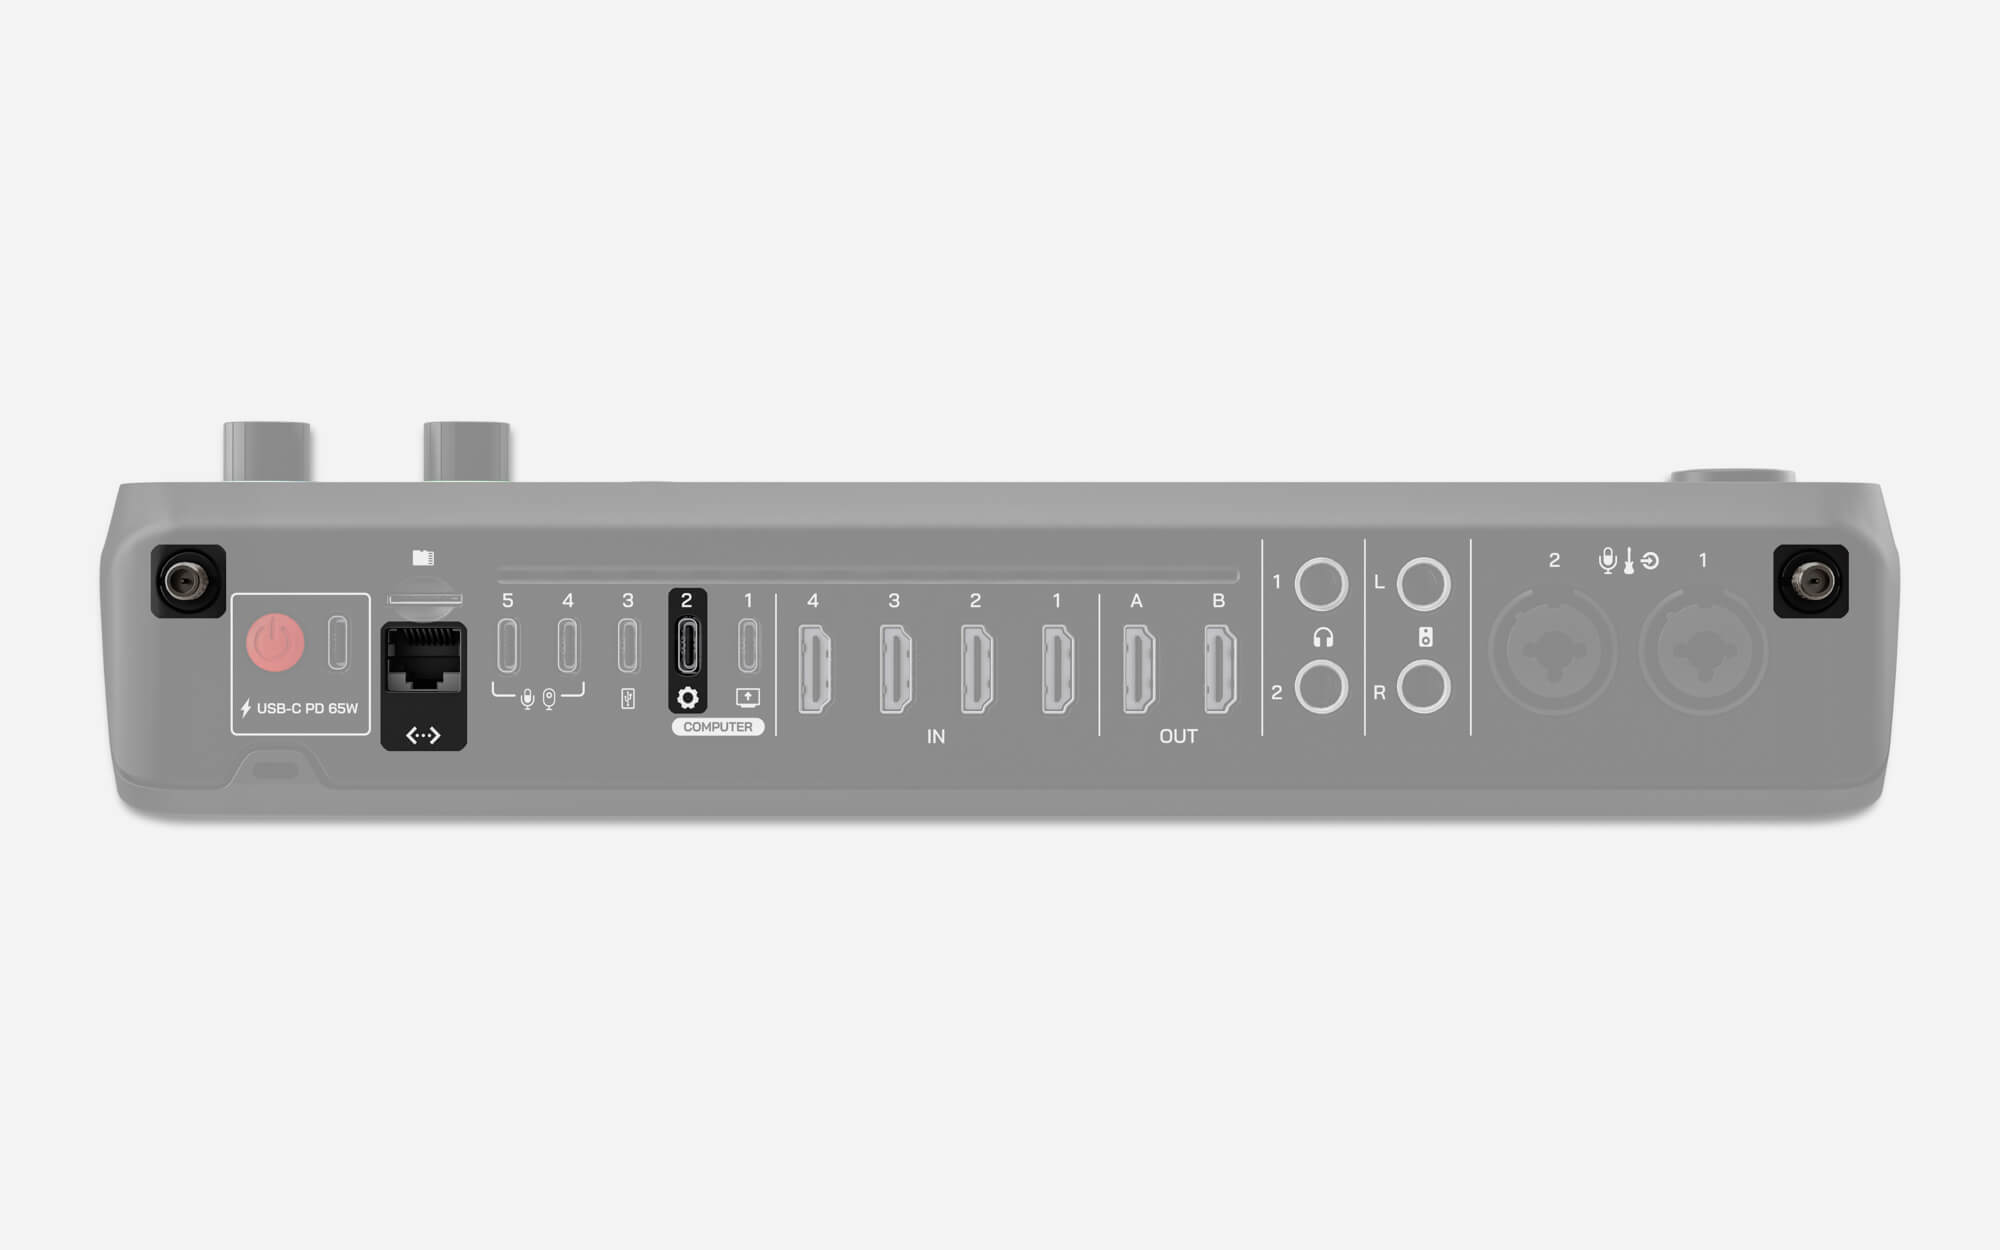
USB-C 输入 (1-3)
USB 1 – 视频和音频接口
USB 1 能够将 RØDECaster 视频的流媒体发送到您的计算机,以及多轨音频接口和额外的“USB 聊天”音频通道。使用附带的 SuperSpeed 电缆将此端口连接到您的计算机,并通过进入设置 > 视频 > USB 1,然后选择以下选项之一来选择要发送的视频输出:节目、预览、多视图或摄像机 1 – 6。
USB 2 – 控制和辅助音频
USB 2 用于控制和配置连接到运行 RØDECaster 应用程序的计算机的 RØDECaster 视频 – 请务必使用 SuperSpeed USB 电缆,例如附带的电缆。它还作为辅助音频接口,并获得 MFi 认证,这意味着它非常适合连接到辅助计算机、iOS 和 Android 手机。您还可以将 USB 1 和 USB 2 同时连接到同一台计算机,以获得更大的灵活性。
USB 3 – USB 存储
USB 3 用于连接 USB 大容量存储设备,如外部硬盘和 U 盘。您的视频和音频将在此处录制,既可以是单个文件,也可以是多轨文件。
注意
RØDECaster 视频要求存储设备为 exFAT 文件格式。您可以通过导航到 设置 > 存储 > USB 存储 并点击“擦除”来格式化您的驱动器。
USB-C 输入(4 和 5)
RØDECaster Video 具有 2 个多用途 USB-C 端口(USB 4 和 5),可用于连接 USB 视频设备,如兼容的网络摄像头、采集卡,以及 RØDE USB 音频设备,如 RØDECaster Pro II 和 Duo,以及一系列 RØDE USB 麦克风,包括NT-USB+、PodMic USB等。默认情况下,USB 4 和 5 将分配给输入按钮 5 和 6。
USB 视频设备
RØDECaster Video 支持使用 UVC(USB 视频类)标准的网络摄像头和类似的 USB 视频设备。连接后,RØDECaster Video 将为 UVC 设备供电,并将其识别为输入,使您可以像使用 HDMI 输入一样使用它。
注意
RØDECaster Video 仅支持能够提供至少1080p24 UVC视频流的未压缩USB视频设备。未压缩格式通常指定为YUV或NV12,而不支持的(压缩)格式通常指定为MP4或H.264。欲了解更多信息,请查看我们的USB视频设备兼容性文章。
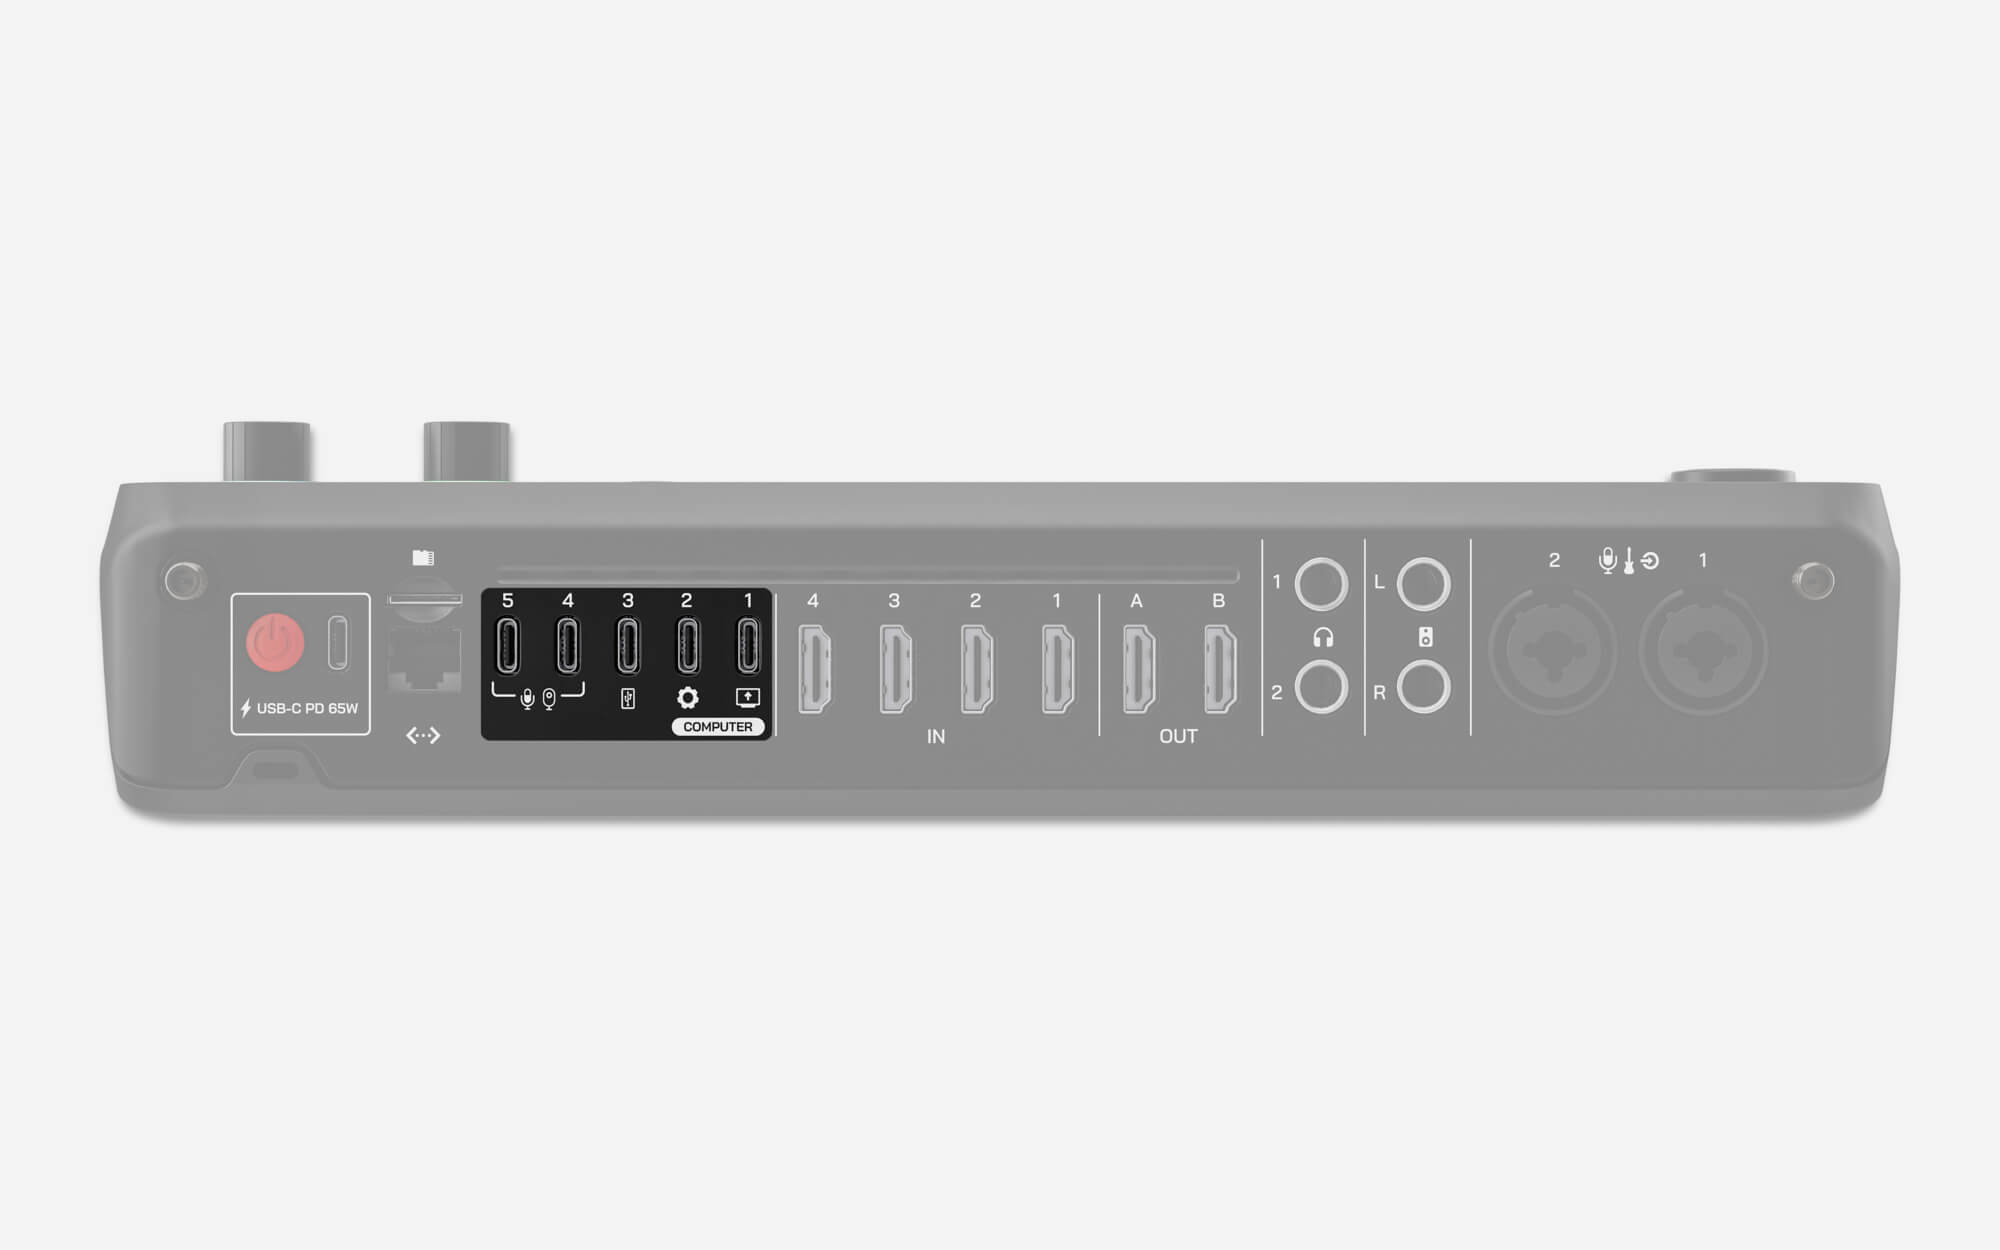
HDMI输入和输出
RØDECaster Video具有4个标记为1-4的HDMI输入和2个标记为A和B的HDMI输出。
HDMI输入(1-4)
这4个HDMI输入用于连接摄像机和其他视频设备。默认情况下,输入1-4将分配给前4个输入按钮。RØDECaster Video接受任何能够输出1920x1080视频流的视频源——如果您的视频设备能够生成此分辨率,系统将自动请求。
HDMI输出(A和B)
这两个HDMI输出用于连接显示器以监控和输出您的制作。导航到设置 > 视频 > HDMI A或HDMI B,以选择要发送到每个输出的视频源(节目、预览、多视图或摄像机1 – 6)。
注意
如果通过您的RØDECaster视频从某个HDMI视频源获取的图像未显示,请检查视频源(摄像机、采集卡等)的分辨率,以确保其支持1920x1080输出。
Network Video Inputs and Output
Your RØDECaster Video can both receive NDI® video from other devices on your network and send its own NDI video stream. Simply connect your RØDECaster Video to your local network with an ethernet cable to access these features.
NDI Inputs
There are 4 network input sources available to connect cameras or other devices. This can be done on the hardware by using the Inspect mode. Once in Inspect mode, select an input button then select the device type, then use the encoder to scroll down and select one of the Network options. A list of NDI devices on your network will be displayed as options to assign to the button. This process is also available in the RØDECaster app Scene Builder under Input Source.
NDI Output
The NDI output can be enabled to cast a video stream over the local network. This allows the RØDECaster Video to appear as an input option to other devices, such as software or hardware decoders. This can be enabled on the hardware by selecting Settings > Video > NDI, then, choose the feed you would like to cast. This can also be enabled by using the RØDECaster app by selecting Device Configuration > Video > Outputs, then select an option from the NDI drop-down list.
Using the RØDECaster Video to control PTZ cameras
With the RØDECaster Video you also have full Pan, Tilt, Zoom and Focus control of compatible PTZ cameras on your local network.
To enable PTZ control for compatible cameras, simply select the PTZ controls from the dropdown menu in ‘Scene Builder’ and enable PTZ to remotely control your device. You can save presets directly to the camera input, which you can then assign in a scene to recall the preset with the touch of a button.
This can be used to frame shots and create dynamic camera angle adjustments for each scene you create.
Adding iPhone Cameras Using RØDE Capture
With the NDI feature, you can connect your iPhone directly to your RØDECaster Video and add its cameras into your production using the free RØDE Capture app. This means you can use your iPhone's main camera, or use both the main and selfie cameras as separate video sources, and do so without any cables connected to your phone.
To enable this feature:
- Ensure your iPhone is on the same network as your RØDECaster Video. Your RØDECaster Video needs to be connected to the network physically via Ethernet, but your iPhone can be connected either via Wi-Fi (to the same network) or via Ethernet using an Ethernet adaptor
- Open the settings arrow in RØDE Capture and toggle "NDI Cast" on
- If you only want to use your main camera, ensure "Dual Cam" mode is toggled off. To send both front and rear cameras, enable Dual Cam mode (with either the "PiP" or "Split" setting) and then in Capture's settings, choose "Separate" for two discrete feeds, or "Combined" to have both cameras in a single feed.
- When selecting the input source on your RØDECaster Video (either on the hardware or via RØDECaster App), choose Network > RØDE Capture Stream A. There will also be a 'Stream B' available if you are in the Separate Dual Cam mode.
.png)
Note
You can rename your RØDE Capture NDI streams by heading to your iPhone's Settings app, then Apps > RØDE Capture and editing the "NDI Device Name". Here, you can also adjust the NDI Stream Codec.
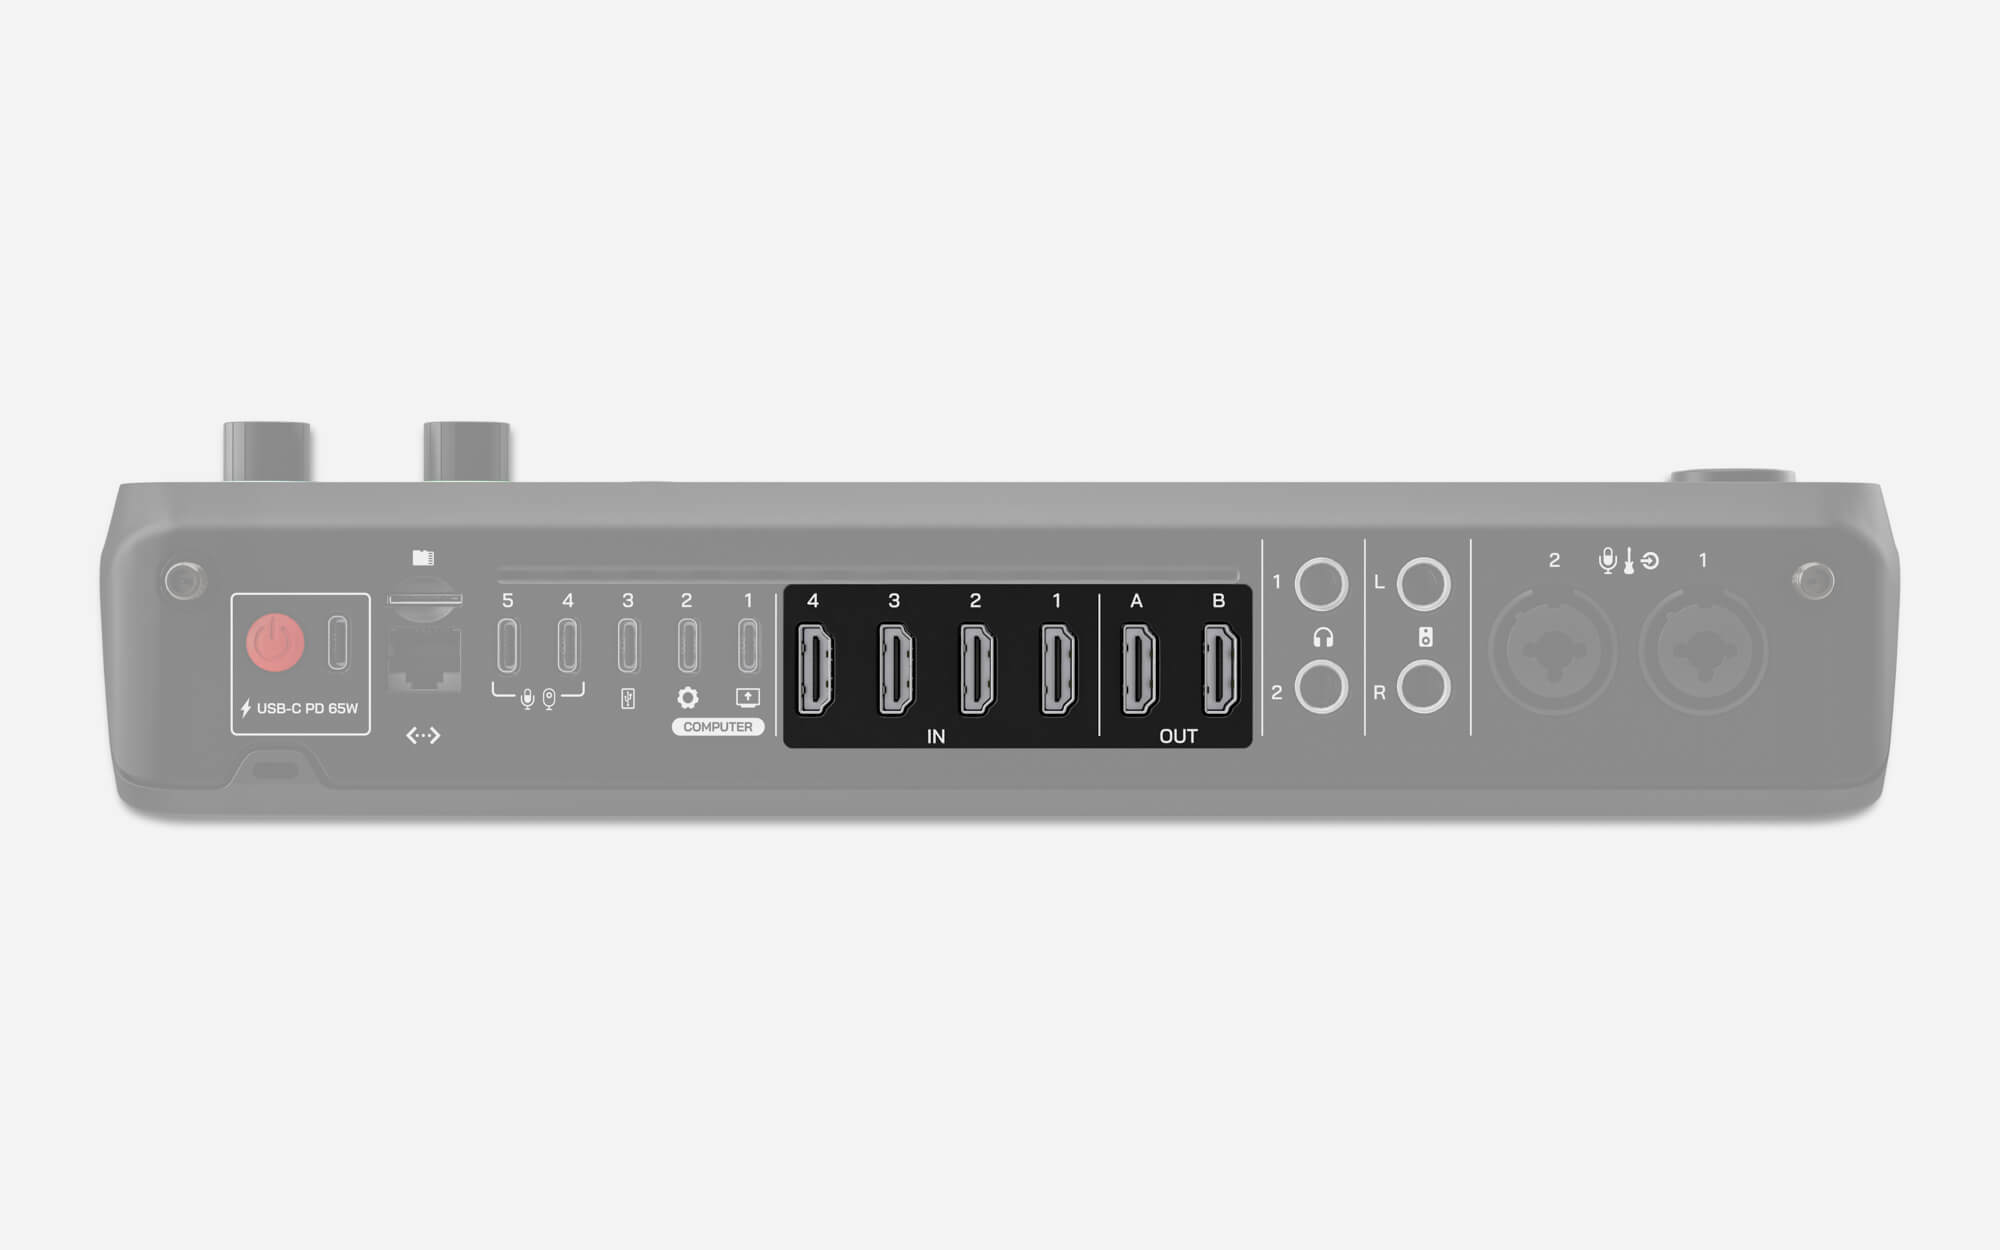
音频输入和输出
除了其视频切换能力,RØDECaster Video 还配备了一个完全集成的专业音频接口。
组合输入
RØDECaster Video 配备了一对高质量的 Neutrik™ 组合插孔,可用于连接麦克风、乐器和具有 XLR 或 1/4 英寸连接的线路级设备。如果您的麦克风需要幻象电源,请阅读 音频混音器 部分,了解如何在任一组合输入上启用此功能。
耳机和扬声器输出
在 RØDECaster Video 的背面有两个输出,用于连接两对耳机,例如 NTH-100。如果您的耳机有 3.5mm 连接器,请使用 1/4 英寸转 3.5mm 适配器,例如 RØDE HJA-4 将其连接到设备。
在 RØDECaster Video 的背面还有两个平衡的 1/4 英寸线路输出,用于连接一对扬声器,标记为左和右。
要调整耳机 1 或 2 或扬声器的输出音量,请按下音频编码器,直到耳机 1 或 2 或扬声器图标上方的 LED 灯亮起,然后旋转编码器以调整音量。
microSD 卡槽
RØDECaster 视频 microSD 卡槽用于存储在您的制作中使用的视频、图像、图形和声音。
注意
我们建议使用UHS-I级或更高等级的卡,写入速度至少为30MB/s。

输入按钮 (1 – 6)
底部标有1-6的按钮是输入按钮,与可以同时分配在RØDECaster Video上的6个可能输入源相关联。当输入源分配给这些按钮时,它们会亮白色;当它们当前处于直播状态时(节目输出),会亮红色;当它们准备好发送直播时(预览输出),会亮绿色。
当一个按钮分配了输入源时,按下该按钮将在直播节目源中切换该输入(如果处于即时模式)或切换到预览源(如果处于工作室模式)。
为输入按钮分配输入源
默认情况下,HDMI 1-4将分配给前四个输入按钮,USB 4和5将分配给输入按钮5和6,但您可以将任何输入分配给这6个按钮中的每一个。操作步骤如下:
- 按下检查按钮
- 选择您希望调整的输入按钮
- 点击屏幕上的输入选择框(这将显示当前分配的输入)
- 旋转编码器以浏览输入,并点击编码器确认选择
- 完成分配后,再次按下检查按钮
场景按钮(A – G)
七个场景按钮中的每一个都可以通过不同的输入源、图像、视频、图形叠加和键控布局配置进行完全自定义,使您能够快速切换到预先配置的设置。场景可以直接在RØDECaster Video上快速创建,或者使用RØDECaster App Scene Builder进行更高级的自定义。
淡出至黑按钮
按下淡出至黑按钮(位于输入按钮旁边)将过渡到空白屏幕,覆盖当前的节目输出,并淡出任何正在播放的音频。如果您需要快速切断直播或希望通过淡出至黑来结束节目或片段,这将非常有用。淡出的时间由您的过渡时间设置。
注意
您可以通过按下“检查”按钮,然后按“淡入黑色”按钮来禁用此功能,并切换该功能的开启或关闭状态。

显示屏和编码器
触摸屏显示器及其上方的编码器用于导航和调整RØDECaster Video的设置和控制。点击图标并旋转编码器以导航菜单、选择项目、确认设置、翻页或返回主页。
编码器周围的LED环在可以用于导航菜单时会亮白色,在可以用于调整屏幕设置时会亮绿色。
媒体按钮
媒体按钮可访问您加载到microSD卡上的视频、图像和声音,并将其分配给媒体按钮。按下时,媒体按钮会亮紫色,场景按钮(A – G)的功能会改变以表示分配的媒体。任何分配了媒体的按钮会亮紫色,而没有分配的按钮则不亮。
您可以像与输入按钮和场景按钮交互一样与这些按钮交互,这意味着您可以切换到视频、图像和声音,并在场景中使用它们。
再次按下媒体按钮以退出此模式——场景按钮将恢复其选择场景的默认功能。
注意
视频文件不会在预览画面中播放,但一旦切换到节目画面就会开始播放。

Overlay Button
The Overlay button provides access to the images you have loaded onto your microSD card and assigned to an Overlay button. When pressed, the Overlay button will light blue and Scene Buttons (A – G) will alter their function to represent assigned graphic overlays. Any buttons that have graphic overlays assigned to them will be lit blue, and those with no assignments will be unlit.
Pressing one of these buttons will enable the corresponding graphic overlay, showing it over the top of your existing feed in both Program and Preview. Overlays will remain on-screen until the button is pressed again, allowing you to switch inputs, scenes and media without them disappearing.
While you can use JPG files for simple overlays, using PNG files with a transparency layer allow you to maintain that transparency in your show. This makes them ideal for use as lower-thirds, logos, watermarks, and other such elements.
Press the Graphic Overlay Button again to exit this mode – the Scene Buttons will return to their default function of selecting scenes.
注意
一次只能激活一个图形叠加层。
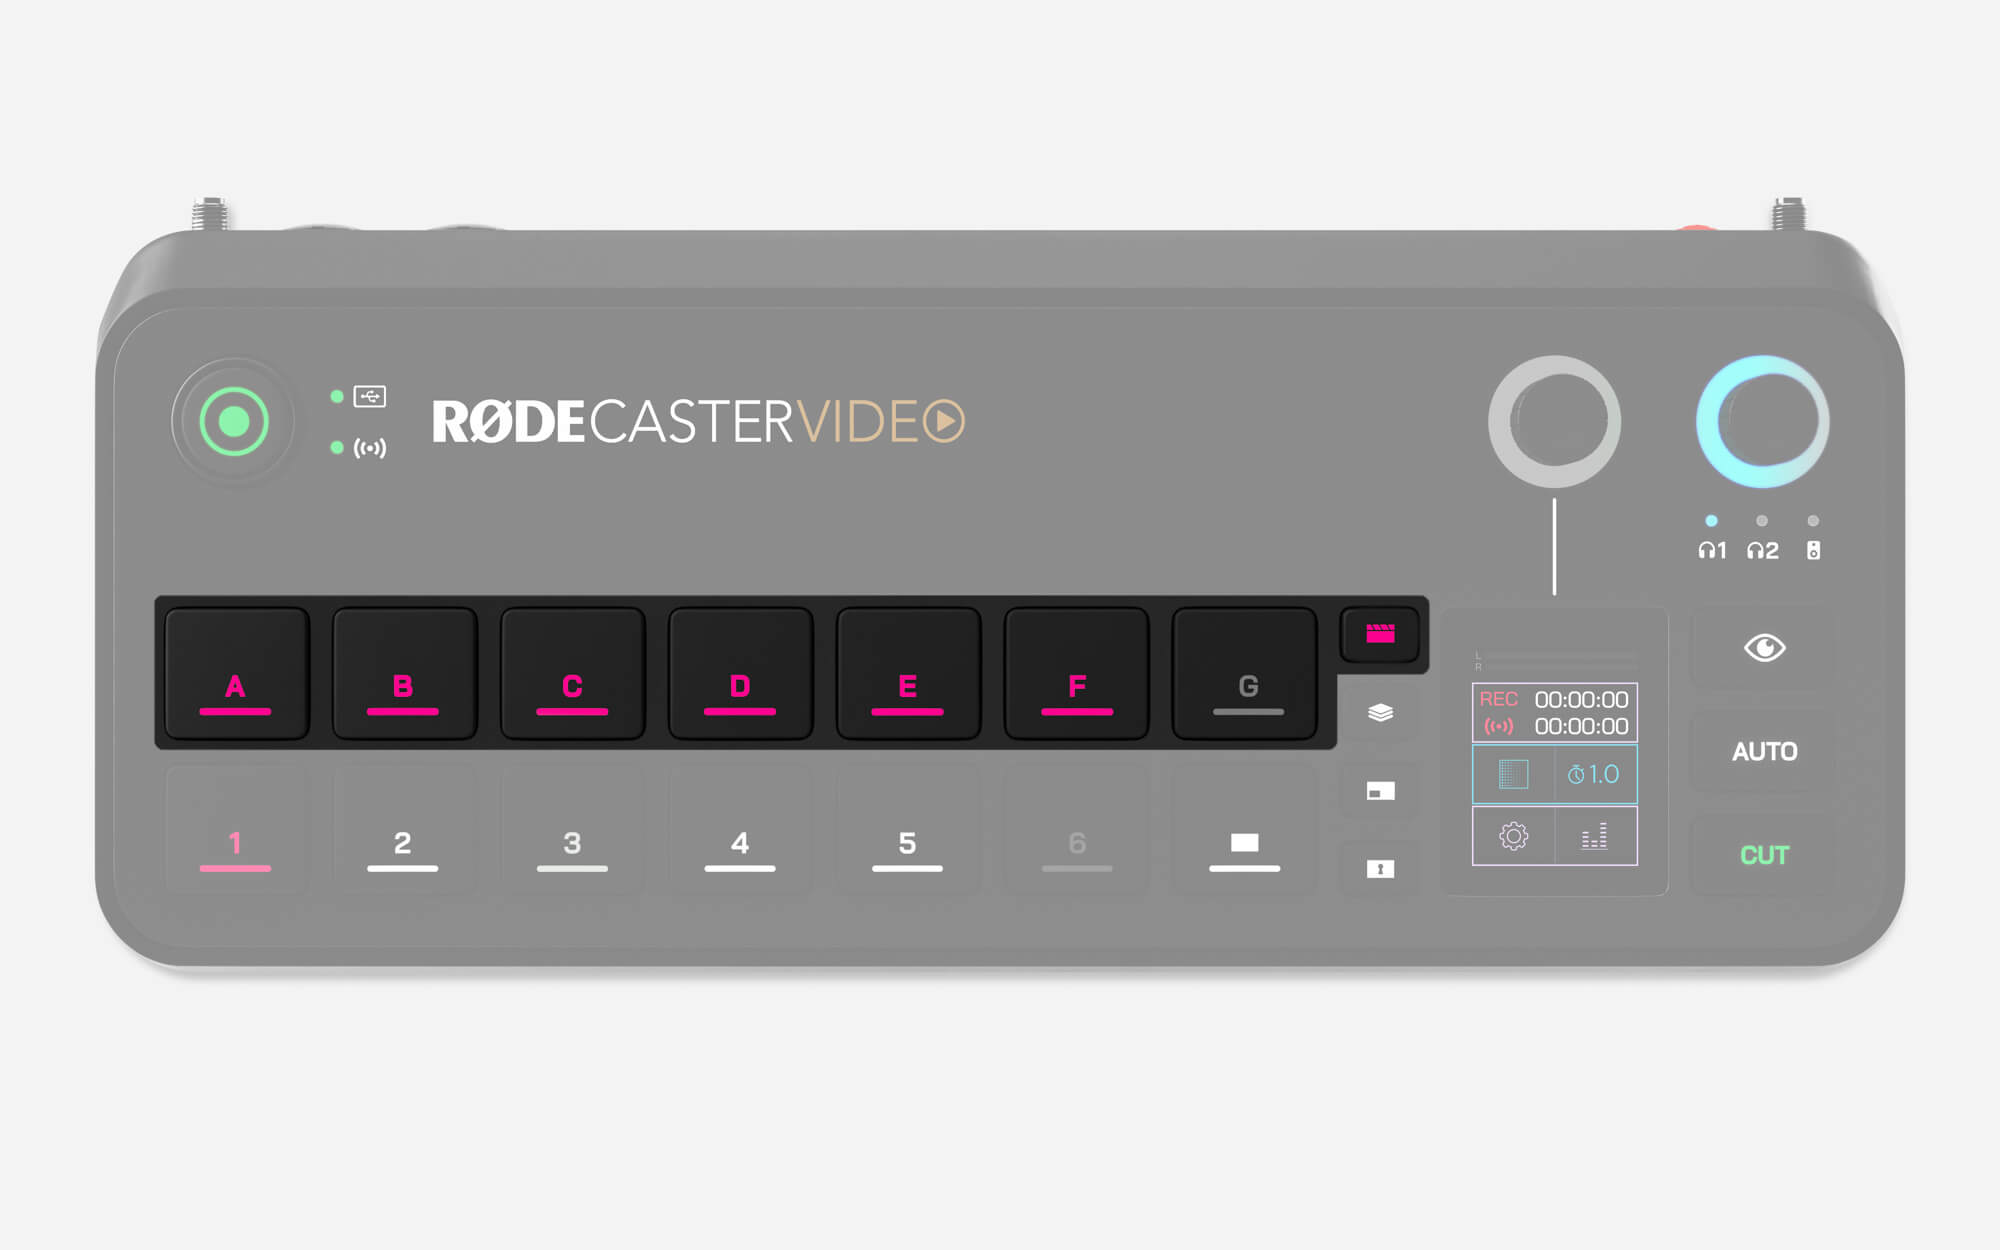
多源按钮
此按钮允许您快速创建输入和媒体的多源排列,例如画中画或分屏配置。您可以在制作过程中即时使用这些配置,也可以将其保存到空的场景按钮以供日后使用。
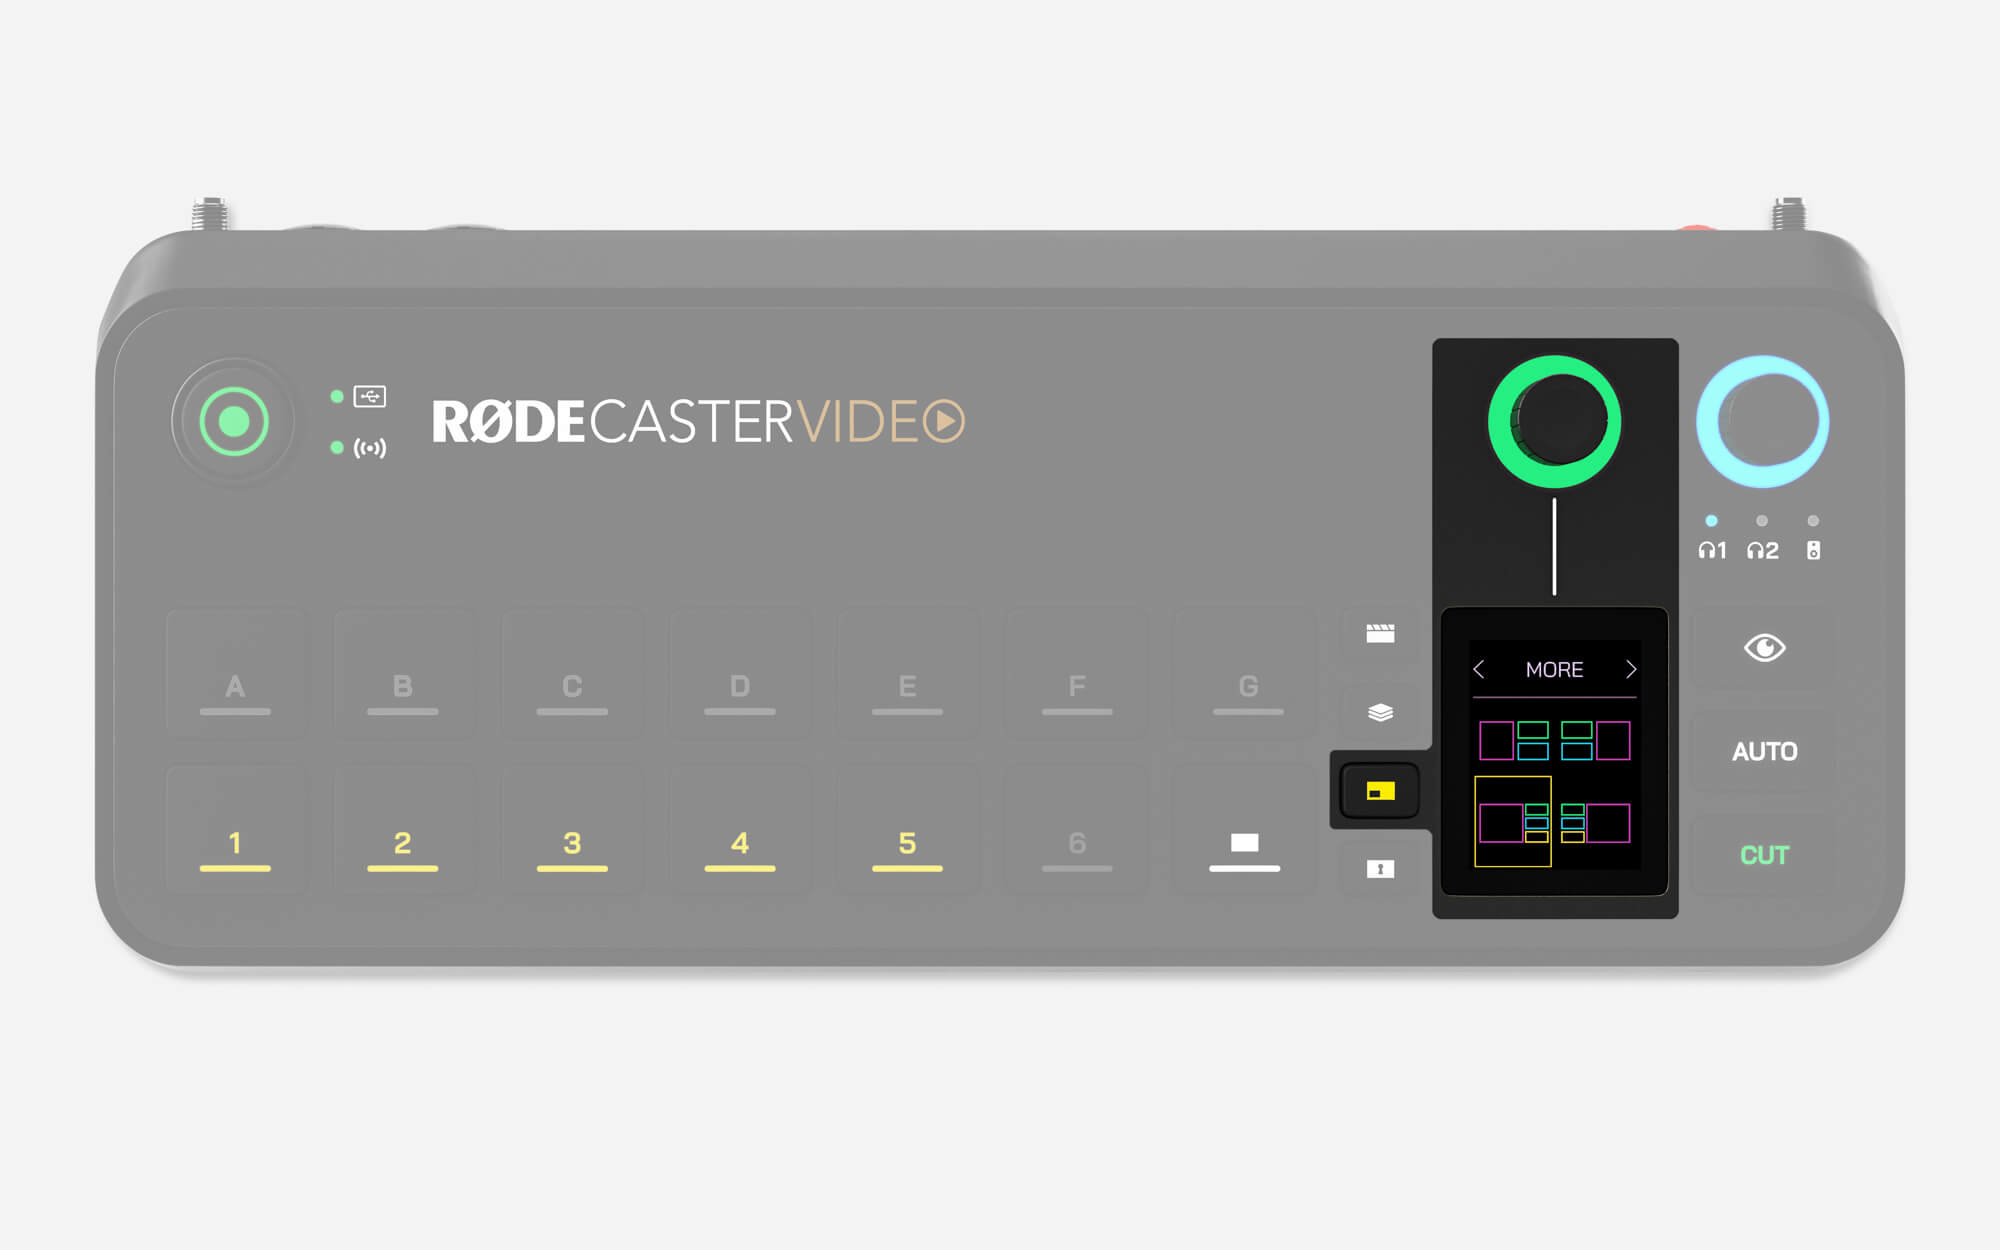
按下时,多源按钮将亮黄色,您将在屏幕上看到布局菜单。点击此菜单的顶部部分,您可以使用编码器浏览各种预设布局,然后点击编码器进行选择。选择后,您可以使用编码器循环浏览多源布局的每个框架,并按输入或媒体按钮将其分配给每个框架。
配置好多源布局后,按下绿色勾号以确认。在工作室模式下,此多源布局将应用于预览视频流,而在即时模式下,它将应用于节目输出。如果您希望将此布局保存为场景,只需长按空场景按钮即可。
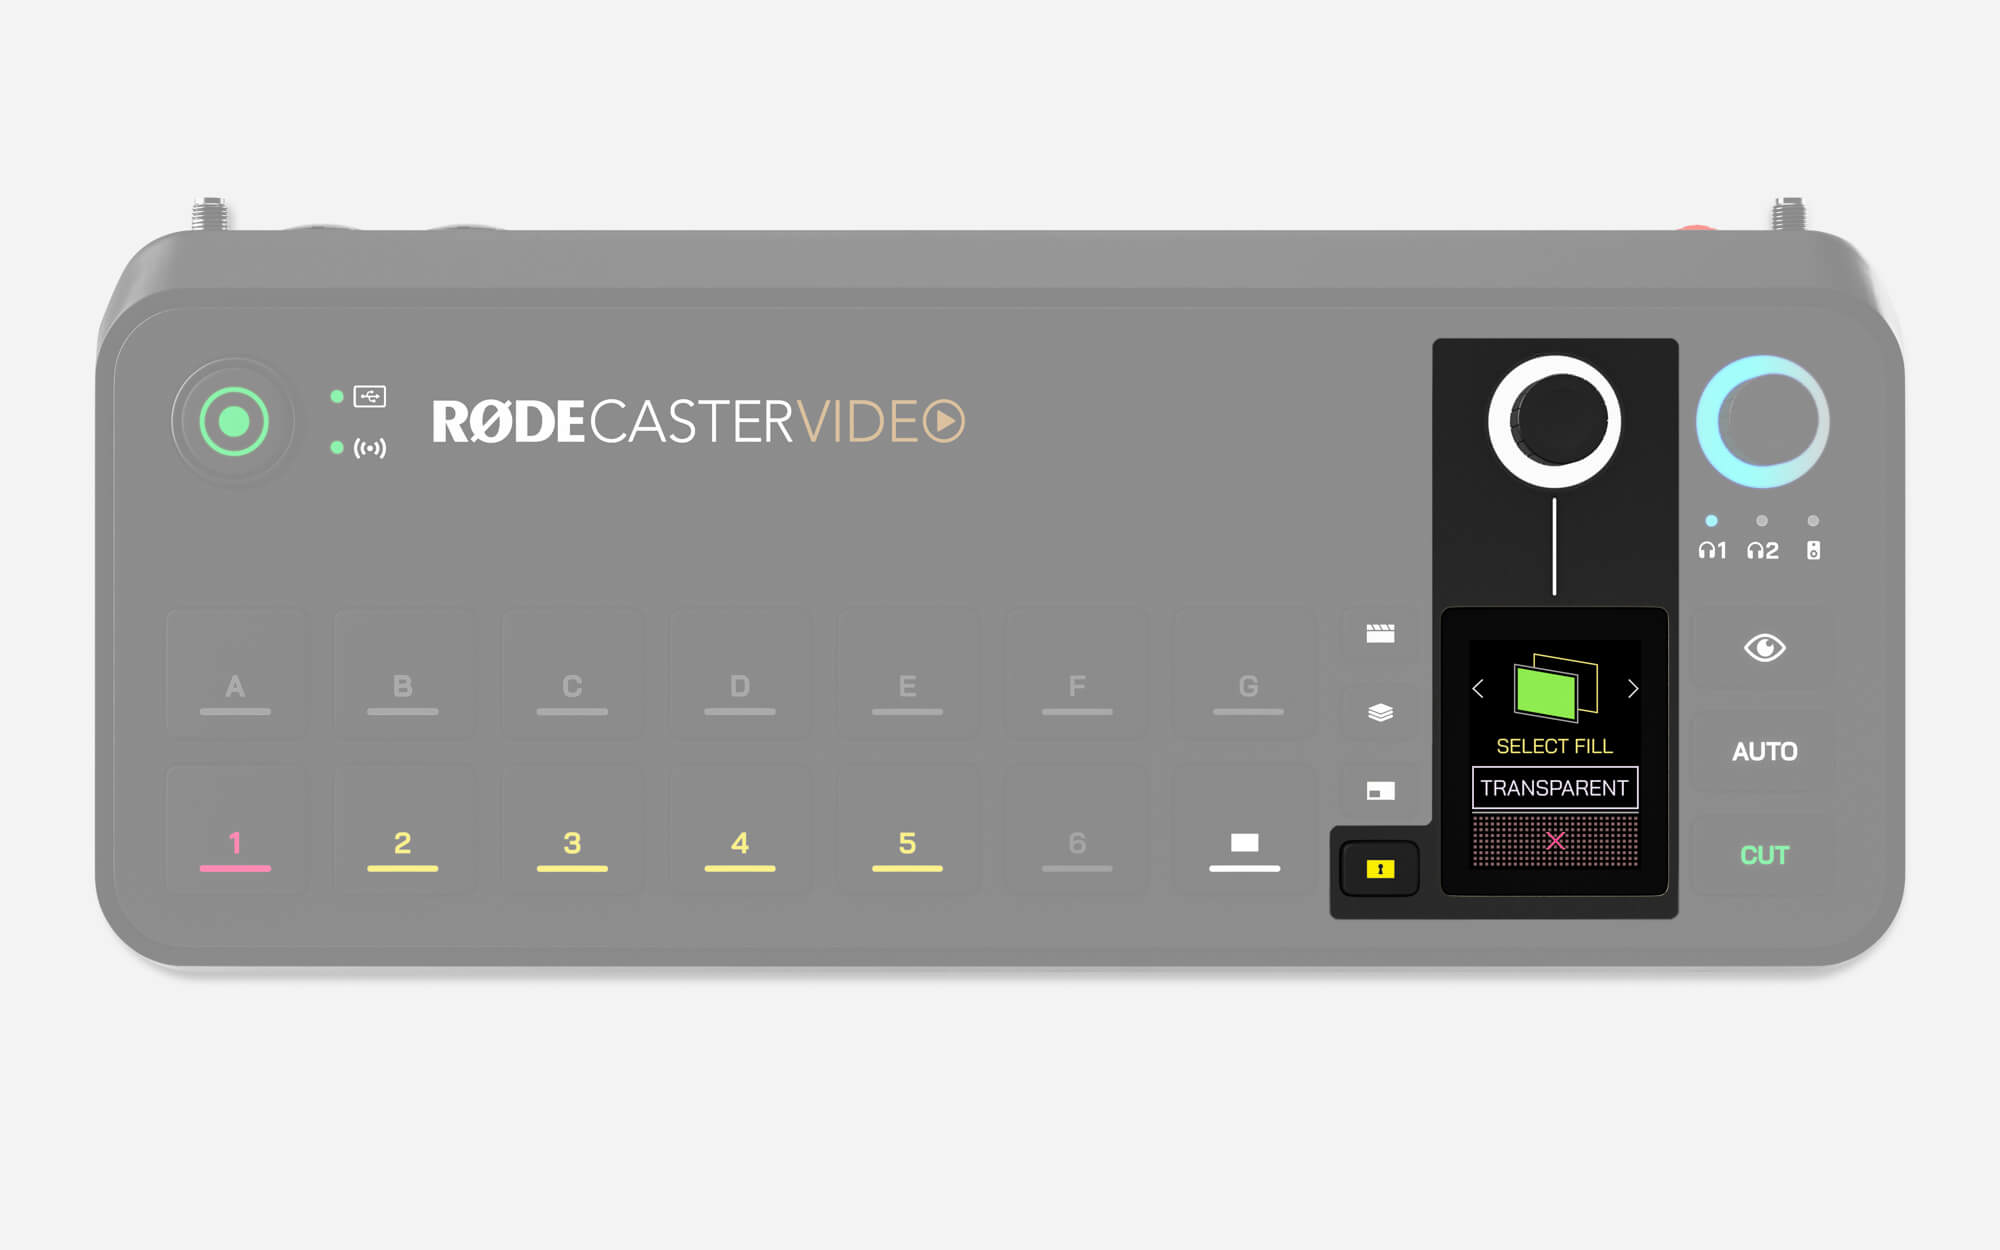
Keying Button
The Keying button automatically applies a chroma key (green screen or blue screen) or a luma key to the Preview feed in Studio mode, or the Program feed in Instant mode, allowing you to place your subject in front of images, videos, and even other input sources.
Press the Input button you wish to apply the key to and then press the Keying button. Now, you can use the encoder to select either green or blue screen, and then press another input or media button to select it as the replacement background. To select no background (transparent), simply tap the screen instead of pressing a button – this allows you to use this keyed input in scenes.
Once you apply a key to an input source, this setting will be automatically linked every time you use this input source – you’ll need to disable keying for the source to un-link it.
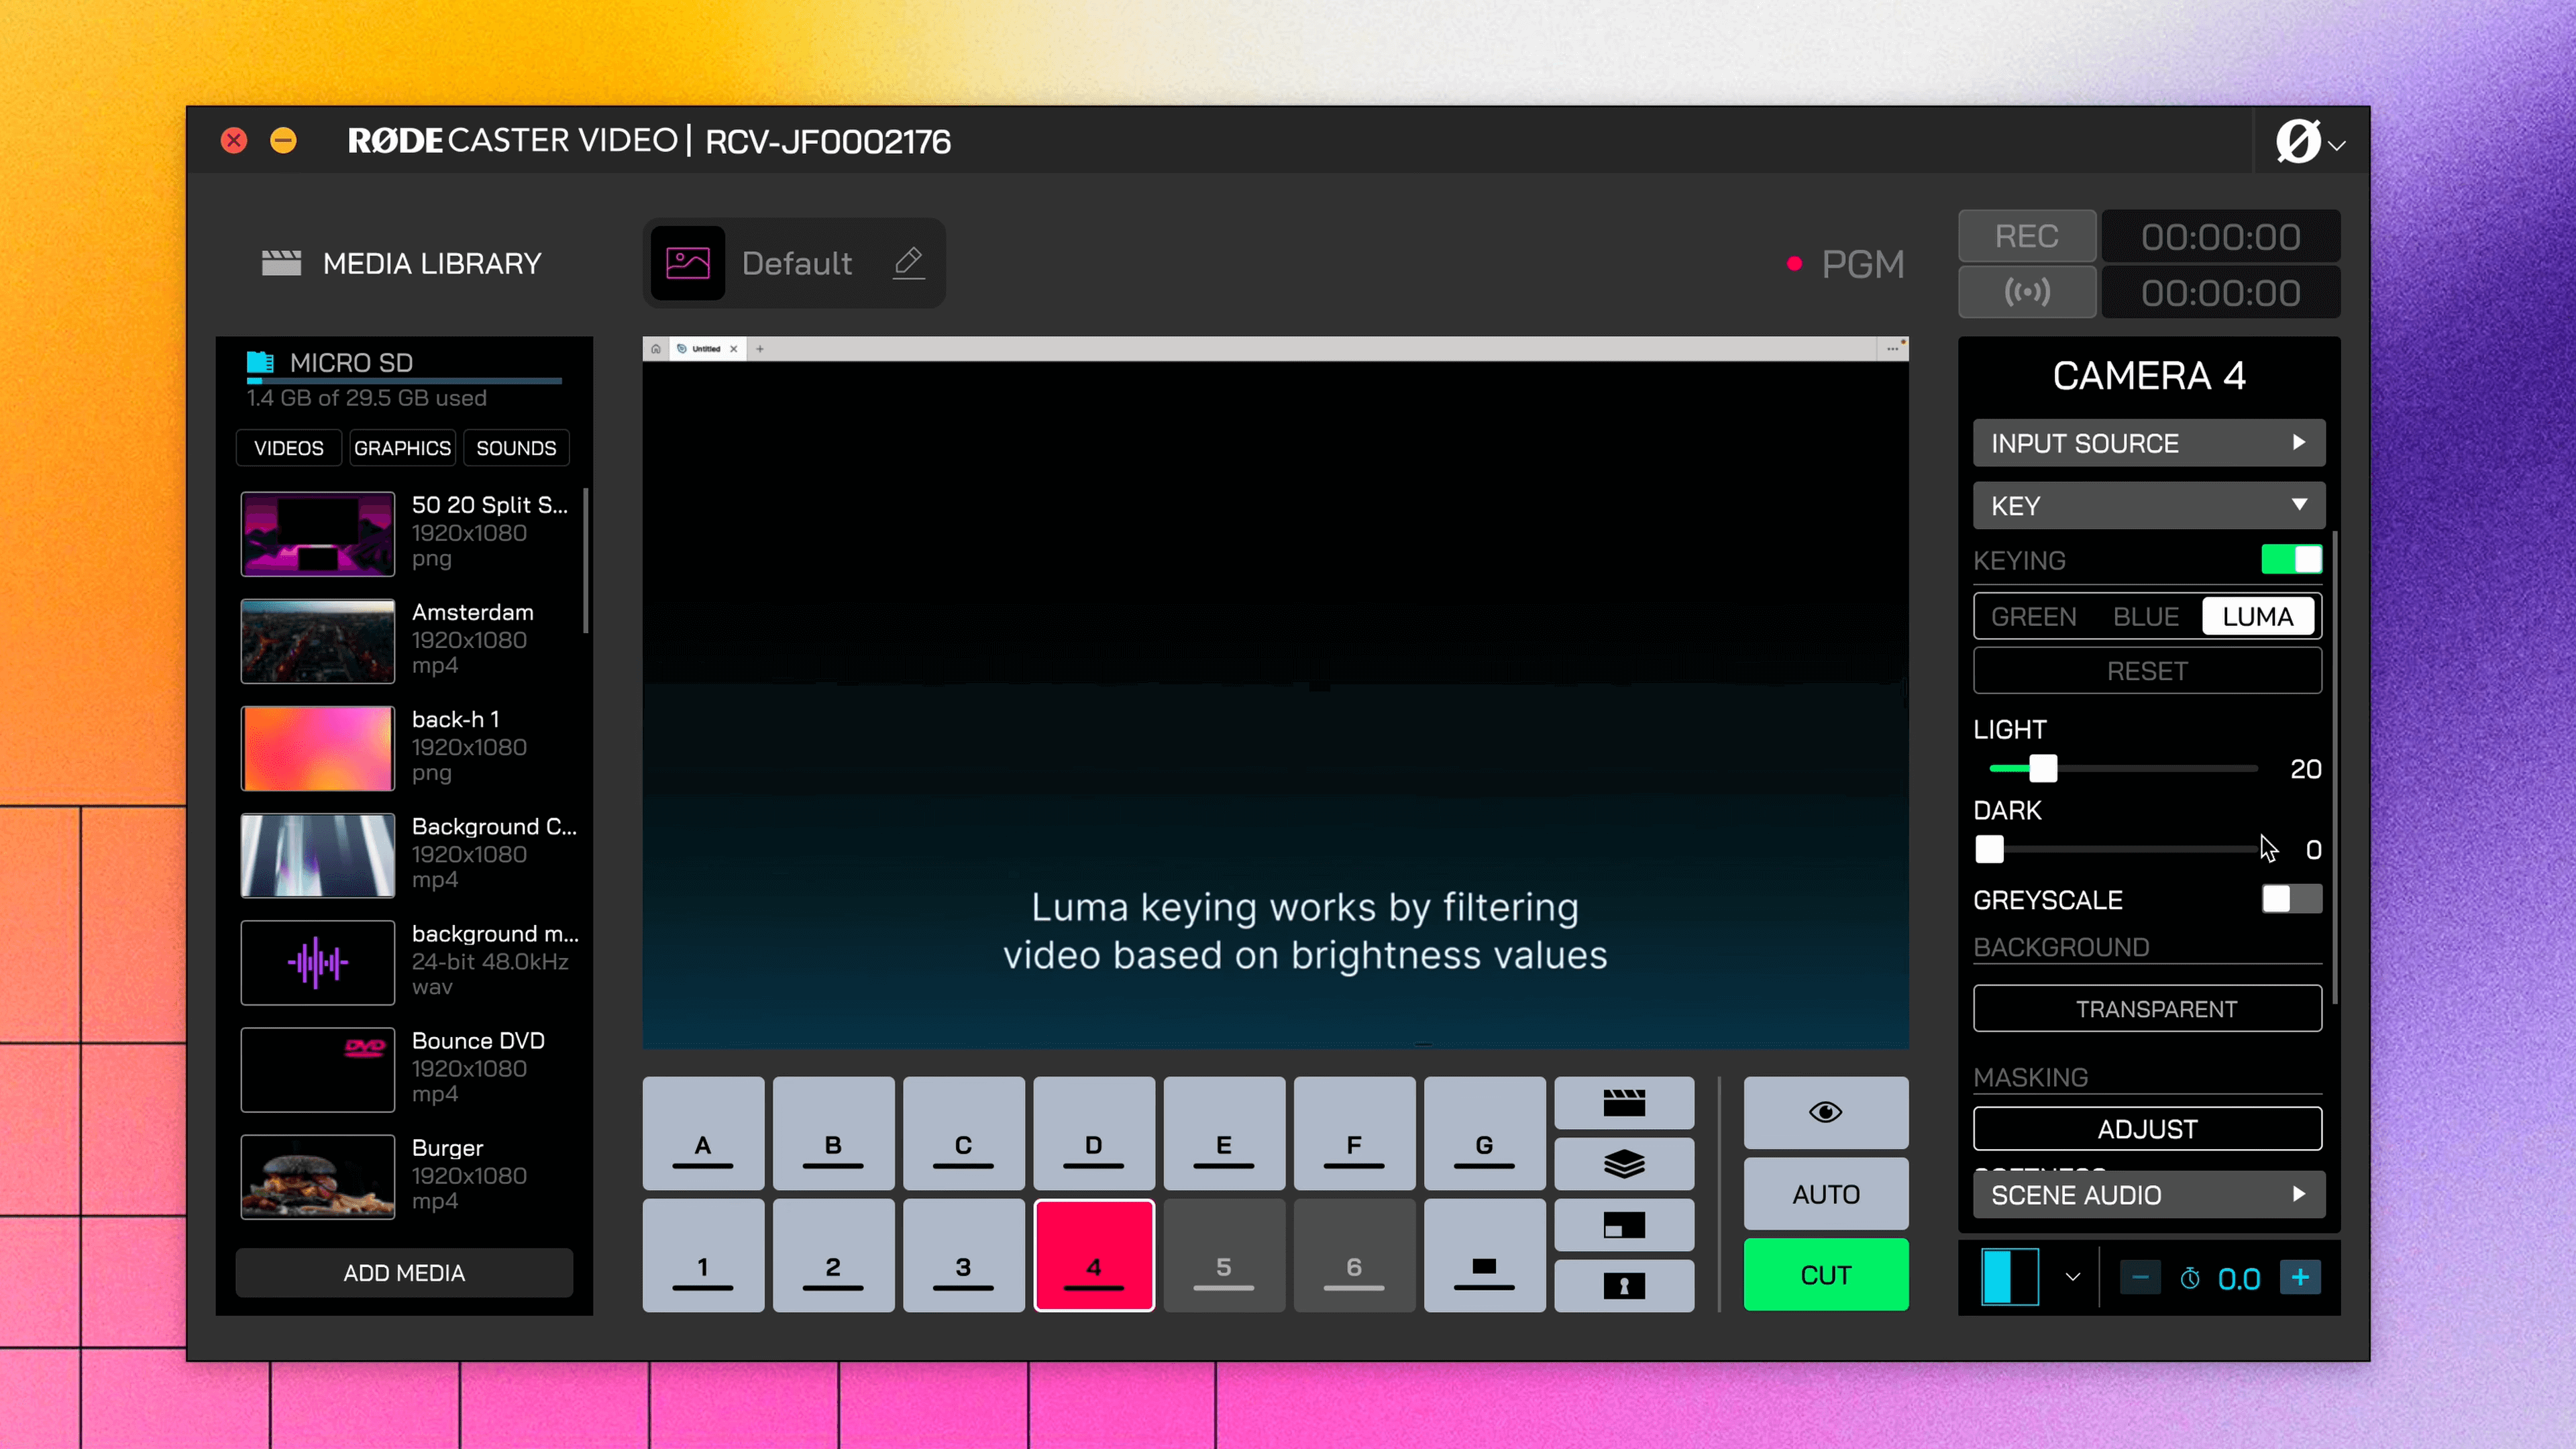
Advanced Keying
For more advanced set-ups, you can use the Luma Key and Key Mask features to create overlays and visual effects.
The Luma Key filters video based on brightness values, which helps remove black backgrounds from input video sources.
Then the Key Mask gives you precise control over your keying area by letting you crop the frame to force transparency in specific regions that may not fully cover the camera frame.
For this keyed section, you also have control of the softness and shadow.
The Softness control allows you to smooth out the edges of the mask for a more natural blend. Then the Shadow control, you can darken the inside of the masked area to improve contrast and allow important visuals like white text stand out clearly.
Pro Tip
As the Luma Key works on a gradient, the darker the area, the more transparent that area will appear.
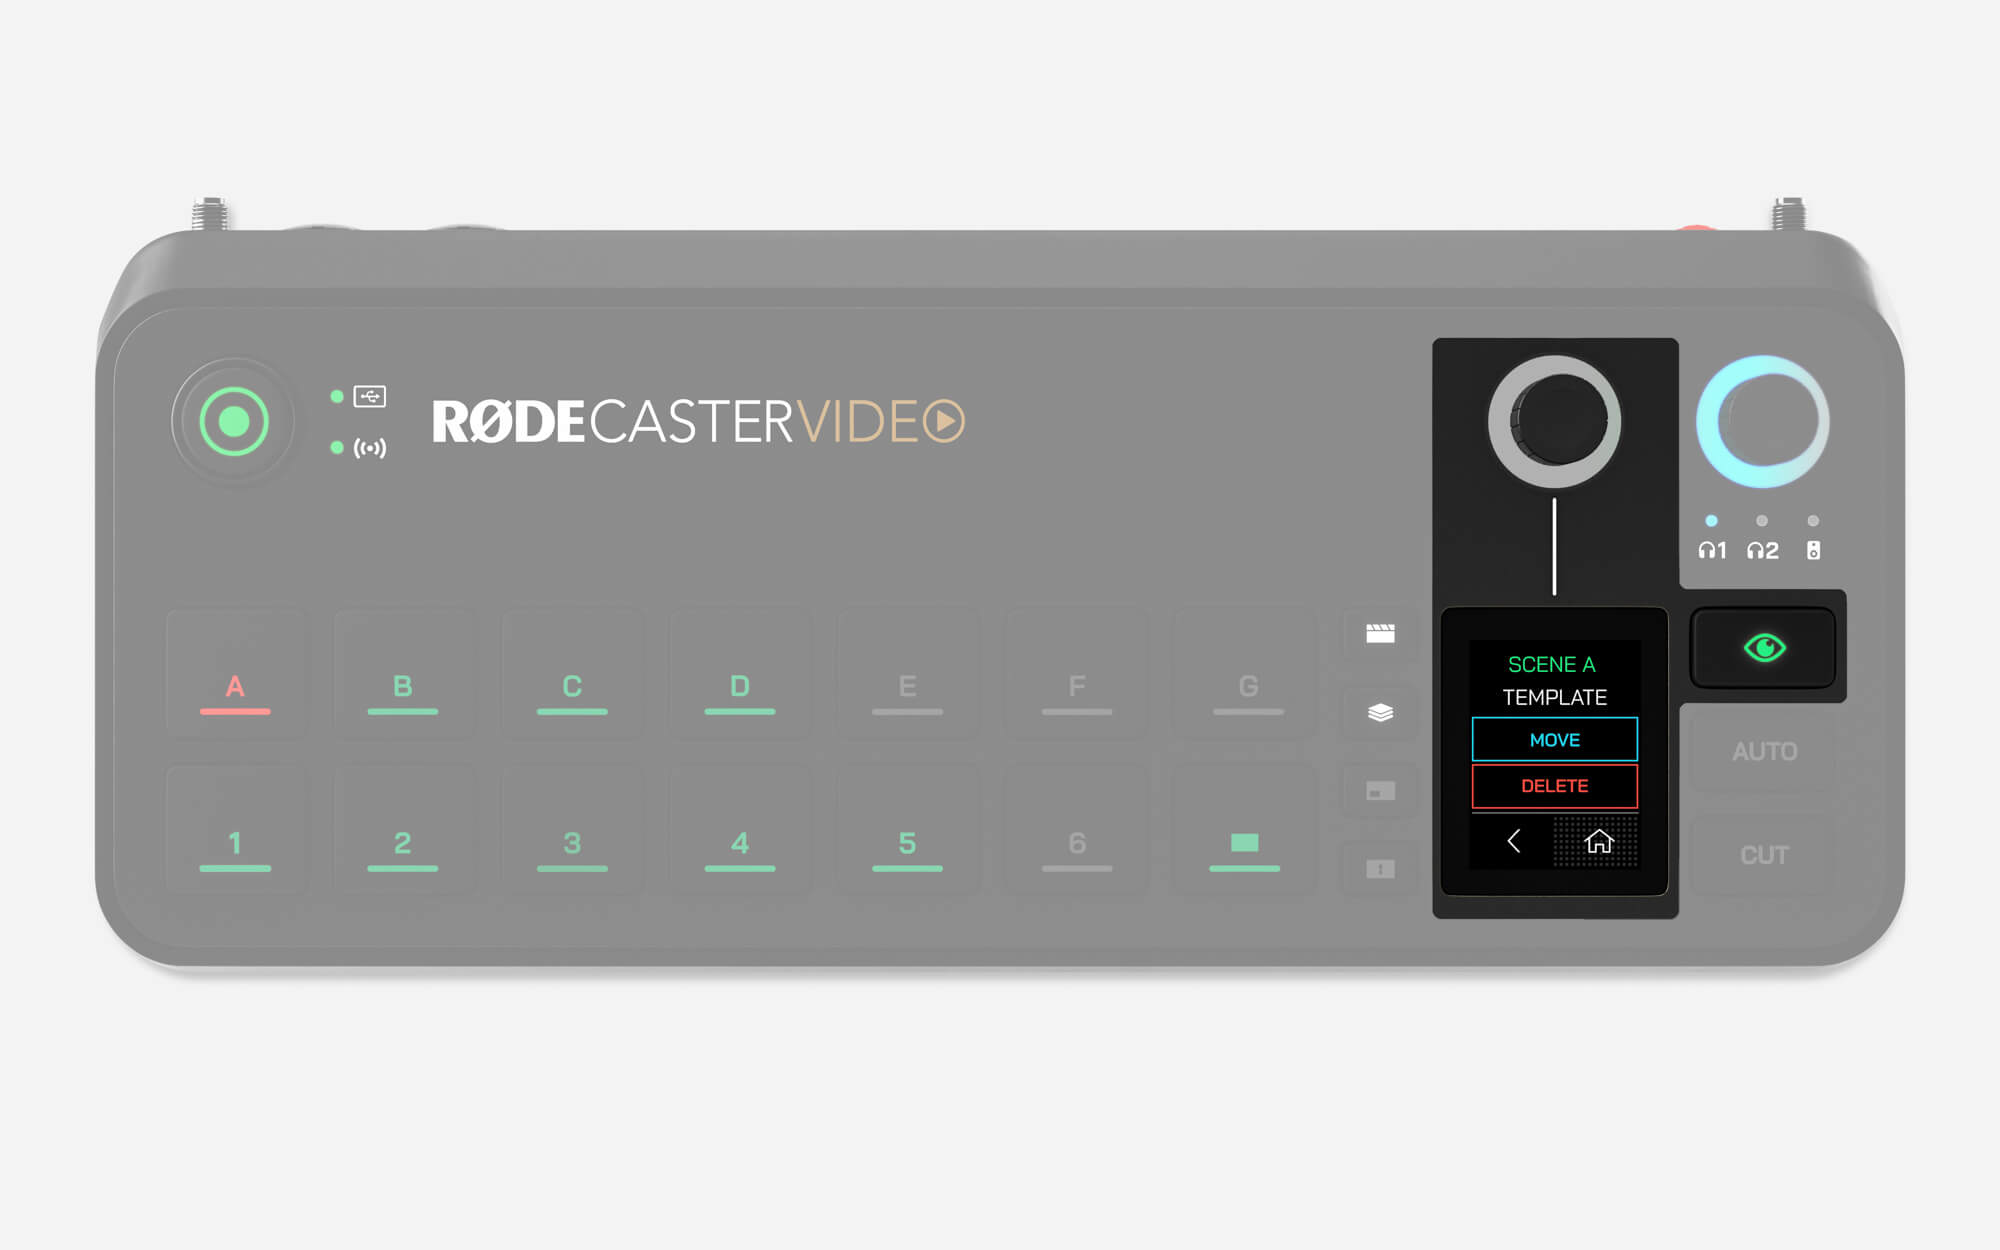
检查按钮
检查按钮允许您在不切换或提示的情况下安全查看输入、场景、媒体或覆盖的相关信息,并调整其设置。在即时模式中,它还允许您将任何输入、场景、媒体或覆盖发送到预览输出,让您在直播前安全查看。当按下时,检查按钮将亮起绿色,并保持这种状态,直到您再次按下按钮退出模式。
在检查模式下,按下以下按钮时可以查看和执行以下信息和操作:
输入按钮:显示连接输入的分辨率、帧率和色彩空间信息,并允许您更改分配给按钮的输入源。
场景按钮:允许您删除或移动场景到另一个场景按钮。
媒体和覆盖按钮:显示文件名、缩略图预览,并允许您删除或移动文件到另一个媒体或覆盖按钮。
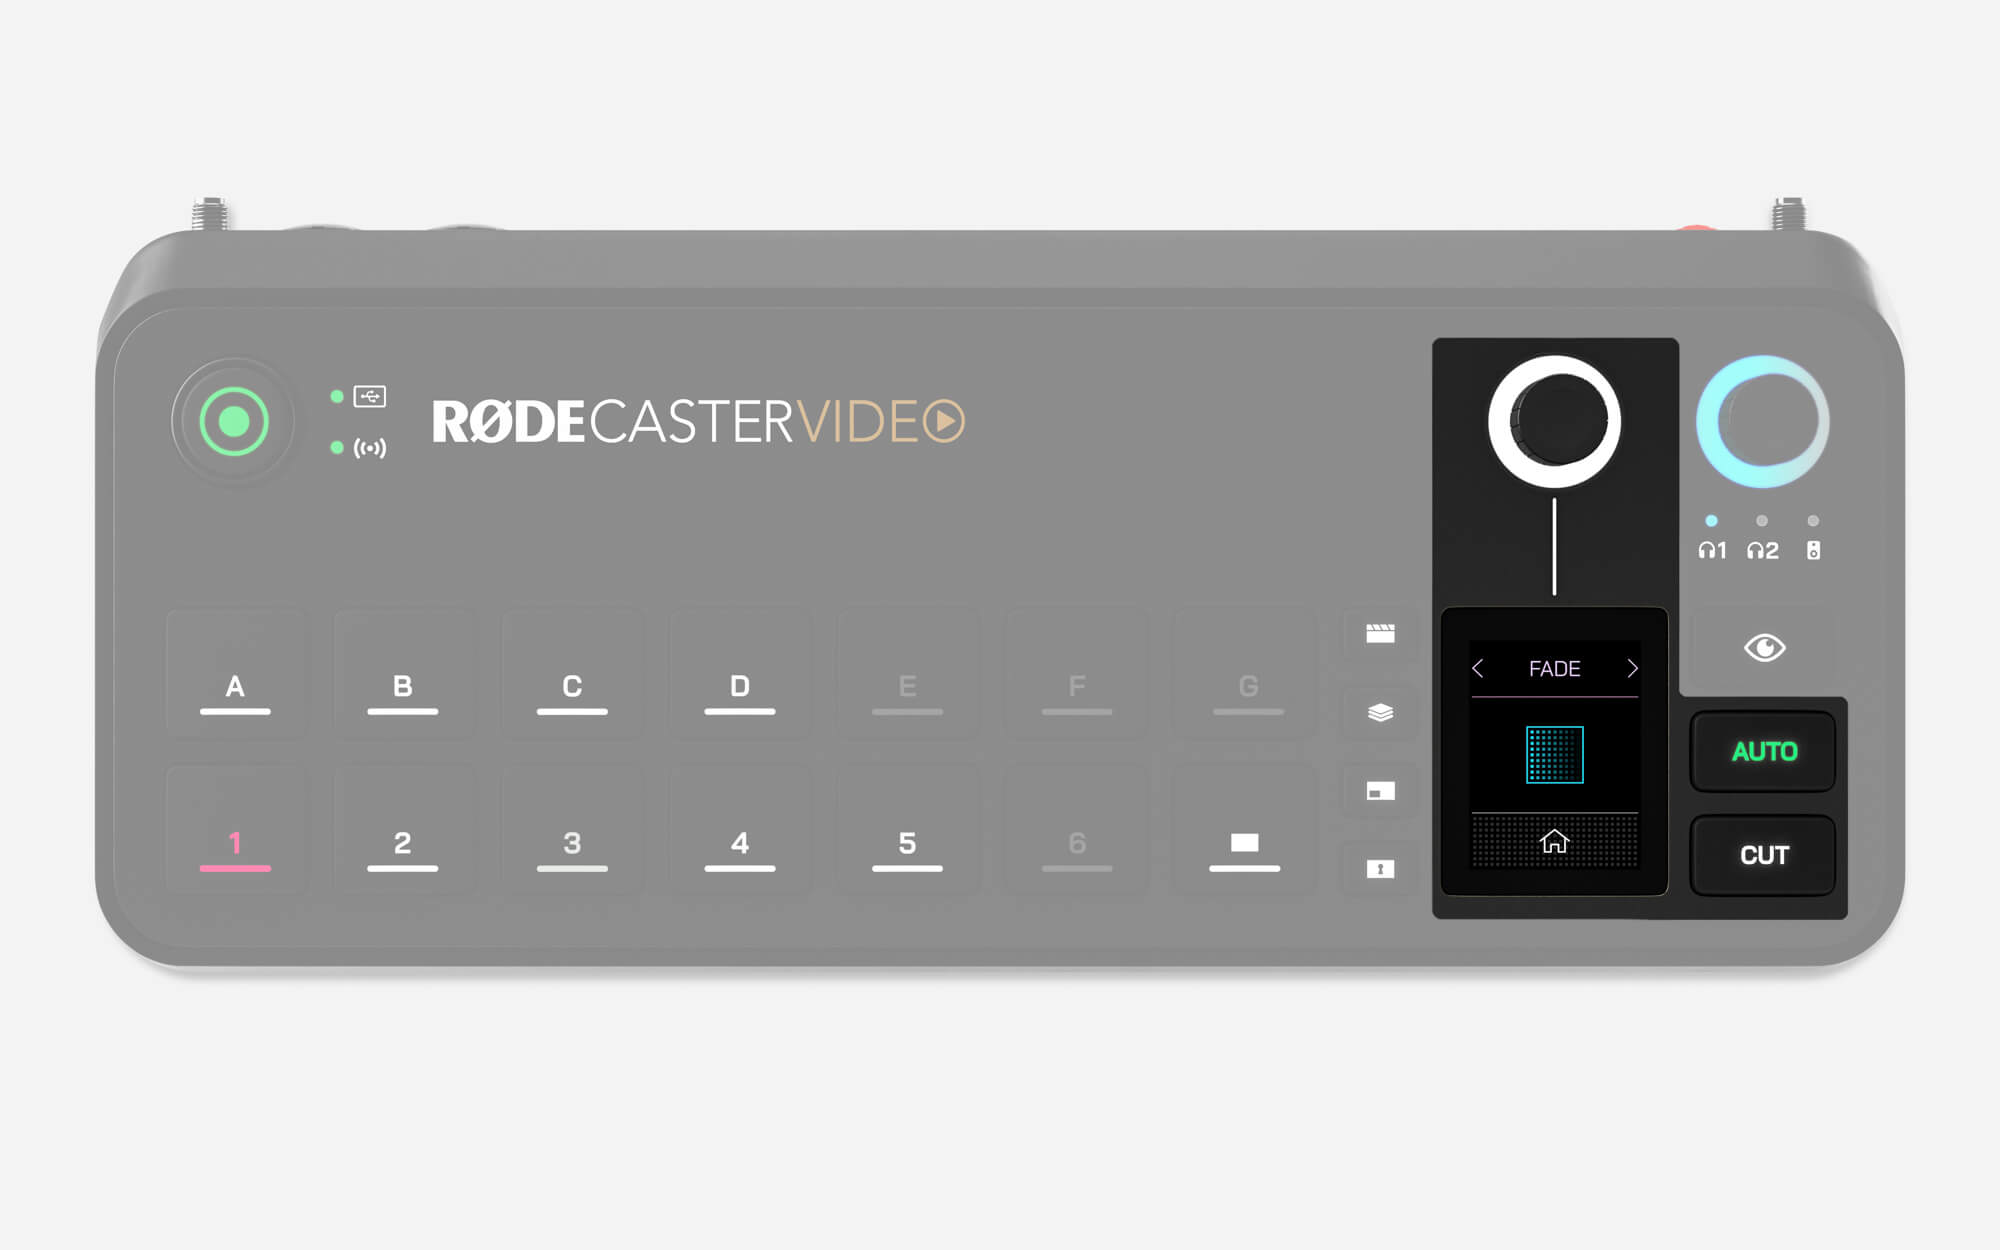
剪切、自动和过渡
剪切和自动按钮提供了两种不同的视频源切换方式,并且在即时模式或工作室模式下会有不同的表现。
剪切
剪切是默认模式,允许您在即时模式下即时切换输入、媒体和场景,在工作室模式下则在预览和节目视频源之间切换。
自动
在即时模式下,自动将根据您的过渡设置在输入、媒体或场景之间切换,或在工作室模式下在预览和节目源之间切换。
过渡设置
要调整过渡时间,只需点击屏幕上的秒表图标,调整旋转编码器,并点击编码器确认。要更改过渡类型,点击秒表左侧的屏幕图标,并使用编码器选择淡入淡出、渐变或擦除(后者有多种子类型)。
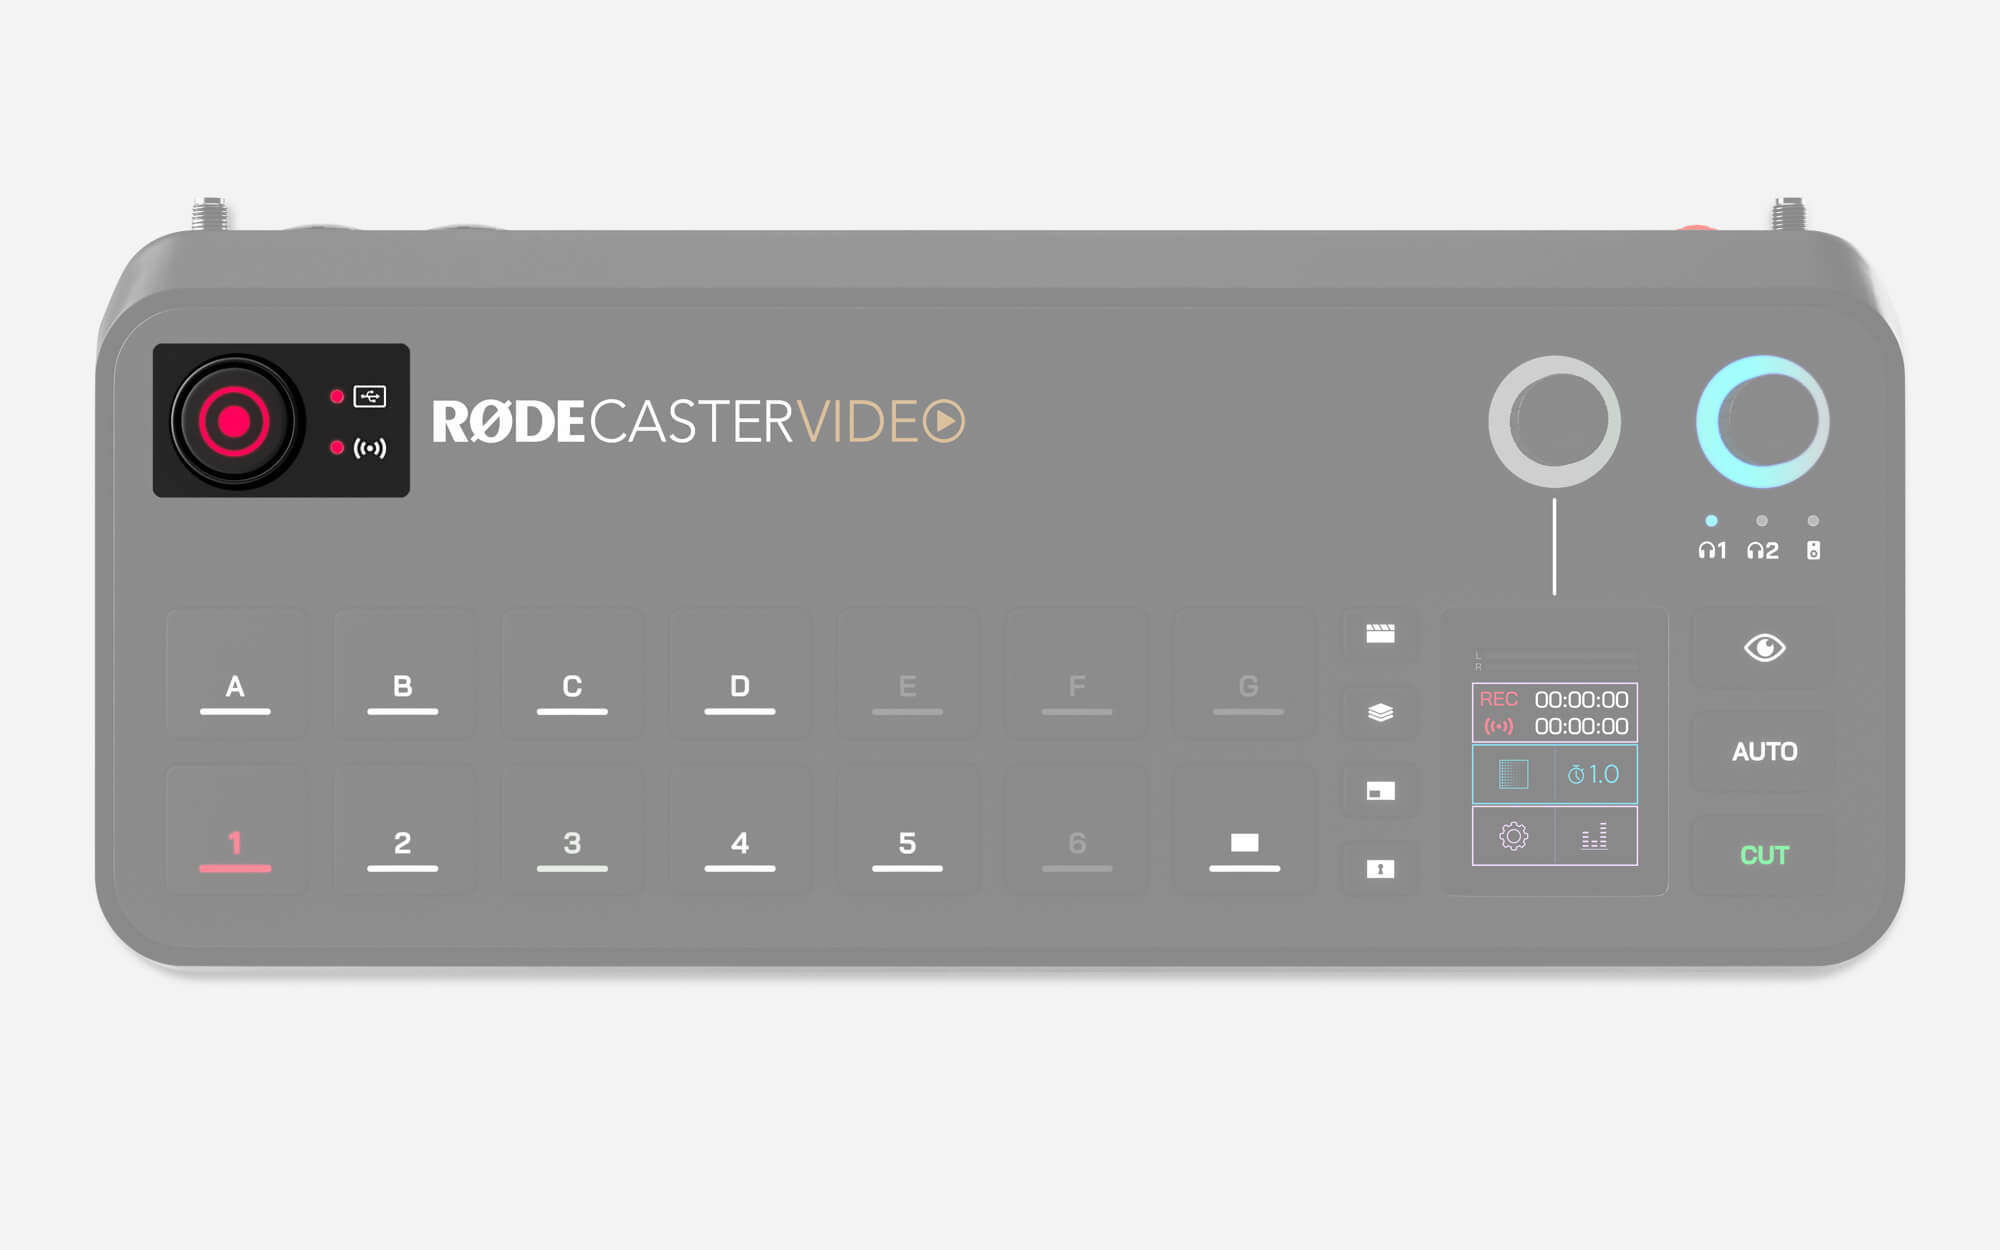
录制按钮和存储/网络指示灯
录制按钮用于开始和停止录制。当准备录制时,录制按钮和旁边的存储指示灯将亮绿色,录制时将亮红色。如果两者都不亮,意味着您没有连接兼容的USB存储设备到USB 3,设备未格式化为正确的exFAT格式,或设备已没有可用空间。
同样,网络指示灯在准备流媒体时将亮绿色,流媒体时将亮红色,如果RØDECaster Video未准备好流媒体,则不亮。这意味着您尚未在RØDECaster Video上设置流媒体配置文件,或未连接到互联网。
帧率
RØDECaster Video 的全局帧率决定了流、录制、HDMI A 和 HDMI B 输出的帧率。为获得最佳效果,重要的是为您的项目选择一个帧率,并将所有摄像机和其他视频设备设置为以此帧率输出。
要在您的 RØDECaster Video 上设置全局帧率,点击设置齿轮图标,然后导航到视频 > 帧率,并使用编码器进行选择。
帧率:23.98, 24, 25, 29.97, 30, 50, 59.94, 60
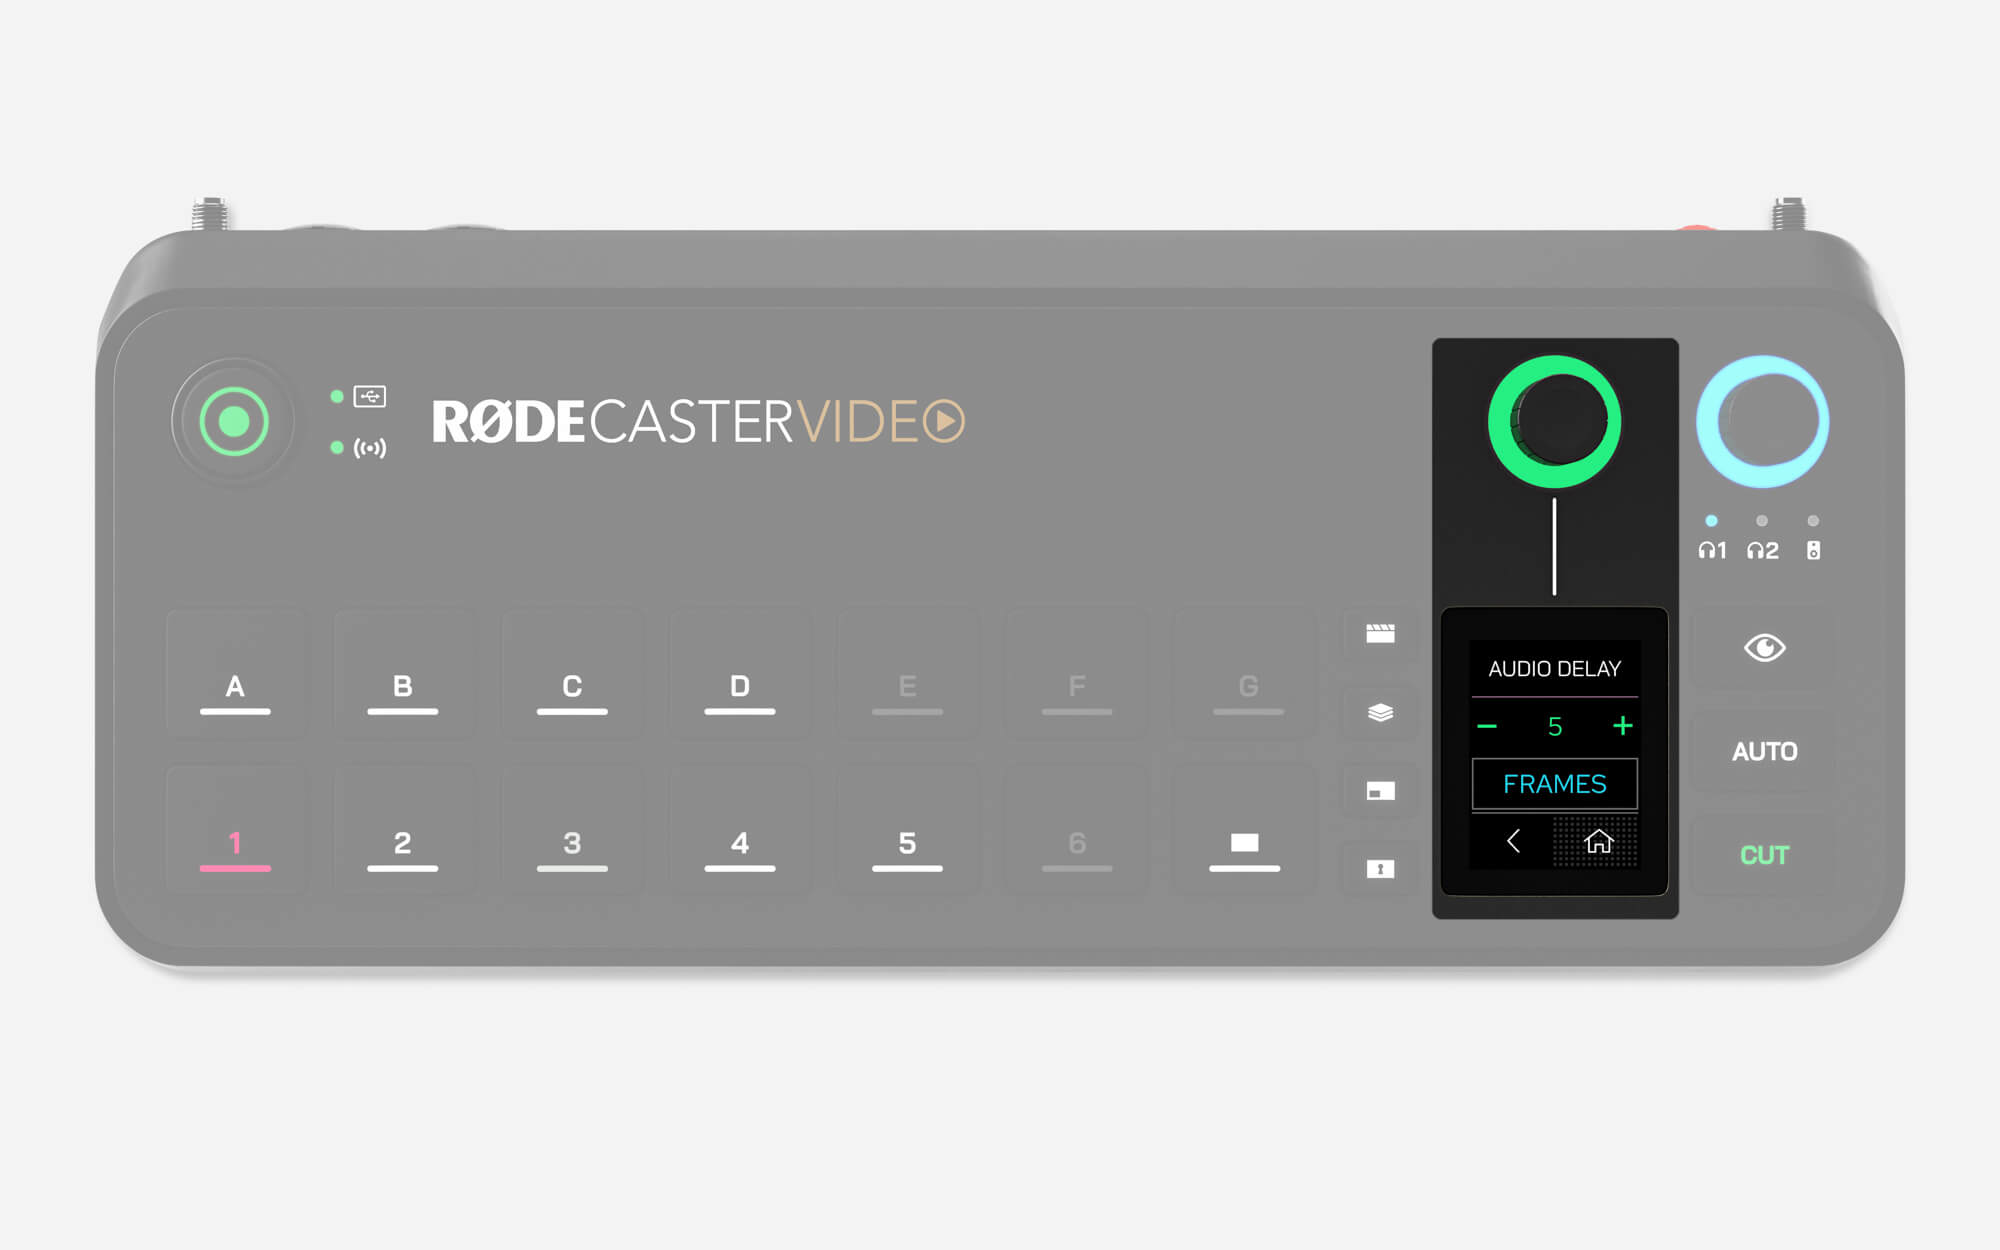
音频输出延迟
一般来说,任何摄像机(或其他视频设备)在其视频传输中都会有轻微的延迟。然而,音频设备的延迟通常要低得多。为了帮助解决这种差异,RØDECaster Video 提供了音频输出延迟功能,使您能够在直播和录制中完美同步音频和视频。
默认情况下,延迟设置为5帧,这应该能适应最广泛的情况,但您可以通过进入 RØDECaster Video 的设置 > 音频延迟,或通过 RØDECaster App 中的音频混音器来微调此设置。您可以以1毫秒或1帧为增量调整延迟。
如何测量音频输出延迟
要确定适合您设置的延迟,您只需执行以下过程一次:
- 确保您的 RØDECaster Video 和所有视频设备设置为相同的帧率
- 录制一个快速的自己拍手的视频片段,确保同时录制音频
- 弹出您的 USB 存储设备,将其连接到您的计算机,并将视频文件导入您选择的非线性编辑器(如 DaVinci Resolve 或 Adobe Premiere Pro)
- 在您的非线性编辑器中,找到拍手发生的视频帧,并在波形中寻找音频的峰值
- 在时间轴上,突出显示拍手音频峰值与拍手视觉之间的差异,以测量延迟(以帧或毫秒为单位)
- 将您的音频输出延迟设置为此数值
注意
音频输出延迟仅适用于您的直播和录音——为了实时监控您自己的声音,延迟不会应用于您的耳机或监听音箱。