Features
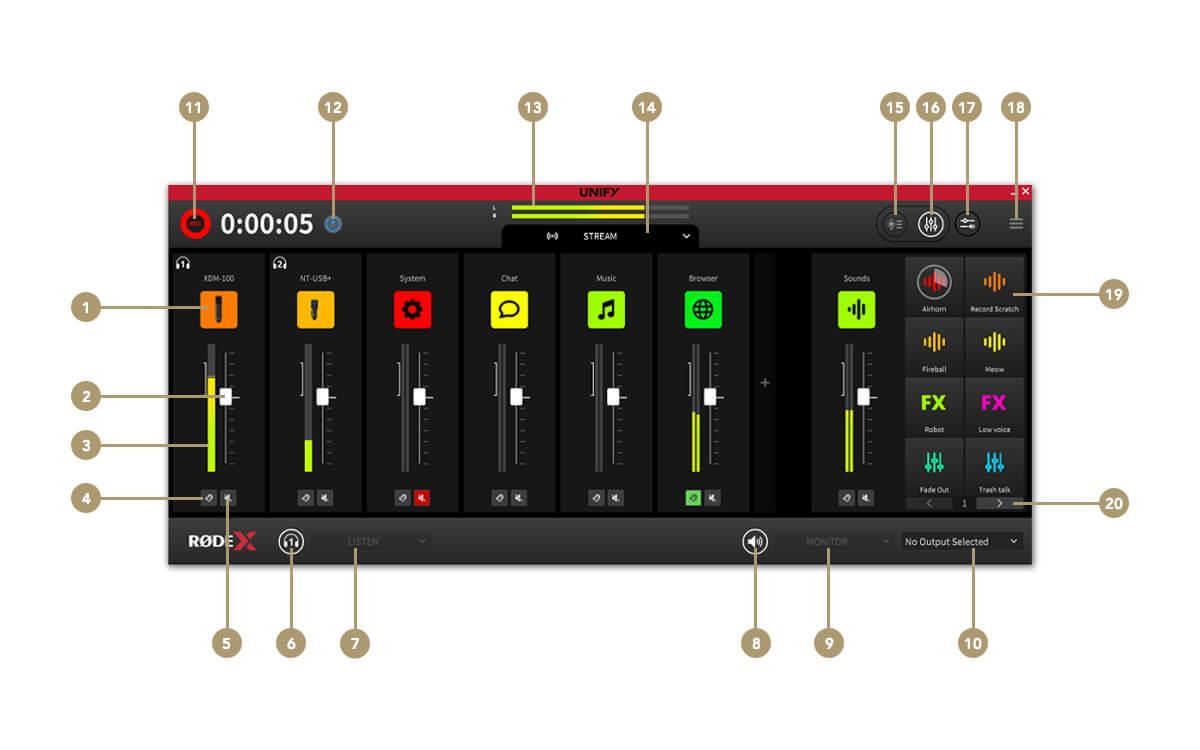
1Channel source settings
2Channel fader (level)
3Channel level meter
4Listen (cue)
5Channel mute
6Headphone mute
7Headphone monitor selector
8External monitor mute
9Monitor source selector
10Monitor device selector
11Start / stop recording
12Drop record marker
13Stream output level
14Submix selector
15Switch to recording window
16Switch to mixer window
17App audio routing (Windows only)
18Settings menu
19SMART pads
20Switch and banks
The Submix Controls
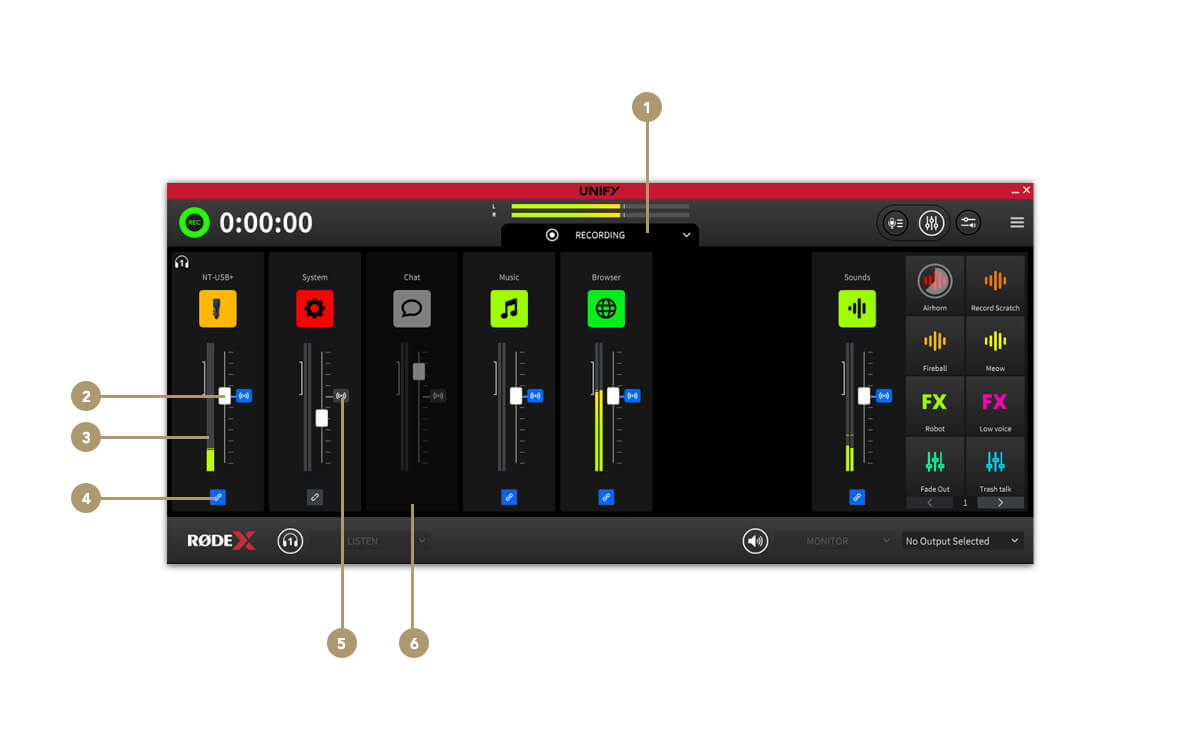
1Submix selector
2Submix level fader
3Submix level meter
4Link / unlink channel from Stream mix
5Stream mix audio level indicator
6Channel removed from submix
The Recording Window
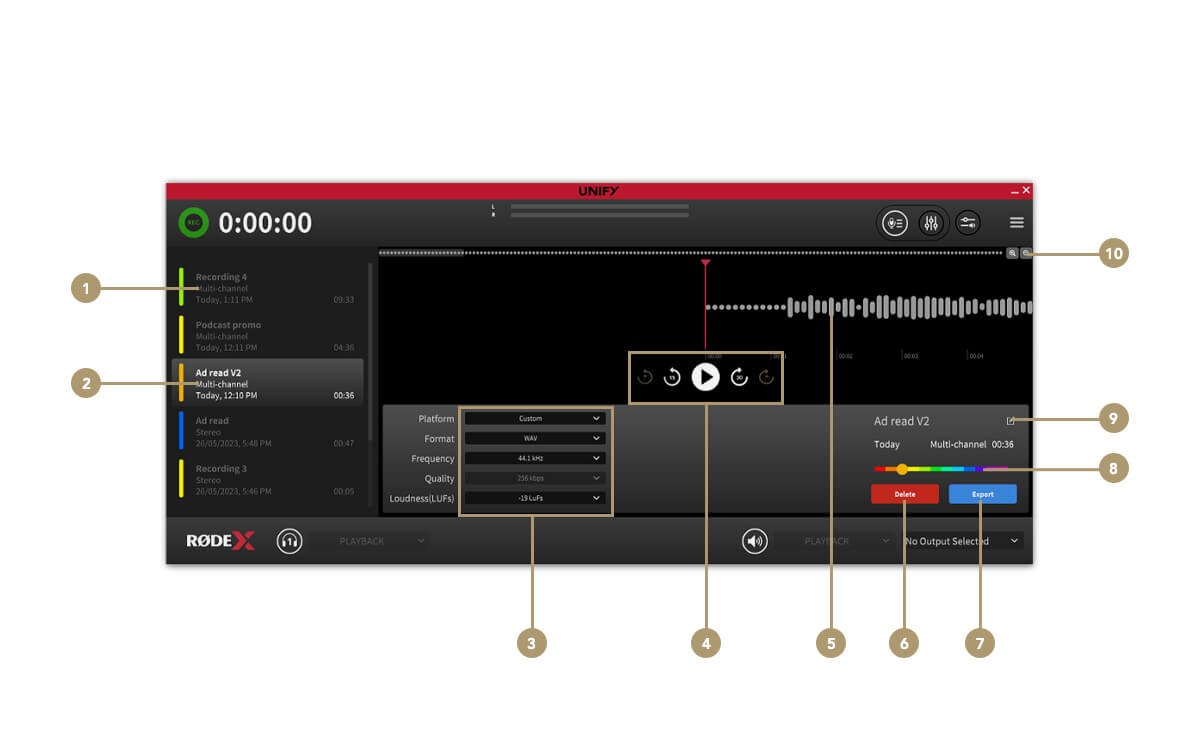
1Recordings list
2Selected recording
3File export settings
4Transport controls
5Audio waveform/playback
6Delete recording
7Export recording
8Colour selector
9Rename recording
10Zoom controls
How UNIFY Works
How it Works
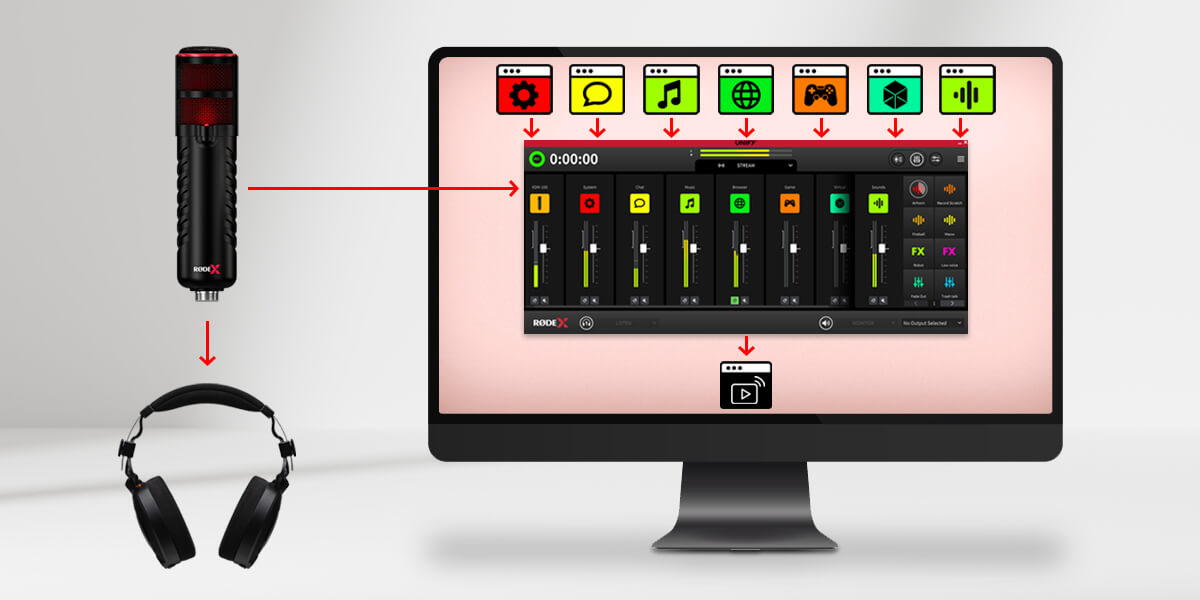
Before getting into specifics, let’s look at some of the basic principles of UNIFY, and how to use them. UNIFY is software that brings together multiple audio sources. It’s the same as an audio mixer you might have on your desk, but instead it is software on your computer. Each audio source appears on a slider in UNIFY, so you can adjust the level of each. You might want your music to be lower, and you voice to be louder, for example. Then the output of UNIFY is fed into your streaming software.
This is important! UNIFY sits between your audio sources and your stream, so audio from your microphone and your game and so on goes into UNIFY, and the output of UNIFY goes into your stream. There is no need to select those audio devices again in your streaming software, as UNIFY is already managing them all for you.
Assigning Audio Sources
Channel Assignment Screen
The first thing to do is bring each audio source into UNIFY – just like you would plug them into a hardware mixer. To do this, you use the channel assignment screen. If it’s the first time you have used UNIFY, you will see the channel assignment screen when you start UNIFY. If you’ve opened it before, you will see the mixer window, but you can get back to the assignment screen by selecting it from the menu on the right.
The Different Device Types
The channel assignment screen is where you choose what audio sources you need. All the available sources are shown at the bottom. There are two types.
Audio devices are RØDE hardware devices. They include microphones, and sources from interfaces such as the Streamer X.
Virtual devices are the connectors for your computer applications. These connect the audio from your game, Discord chat, browser etc with UNIFY, so that UNIFY can mix them and send them on to your stream.
Selecting the Audio Inputs You Need
You can add the audio devices you need for your stream by dragging them from the available devices up to the mixer configuration.
Any devices that you do not need, you can remove from the mixer by clicking on the ‘x’ that appears when you click on them.
You can also drag your sources around to put them in the order you prefer.
Pro Tip
It can sometimes be easier to clear all the defaults and start from scratch. To do this, simply click the ‘x’ that appears on any assigned channel when you move the mouse over it.
Adding Audio Sources/Microphones
You can add up to four audio sources to your stream. All current RØDE USB microphones are supported (note older devices without inbuild DSP are not supported), meaning you can have multiple people on your stream or podcast.
For example you can connect two XDM-100 microphones, or even a mix of different RØDE mics. They will appear as sources, and can be dragged up to the mixer configuration.
Each person them plugs their headphones into their own microphone. This will allow them to hear both their own voice, and all the other audio sources connected to UNIFY.
Adding Virtual Devices
You can add up to 6 virtual devices, meaning that you can bring in 6 independent audio sources from other programs on your computer. This can include your browser, your game, a music playback app, communications apps such as Discord or Zoom and so on.
Count up how many sources you need, and ensure you add enough virtual channels to support them all by dragging those virtual channels up to the mixer configuration.
The Chat Device vs Other Devices
Most of the virtual channels work in the same way, and allow audio to come unto UNIFY from other applications.
The Chat virtual device is a little different, as it also allows you to send audio back to the application, which means you can have a caller on the line, and they can also hear you.
So you need to reserve the Chat virtual channel for your comms channels, and use the other devices for other sources such as music and gameplay.
Pro Tip
The names of the virtual devices are there for convenience, to help you identify your sources. Apart from Chat, they all work in the same way, so you can use any of them for any source. If you have several different browsers, for example, you can bring audio from your second and third browsers into any of the virtual channels that are available.
Finishing Your Mixer Setup
Clicking ‘finish’ will close the channel assignment window and return you to the mixer main screen. You can return to the channel configuration window at any time if you need to adjust your configuration – you can access it from the main menu, found to the left of the UNIFY display.
Routing Audio From Other Programs
Connecting Your Virtual Devices
It’s important to realise that your browser audio will not automatically be assigned to the ‘Browser’ virtual device. You have to manually assign each program to its virtual device in order for the audio to appear in UNIFY.
There are two ways to do this – you can either use the device configuration settings in the program (if it has them), or you can assign them via the Windows control panel. Each method is outlined below.
Manually Configuring Audio Sources to Use Virtual Channels
To assign a program to the correct virtual channel, you need to navigate to the ‘audio’ or ‘device’ settings in your program. There you will find a setting where you can select the ‘speaker’ or ‘audio output’ settings.
You need to set these to the name of the virtual device you want that program to send audio to. So if you want to have Discord appear on the ‘Chat’ channel in UNIFY, go to the audio settings in Discord, and select ‘Chat output (RØDE UNIFY)’ for the audio options.
You then need to do the same for other programs, setting them to the correct virtual channel.
Using Windows to Assign Virtual Channels
Some programs (eg browsers) may not have their own audio settings. But it is still possible to assign them to a specific virtual device using the Windows control panel. To do this:
- Ensure the application you want to assign (eg the browser, music player etc) is running
- Click the ‘Launch windows settings’ button in UNIFY – it’s the top left button next to the menu. This will show the Windows audio control panel. Every program on your computer that is open and has audio capability is listed.
- Look for the specific program you want to assign, and set the ‘output’ settings to the desired UNIFY virtual device.
- If the program is going to be used for comms, then you will also need to set the input to the ‘Chat’ device.
Pro Tip
If you have more than one communications app (eg Discord and Zoom), you can still assign the output of them to different virtual devices, but you will need to choose the ‘Chat’ device as the input (‘microphone’) device for all of them. You can configure exactly what audio is send to your chat audience – but note that with multiple comms apps you will have to send the same audio mix to all of them.
Checking Your Configuration
If you have followed all the steps to this point, you should be good to check your configuration. Connect your headphones to your microphone (or Streamer X) headphone output. Try playing audio from each app – you should see it appear in UNIFY, hear it in your headphones and be able to adjust the volume of each source using the sliders. You should also be able to hear your own voice when speaking into the microphone. If you have other hosts with microphones connected, they too should be able to hear everything through headphones connected to their microphone.
Troubleshooting Tip
If audio is not showing up in some (or all) of the virtual channels in UNIFY, it could be because those devices are muted by your operating system. To check this on Windows, right click on the sound settings (the speaker icon in the taskbar), and open the volume mixer. Select each of the UNIFY virtual devices in the ‘Device’ dropdown list (System, Chat, Music etc), and check each device is not muted or faded right down.
Renaming Channels
You can rename the channels in the UNIFY mixer to make it easier to identify your sources. To do this, simply double click on the name label at the top of the channel, and type your preferred label.
Note that changing the labels will not change the names of the USB Virtual Devices that appear when selecting audio devices on your computer.
Getting Audio to Your Stream
Assigning UNIFY Output to Your Stream
Now you have all the audio sources routed to UNIFY, you need to ensure the output of UNIFY is feeding your stream. To do this, go to the audio settings of your streaming software. Each software has very different settings for this, but you need to ensure that the only audio device that is feeding audio to your stream is ‘Stream Input (RØDE UNIFY)’. If you can see there are other sources also selected you should remove them. Remember, it is UNIFY that will control your audio levels, not your streaming software.
Troubleshooting Tip
If you have your RØDE microphone directly selected as an audio source in your streaming software, it can prevent UNIFY from accessing it. This can make it seem as if the microphone is not working. Ensure that the only audio source your streaming software is using is the ‘Stream Input (RØDE UNIFY)’ device.
Setting Up Your Microphones and Devices
Setting Up Audio Devices
To finalise the setup of your audio devices, you need to set the gain, and also any audio processing you need. To do this, click the icon above the slider for the microphone or device you want to set up. The most important setting is the gain, which sets the overall level of the microphone. The process for setting this is slightly different for USB microphones compared to the Streamer X.
For USB microphones such as the XDM-100 and NT-USB Mini:
- Turn off the processing by ensuring none of the ‘processing’ buttons are illuminated green (click on them to toggle processing on and off)
- Speak into the microphone at the volume you will use for your stream
- Adjust the ‘+’ and ‘-‘ buttons until the meter is peaking well into the green target section, without going into the red
For the Streamer X:
- Turn off the processing by ensuring the ‘processing’ button is not illuminated green (click on it to toggle processing on and off)
- Ensure that on the Streamer X, the microphone type you are using (XLR, Headset or wireless) is selected by pressing the microphone knob until the indicator on the unit matches the device you are using
- Speak into the microphone at the volume you will use for your stream
- Adjust the microphone knob on the device until the meter is peaking well into the green target section, without going into the red
Once you have set the gain, you can turn the processing back on by clicking the ‘processing’ button so it is illuminated green.
Setting Up Virtual Devices
Virtual devices usually do not need further setup, but you can adjust the gain (overall level) of each source if you need to. To do this, click on the icon above the slider. You can then adjust the gain up or down as needed, using the meter as a guide. Remember that when you mix lots of sources together, the overall level will be higher than any individual source.
Audio Processing
Configuring Audio Processing
UNIFY allows you to unlock the powerful DSP processing that is built into your RØDE USB microphone or interface. This allows you to add professional audio processing including noise gate, compressor and even the legendary APHEX effects. The exact settings available will depend on your microphone, as different microphones have different DSP capabilities. But whatever microphone you have, the below guide should help you achieve a professional sound for your content.
Microphone Capability
Basic Audio Processing
This feature allows you to add a variety of audio processing tools to give your audio a professional edge. They are preset to give great results in a range of settings, and can easily be turned on or off to suit your needs.
Pad (if present)
This control reduces the sensitivity of the microphone, making it quieter. It is useful when using a microphone designed to be further away from the sound (such as a VideoMic) as a vocal mic, as it reduces the risk of your audio distorting.
High Pass Filter
This control will reduce the lowest frequencies from your audio, which helps cut down on unwanted rumble from traffic, air conditioning and so on. The 75Hz setting will remove the very lowest frequencies, and works well in most settings. The 150Hz setting will remove more background noise, but you may notice it affecting the lower tones of your voice too, depending on your voice type.
Noise Gate
This control will turn down the level of your mic when you are not speaking, helping to reduce background noise when you are not talking.
Compressor
This control will even out the louds and softs in your voice, making it sound more even and professional.
Aural Exciter
This is the famous studio-grade processing that adds additional high harmonics to your voice to give it presence and sparkle.
Big Bottom
Another famous APHEX studio processor that adds depth and body to your voice.
VOXLAB™ Sound Controls
The VOXLAB™ controls are an innovate interface that allows you precise control over your sound without the need for expert audio knowledge. Each control affects multiple parameters to ensure your sound remains balanced and professional as you dial in the exact sound you prefer. Note that not all devices support the VOXLAB™ feature.
Depth
This control will add additional body and mid-range presence to your voice as it is boosted.
Sparkle
This control will add clarity and boost intelligibility of your voice. As you turn it up further it gives an exciting edge to your voice similar to a ‘radio station’ sound.
Punch
This control will even out your voice tones, and as you turn it up will create a dynamic, punchy sound that cuts through the mix of your other sounds ensuring you can be clearly heard.
Advanced Processing
Activating the ‘advanced processing’ function allows you fine control over every parameter of the audio processing, and is perfect for perfectly tweaking your sound. Note that in this mode it is possible to dial in extreme values which can cause unpleasant sounds or distortion, so use with care. If you need to reset your settings, you can exit advanced mode, which will return to the standard defaults, and then start again by going back into advanced mode. Note that not all devices support advanced processing.
Advanced Processing – High Pass Filter
This control will reduce the lowest frequencies from your audio, which helps cut down on unwanted rumble from traffic, air conditioning and so on. Depending on the microphone being used, there may be a single on-off control, controls for either 75Hz or 150Hz filters, or granular control as described below.
Frequency:
This control sets the frequency of sounds that will be cut. Any sound below the set frequency will be reduced. Setting a high frequency will reduce background noise more, but may also start to affect the sound of your voice.
Slope:
This sets how harshly the filter cuts off low frequency sounds. A gentle slope will tail of the lower frequency sounds gradually, whereas a steep slope will cut them off more abruptly
Advanced Processing – Noise Gate
This control will turn down the level of your mic when you are not speaking, helping to reduce background noise when you are not talking.
Threshold:
Perhaps the most important control, which sets where the noise gate will operate. It sets the point at which the noise gate detects when you are speaking. If it is set too high the noise gate will not open when you speak, and some of your words will be cut off. If you set it too low, it will open when there are unwanted background sounds present. It should be set so the gate opens easily when you speak, but stays closed when you are silent.
Attack:
This sets how fast the gate opens. A faster speed will reduce the risk of the start of your words being cut off, but can also introduce a ‘click’ when you begin to speak.
Hold:
This is how long the gate stays open once you stop speaking. This ensures that the gate does not cut off your last syllable by closing too early. A longer hold will reduce that risk, but can make background noise more audible when you stop speaking.
Release:
This is how quickly the gate closes. A slower speed will reduce the risk that your words are cut off, but can also mean background noise is more audible when you stop speaking.
Range:
This is another important control that sets how much the volume of your microphone is turned down when you stop speaking. If the range is set to a small value, the noise gate will not have much effect on the background noise. A large range will turn down the microphone a lot when you are not speaking, reducing background noise more, but at the risk of hearing the background noise ‘pump’ up and down as you speak.
Hysteresis:
It is common when talking to finish a sentence quieter than you start. Hysteresis puts an offset between the point at which the gate opens (set by the Threshold) and when it closes. This makes it less likely that quiet words at the end of sentences will be cut off, but may mean more background noise is heard when you finish speaking.
Advanced Processing – Compressor
This processor will even out the louds and softs in your voice, making it sound more even and professional. It does this by reducing the volume of the louder parts of your speech.
Threshold:
This sets at which point the compressor starts to reduce the volume of your voice. A low threshold means the compressor will be working to reduce your volume most of the time. A high threshold will mean the compressor only operates on the loudest peaks of your voice.
Ratio:
Possibly the most important control, this sets the amount by which the volume will be reduced. A high ratio will mean the difference between the loudest and quietest parts of your speech are reduced significantly – making the sound more even, but also more artificial. A lower ratio will even out the peaks more gently with less noticeable effect on the overall sound.
Attack:
This is how fast the compressor works. A fast attack will mean every individual syllable or sound is individually processed, giving a lot of control over the volume but at the risk of the sound being a bit unnatural. A slower attack will make the compressor work more gently, only reducing the level if you remain loud for a longer period of time – maybe a whole word.
Release:
This is how quickly the volume returns to normal when the peak of the sound has passed. A fast release will give more control over the volume, but may sound more unnatural or processed. A slower attack will sound more natural, but may mean some syllables after a peak remain quiet.
Gain:
Because the compressor works to reduce the volume of the loudest sounds, it has the effect of reducing the overall level. The gain control allows you to normalise the level. It is especially useful if you use very extreme settings (a high compression ratio and a low threshold).
Advanced Processing – Exciter
This processor is a faithful recreation of the famous APHEX studio processor that is found in the world’s top studios. It allows you to add additional harmonics to your voice to give more depth and presence without making your voice muddy or sibilant. The Aural Exciter adds additional high harmonics to your voice to give it presence and sparkle, whilst the Big Bottom adds depth and body to your voice.
Big Bottom - Tune:
This sets the frequency around which the processor operates to add harmonics. It works best when this control is set to match the lower frequencies in your voice.
Drive:
This sets the depth of the Big Bottom effect. Turning it up will add more harmonics and create a larger, richer bass to your voice. Note that extreme settings can sound unnatural and harsh, so use discretion!
Aural Exciter Tune:
This sets the frequency around which the processor operates to add harmonics. It works best when this control is set to match the higher mid-range frequencies in your voice. If you set it too high you will add unpleasant sibilance, whilst setting it too low will make your voice sound harsh and nasal.
Harmonics:
This sets the depth of the Aural Exciter effect. Turning it up will add more harmonics and add more presence to your voice. Note that extreme settings can sound unnatural and harsh, so use discretion!
Advanced Processing – Equaliser
The equaliser is a three-band fully parametric equaliser that allows you to boost and cut specific frequencies to shape your sound.
High, Mid and Low Bell:
This sets the frequency for each of the three bands of the EQ, which can then be boosted or cut as needed.
High, Mid and Low Gain:
This sets the amount of boost or cut that is added for each frequency.
High, Mid and Low ‘Q’
This control is accessed via a long click on the Gain control, and sets the steepness of the curve. A high ‘Q’ will mean the boost or cut is tightly centered on a single frequency, whereas a low ‘Q’ will make the frequency boost or cut operate over a range of frequencies centered on the one set.
H M L buttons:
These allow you to disable individual bands of the EQ, allowing for quick comparisons when setting up your EQ.
Note that the EQ is not available on all devices or microphones.
Submixes
What are Submixes?
Submixes unlock one of the most powerful features of UNIFY – the ability to create different mixes for different devices or audiences. So for example you can turn down the level of your own voice in your headphones without affecting your stream. Of you can choose to only send your own voice and the sound pad sounds to your Discord channel, whilst still outputting a full mix to your stream.
Whilst this is very flexible, it can also be complex to set up, so it is worth reading through this section as you set up your submixes.
The Submix Dropdown
Submixes unlock one of the most powerful features of UNIFY – the ability to create different mixes for different devices or audiences. So for example you can turn down the level of your own voice in your headphones without affecting your stream. Of you can choose to only send your own voice and the sound pad sounds to your Discord channel, whilst still outputting a full mix to your stream.
Whilst this is very flexible, it can also be complex to set up, so it is worth reading through this section as you set up your submixes.
Creating a Custom Submix
You can create a submix by selecting the destination you want to affect in the submix dropdown, and then simply adjusting the sliders until you have the desired mix. However, there are three different modes to do this which operate slightly differently.
Linked Sliders
By default, when you adjust a slider for a submix, it will remain linked to the slider for the main mix. An offset will be created between the level of that source in the submix, and the level in the main stream output. This means if you adjust the level in the stream mix, it will also change in the submix, but with the offset. For example, if you set your voice level in your headphone submix to half the level in the stream mix, but then also lower your voice level in the stream mix it will further lowered in the headphone submix, so it remains at half the volume. This linked status is indicated by a blue ‘chain’ symbol underneath the slider.
Unlinked Sliders
You can decouple the submix level from the stream mix completely by clicking the icon underneath the slider so it shows a grey ‘unlinked’ status. This means that you can set the level of that source in the submix completely independently of the stream mix.
Removing a Source
You can remove an audio source completely from a submix by hovering the mouse over the slider, and then clicking the ‘cancel’ icon that appears above the source name. You can reinstate it to the mix by clicking in the same place.
Stream Mix Indicators
When creating a submix, a symbol to the right of the slider indicates the level of that source in the main stream mix.
If the slider is linked to the stream mix (see above), the icon will be blue. If the slider is unlinked, it will be grey.
You can reset the level of an individual source in the submix to match the stream mix by clicking on this blue icon (if the icon is grey, simple enable the ‘link’ icon underneath the fader prior to clicking on the stream mix level symbol)
Using a Submix For Clean Chat Audio
One of the most common reasons to set up a submix is to send clean audio to your communications apps such as Discord or Zoom, as sending the complete mix is distracting for your chat participants to listen to.
As an example, you might only want to send your own voice and the soundpad sounds to Discord. To do this, select the ‘Chat’ submix from the submix dropdown under the main meter.
If you want your voice to always go to the chat, regardless of whether you have faded it down in the stream mix, you can unlink it from the stream mix by clicking on the blue ‘link’ icon under the slider so it turns grey. Otherwise you can leave it linked.
Now disable all the other audio sources except the SMART pads. The easiest way to do this is to hover over them, and click the ‘disable’ icon that appears above the source name (you can also unlink the sliders and turn them down to zero).
(Note that for the Chat submix, UNIFY will by default disable the Chat audio. Whatever audio you choose to send to the chat, you should keep the Chat source disabled to prevent echo and feedback.)
The Headphone Submix
You can create a custom mix for your headphones by selecting the ‘Headphone 1’ submix from the submix dropdown, and adjusting the sources as described above. For example, you might want to listen to music in your headphones that is not being sent to your stream for copyright reasons. You can do this by sliding the music audio source to zero in your Stream mix, then unlinking it in the headphone 1 mix by clicking the ‘link’ icon under the music slider until it turns grey. You can then turn up the music in your headphones without sending it to your stream.
Multiple Headphone Mixes
If you have more than one compatible USB microphone (or device) connected to your computer, each device can have a separate headphone submix. Note that the headphone output from the microphone (or device) will carry the headphone submix for that device.
You can see which device is which by looking at the ‘headphone’ symbols above and to the left of the audio source name. Each microphone is numbered so you can keep track of which submix is associated with which device.
Monitoring Different Submixes
You can monitor any of the submixes from your headphones. If you have multiple mics connected to UNIFY, the monitoring is only available on headphone 1 (see above for details), so you should assign your devices accordingly. Note that the microphone that is in the leftmost position will default to being headphone 1. You can rearrange the order of the microphones and other sources using the Channel Assignment screen.
To monitor a specific submix, select it in the headphone monitor dropdown on the bottom left of the main UNIFY screen. This will allow you to check any of the submixes during your stream, and / or listen to them when you are setting them up.
Monitor Output
Using External Monitoring
It is possible to send the output of UNIFY to an audio output device on your computer. This allows you to connect either speakers or headphones as a separate monitor for your stream. This could be used by a producer to monitor the output, for example, or fed to speakers for an audience. You can also use this as the headphone output if you are using a device that does not have a built-in headphone output (for example an NT1 5th Generation or a Wireless GO II).
You can choose the audio device that the monitor output is sent to using the dropdown at the bottom left of the UNIFY main window.
Note this cannot be a device that is available to UNIFY. Typically it would be your computer’s built in headphone output, or another audio interface connected to your computer.
Selecting the Monitor Source
You can select which output of UNIFY is sent to the monitor output using the dropdown next to the monitor selector. You can select to send the stream mix or any of the submixes to the monitoring as required.
Note that there is a specific submix called ‘Monitor’ that you can set up in the same way as other submixes. This allows you to set a specific mix for eg a live audience whilst maintaining all of your other mixes and submixes. By default, the microphone output(s) are muted to the monitor output, to prevent feedback. They can be re-enabled by clicking on the warning symbol above the channel icon.
Muting the Monitor Output
You can easily mute and unmute the monitor output by clicking on the speaker icon to the left of the monitor selector. It is highlighted white when the monitor output is active.
Using the SMART Pads
The SMART pads can be used to trigger sounds, voice effects and perform mixer actions to add interest and excitement to your stream.
Sounds from the pads appear on the right-hand slider, next to the pads. You can adjust the level of pad playback using this slider. You can also set a different level for the pads in the submixes (see Submix section above).
Pads are triggered by clicking on them. There are three pad functions – sound playback, voice effects and mixer actions.
Note: If you are using the Streamer X, the pads cannot be triggered with the mouse, and are instead triggered by the physical pads on the unit. See the Streamer X user guide for more details on using the pads with the Streamer X.
Sound Pads
When a sound pad has a sound loaded onto it, it will have the ‘sound’ icon showing, with the name of the pad or sound underneath.
Clicking on the pad will play the sound. When the pad is playing, a countdown timer will show on the pod, to indicate how long the sound will play for.
What happens when you click the pad again depends on the pad settings; see below for more details.
Voice Effect Pads
Voice effects pads have the ‘FX’ logo on them, and the name showing underneath. Various voice effects are available, including pitch shift, reverb and megaphone effects. Voice effects can be configured to operate on just a single microphone, or on multiple microphones if they are connected.
Voice effects pads can either remain triggered when clicked, staying activated until they are clicked again, or they can just be activated by holding down the mouse button. See below for more details on configuring the pads.
Mixer Action Pads
Mixer action pads can carry out a range of functions relating to audio levels and microphone outputs, including a profanity bleep, automatic fade out and communications functions.
Mixer action pads can either remain triggered when clicked, staying activated until they are clicked again, or they can just be activated by holding down the mouse button. See below for more details on configuring the pads.
Pad Banks
You can configure multiple banks of pads, and switch between banks using the bank switch buttons underneath the pads. Up to 8 banks can be configured, giving up to 64 pad actions. A new bank will be added (up to the maximum of 8) when a pad is configured on the highest number bank.
Note: When using the Streamer X, there will only by 4 pads on the screen, to correspond with the physical pads on the device. For more details on using the SMART pads with the Streamer X, check the Streamer X user guide.
Changing the Pad Type, Colour and Name
Changing Pad Type, Colour and Name
To configure the SMART pads, right-click on the pad you want to configure. This will reveal a pop-out menu with pad options.
At the top of the menu, you can select what kind of pad you want it to be – either sound, voice effect or mixer action.
Underneath this is a slider where you can select the pad colour. Under this is the name of the pad. By default, this will be the name of the sound file or effect that has been configured, but this can be edited by pressing the ‘edit’ pencil icon. A new name can then be typed – note this is limited to 25 characters.
You can delete (completely clear) the pad by clicking on the delete (trash can) icon. This allows you to remove all the pad settings from that pad.
Configuring Sound Playback From Pads
Loading Sounds on the Pads
To load a new sound on to the pad, right click on the pad you want to add a sound to, and ensure that the ‘sound’ pad type is selected at the top left of the pop-out menu.
You can add a sound either by dragging the sound file you want to add to the pad onto the ‘drag and drop’ icon from the file manager, or you can browse to the file by clicking on the ‘choose file’ option.
Files in either MP3 or WAV format are supported.
When a new sound is added to the pad, the pad will be renamed the name of the sound file. You can further edit the name if needed; see above for details.
Sound Playback Modes
You can alter the playback mode for the pad by clicking on leftmost icon at the bottom of the sound pad configuration meu. Clicking this icon will cycle through the available playback modes.
There are three playback modes for sound pads:
1. Toggle
In this mode, the pad will start playing when clicked. Clicking it again will stop playback.
2. 1-shot
In this mode, clicking the pad will start playing. Clicking the pad again will start the sound again from the beginning, allowing ‘stutter’ type effects
3. Hold
In this mode, the pad will play whilst the pad is clicked, and playback will stop when the mouse button is release.
Looping Sound Playback
If looping is activated, the sound loaded on the pad will loop continuously when the pad is activated. This allows for continuous playback of beats, atmospheres and other loops.
Note that loop mode is not available with the ‘1-shot’ playback mode.
To activate loop mode, click on the ‘loop’ icon in the centre at the bottom on the pad configuration menu.
Replay Mode for Sound Pads
Replay mode changes what happens when a pad is stopped. There are two modes:
1. Replay
In this mode, the pad will play from the start of the sound each time it is activated.
2. Continue
In this mode, the pad will continue playback from the point reached when it was stopped.
Note that continue mode is not available with the ‘1-shot’ playback mode.
To change replay type mode, click on the ‘replay’ icon on the right at the bottom on the pad configuration menu.
Configuring Pad Voice Effects
Activating Voice Effects
To add a voice effect to a sound pad, right click on the pad you want to add the effect to, and ensure that the ‘FX pad type is selected at the top of the pop-out menu.
In this menu you will also see all the microphones (or audio devices) that are available in UNIFY. To add a sound effect to a microphone, click the icon for that microphone so it is highlighted. You can add the sound effect to up to 4 microphones.
Note: If you have a Streamer X connected, you will not be able to add voice effects to other microphones that are connected, even if they are available in UNIFY.
How Voice Effects Are Activated
There are two different activation modes for voice effects which are selected using the buttons in the pop-out pad configuration menu. They operate as follows:
1. Momentary
This mode will activate the effect whilst the pad is being clicked on
2. Latching
This mode will activate the effect when the pad is clicked, and remain active until the pad is clicked for a second time
The Types of Voice Effects Available
There are four different voice effects that can be used. They can be used singly, or more than one effect can be layered up on top of each other. The effects are:
1. Reverb
This adds a reverb to your voice as if you are in a large room or cave
2. Echo
This adds a repeating echo to your voice
3. Megaphone
This adds a megaphone effect to your voice, a if you are speaking through a loudhailer
4. Modulation Effects
This adds a modulation effect that can change the timbre, character or pitch of your voice.
There are three different modulation effects to choose from:
1. Robot
This makes your voice sound like a sci-fi robot
2. Voice Disguise
This will disguise your voice making you sound very different
3. Pitch Shift
This will alter the pitch of your voice, allowing you to sound like a monster or a munchkin
Whilst you can use all four main voice effects at once, you can only use one modulation effect at a time.
Selecting Voice Effects
To add voice effects to a pad, right click on the pad to activate the pop-out pad configuration menu. Select the ‘FX’ type from the top of the menu.
At the bottom of the menu are icons for the different voice effect types. Effects that are activated are highlighted green.
When you click on the icons, the control panel for that effect will appear. Each control panel has an on/of switch, which can be used to either activate or deactivate the effect. See below for more details on the controls for each effect.
Configuring the Reverb Effect
Clicking on the ‘reverb’ icon in the pad pop-out configuration menu will open up the reverb control panel. The controls operate as follows (from left to right):
1. I/O switch
This turns the reverb effect on and off
2. Level
This controls the level of the effect. The higher it is, the more obvious the effect will be
3. Low cut
This reduces the amount of low-frequency sounds in the reverb to make it less muddy and enhance voice clarity
4. High cut
This reduces the amount of high frequency sounds in the reverb to reduce unpleasant sibilance
5. Size
This controls the type of reverb, simulating a range of settings from a room to a very large hall.
To close the control panel when finished click ‘Done’.
Configuring the Echo Effect
Clicking on the ‘echo’ icon in the pad pop-out configuration menu will open up the echo control panel. The controls operate as follows (from left to right):
1. On/off switch
This turns the echo effect on and off
2. Level
This controls the level of the effect. The higher it is, the more obvious the effect will be
3. Low cut
This reduces the amount of low-frequency sounds in the echo to make it less muddy and enhance voice clarity
4. High cut
This reduces the amount of high frequency sounds in the echo to reduce unpleasant sibilance
5. Delay
This controls the length of time between each echo. A higher setting will mean there is a longer gap between each echo
6. Decay
This determines how quickly the echoes die away. A higher setting will mean the echoes go on for longer
To close the control panel when finished click ‘Done’.
Configuring the Megaphone Effect
Clicking on the ‘megaphone’ icon in the pad pop-out configuration menu will open up the megaphone control panel. The controls operate as follows (from right to left):
1. Power button
This turns the megaphone effect on and off
2. Intensity
This controls the overall sound of the effect. The higher it is, the more obvious the effect will be
To close the control panel when finished click ‘Done’.
Configuring the Robot Effect
Clicking on the ‘robot’ icon in the pad pop-out configuration menu will open up the robot control panel. The controls operate as follows (from right to left):
I/O switch
This turns the robot effect on and off
Robot type
This allows you to choose between three different robot voice types, representing different sized robots
To close the control panel when finished click ‘Done’.
Note that the robot effect cannot be used at the same time as voice disguise or pitch shift. Only one modulation effect can be used at a time (see above for details).
Configuring the Voice Disguise Effect
Clicking on the ‘voice disguise’ icon in the pad pop-out configuration menu will open up the voice disguise control panel. This only has one control, which turns the effect on or off.
To close the control panel when finished click ‘Done’.
Note that the voice disguise effect cannot be used at the same time as robot or pitch shift. Only one modulation effect can be used at a time (see above for details).
Configuring the Pitch Shift Effect
Clicking on the ‘pitch shift’ icon in the pad pop-out configuration menu will open up the pitch shift control panel. The controls operate as follows (from right to left):
1. On/off switch
This turns the pitch shift effect on and off
2. Course
This allows you to change the pitch of your voice in semitone increments, up to an octave up or down
3. Fine
This allows you to change the pitch of your voice in cent increments, to fine tune the pitch shift.
The amount of pitch shift being applied is shown on the centre display.
To close the control panel when finished click ‘Done’.
Note that the pitch shift effect cannot be used at the same time as robot or voice disguise. Only one modulation effect can be used at a time (see above for details).
Configuring Pad Mixer Actions
Activating Mixer Actions
To add a mixer action to a sound pad, right click on the pad you want to add the effect to, and ensure that the ‘mixer’ pad type is selected at the top of the pop-out menu.
There are two different activation modes for mixer actions which are selected using the buttons in the pop-out pad configuration menu. They operate as follows:
Momentary
This mode will activate the mixer action whilst the pad is being clicked on
Latching
This mode will activate the mixer action when the pad is clicked, and remain active until the pad is clicked for a second time
Available Mixer Actions
There are several mixer actions available, which can be accessed via the horizontal scroll bar in the centre of the pop-out pad configuration menu.
1. Censor
This mode will mute ALL other audio sources, and play either a beep tone or a custom sound when pressed
2. Trash Talk
This mode will mute the audio being sent to your Chat audio device, meaning you can talk about your online guests without them hearing you!
3. Back Channel
This mode will remove your chat and your microphones from the stream mix and any submixes, allowing you to talk to your guests on the chat without it going out on your stream. Great for setting up a conversation without your audience hearing you.
4. Fade In/Out
This will automatically fade out all your audio whilst the pad is activated. When the pad is deactivated, the audio will fade back in.
5. Ducking
This will lower the volume of all other audio playing when microphone 1 is active (someone is speaking into it). This is great for allowing the host to cut through the chatter and noise to be heard on the stream.
Configuring the Censor Mode
When you select the censor tone, by default the pad will play a classic ‘bleep’ tone when activated. However, you can replace this with a custom sound of your choice.
To do this, select ‘custom’ from the buttons at the bottom of the pad set-up screen for the censor effect. You can then use the ‘file browse’ button to select the file you want to play. You can preview the file using the play icon. To delete the sound, click the ‘clear’ button.
Note that if you clear the sound but do not select ‘beep tone’, no sound will play when the pad is activated.
Custom sounds will loop continuously whilst the censor pad is activated.
Configuring the Fade In/Out Mode
When you select the fade in out effect, activating the pad will fade out all of your audio on your stream and submixes.
You can configure the speed of both the fade in and the fade out using the controls at the bottom of the configuration pop-our menu. To do this, click on the time you wish to change, and move the mouse left or right. Fades can be set from 0s to 3s in length.
If you activate the ‘exclude host’ option by clicking on the control on the right, it will not fade out microphone 1, so the host can continue talking as the rest of the audio is faded out.
Recording
Recording with UNIFY
You can record the output of UNIFY directly to your computer. This makes it great not just for capturing your stream, but also for recording podcasts and other content.
To start recording, simply click the red ‘record’ icon at the top left of the main UNIFY screen. The timer will show the elapsed recording time. To stop recording, simply click on the record icon again.
The Recording Submix
There is a separate submix for the recording. This is accessed in the same way as the other submixes – see the Submix section earlier for details.
This means you can set a different mix for your recordings compared to your stream. Some options for this include:
- Leaving the recording mix linked to the stream mix, to capture exactly what you broadcast
- Unlink all the sources in the recording mix, and set the sliders to the unity point. This will deliver a ‘pre fader’ recording of your show. Combined with multi-channel recording, it allows for maximum flexibility in post-production
- Remove just the music from your recorded mix, so you can upload it later to your channel without introducing copyright issues
Adding Markers When Recording
You can add a marker to your recording by clicking the flag icon that will appear next to the timer when you are recording. This will drop a marker into the recorded file that can be used when exporting, and which can be read by many DAWs when using the files for post-production.
Accessing and Previewing Your Recordings
You can access your recordings by clicking on the ‘recordings’ icon at the top right of the main UNIFY display. Recordings are played back both through the ‘monitor’ output (if active) and headphone 1.
On the left of this window you will see all your recordings, the time they were made, and their duration.
To listen to a recording, select it and click the play icon. You can then use the time jump and marker jump controls to shuttle through the recording. You can zoom in and out on the waveform using the magnifying glass icons.
Note: Accessing the recordings window will cut all audio to your stream and other submixes, so do not access this function when you are streaming. You will not be able to access the recordings window if you are recording.
Exporting Recordings
To export a recording, you can select it, and then click the ‘export’ button on the bottom right of the screen. This allows you to set the location and filename for the export.
You can also select various export options using the dropdowns as follows:
1. Platform
This allows you to select the platform you intent to upload the content to, and optimises the file format and loudness for that platform. Many of the most popular platforms are included. When selecting this option, the other options will grey out, showing the settings relevant for that platform. To manually select your export settings, select ‘custom’ in this dropdown.
2. Format
You can export recordings in either MP3 or WAV format using this control
3. Frequency
This is the sample rate of the recording, and can be set to either 48Khz or 44.1KHz
4. Quality
When exporting in MP3 this sets the quality of the MP3 file. Higher bitrates will sound better, but create larger file sizes.
5. Loudness
This allows you to normalise your audio to a specific loudness (LuFs) setting. This ensures that your audio is neither too quiet or too loud overall.
Deleting Recordings
To delete a recording, you can select it, and then click the ‘delete’ button on the bottom right of the screen.
Colour Coding and Renaming Recordings
You can assign a colour and a name to a recording, to make it easier to keep track of your recordings.
To change the name of a recording, select the recording and then click the ‘edit’ button next to the name (to the right of the window). Retype the name you wish to give the recording. This name will also be used if the recording is exported.
To change the colour, use the colour picker above the ‘delete’ and ‘export’ buttons.
Multitrack Recordings
You can also record a full multitrack mix of your UNIFY inputs, for later post production. To do this, go to the ‘preferences’ settings, found in the main menu. Select ‘multi-channel’ in the recording section.
When you export a multi-channel recording, you will get separate files for each audio source (both audio devices and virtual devices), as well as the stereo mix.
Accessing Recordings Directly
To access the actual files recorded by UNIFY without needing to export them, navigate to the ‘RØDE UNIFY’ folder in your default ‘Documents’ folder. The UNIFY recordings are there. Each recording is in a different folder, labelled with the date of the recording. The default recording format is WAV, 48kHz.
Preferences
Preferences
There are a few preferences you can set in UNIFY that control how the program operates. The preferences are accessed via the main menu.
They are as follows:
1. Recording
This allows you to select either stereo or multi-channel recording modes (see above)
2. Latency
This determines how large the internal audio buffer size is. The ultra-low setting can help reduce delays, especially if using the monitor out as a headphone output for devices such as the NT1 5th generation. However, it uses more computing power, and may cause glitches on some systems.
3. Close action
This selects what happens when you click the ‘x’ in the top corner of the UNIFY window. It can either immediately close the program, give a dialog asking if you want to close, or minimise the application
4. Tooltips
This turns on and off the notes that appear when you hover over a control with the mouse.
Updating UNIFY and Your Devices
UNIFY Updates
When you start UNIFY, it will check to see if there are any updates available. Updates are made regularly, and include bug fixes, support for additional microphones and new features.
If an update is available, UNIFY will ask if you want to download the update. UNIFY will also close, so you can run the downloaded installer to update your version of UNIFY. Note you cannot update UNIFY whilst the software is running.
There is no requirement to update UNIFY, but we recommend that you regularly update to the latest version, in order to ensure continued support and compatibility with computers and audio devices.
Microphone Updates
UNIFY will also tell you if there is a firmware update available for your microphones or other RØDE audio devices. These updates must be done in order to ensure compatibility between your microphone and UNIFY.
Simply click to update your microphone or other device – typically the update only takes a few seconds. It is important not to unplug your device from your computer whilst an update is in progress.
Pro Tip
Whilst most devices will update very quickly, due to the added complexity of the Streamer X it can sometimes take several minutes for the Streamer X to update, and the device may reboot several times during the update. Just be patient until the update is completed, and the Streamer X is available to select in UNIFY.