Using the SMART Pads
Using the SMART Pads
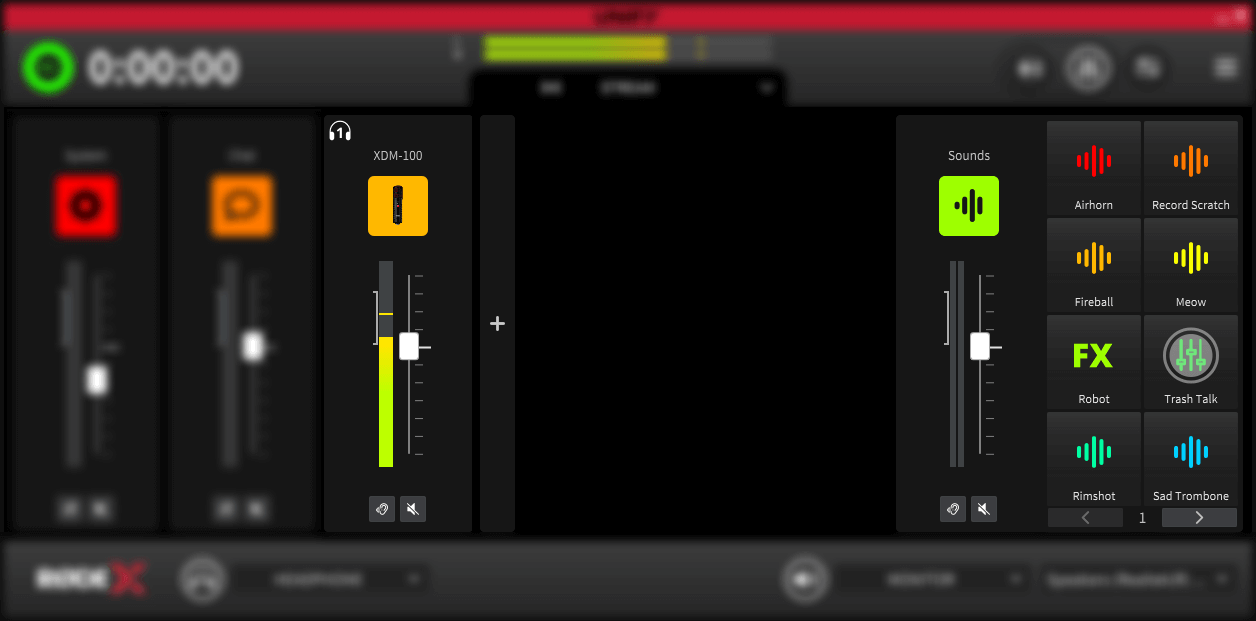
The SMART pads can be used to trigger sounds, voice effects and perform mixer actions to add interest and excitement to your stream.
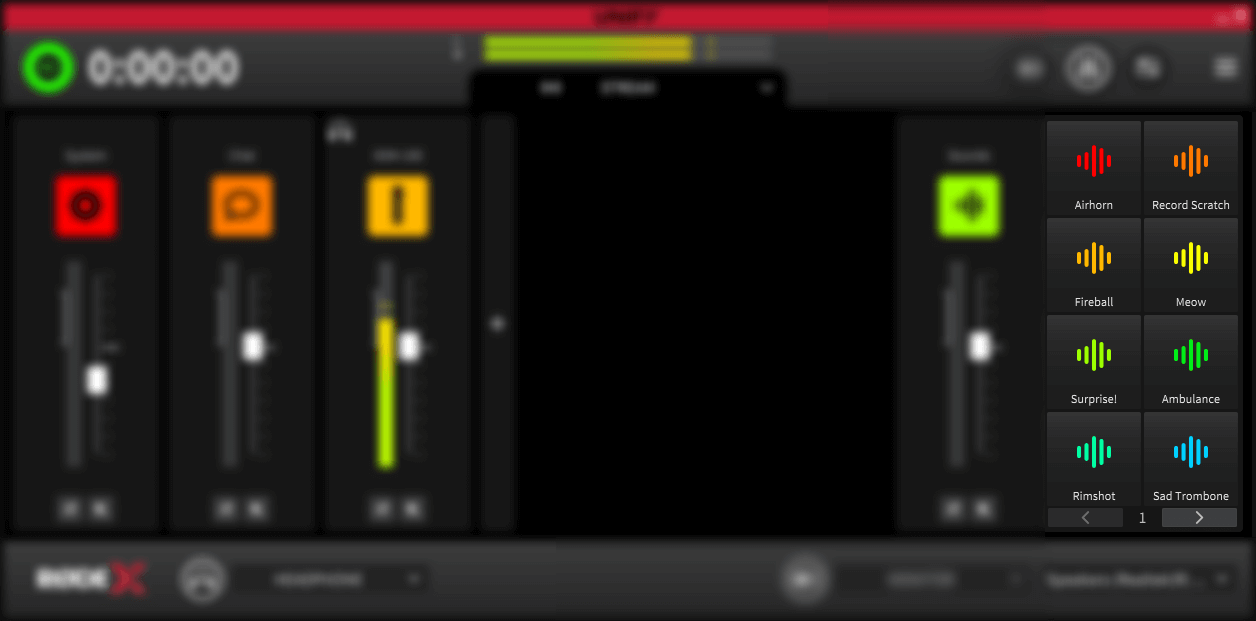
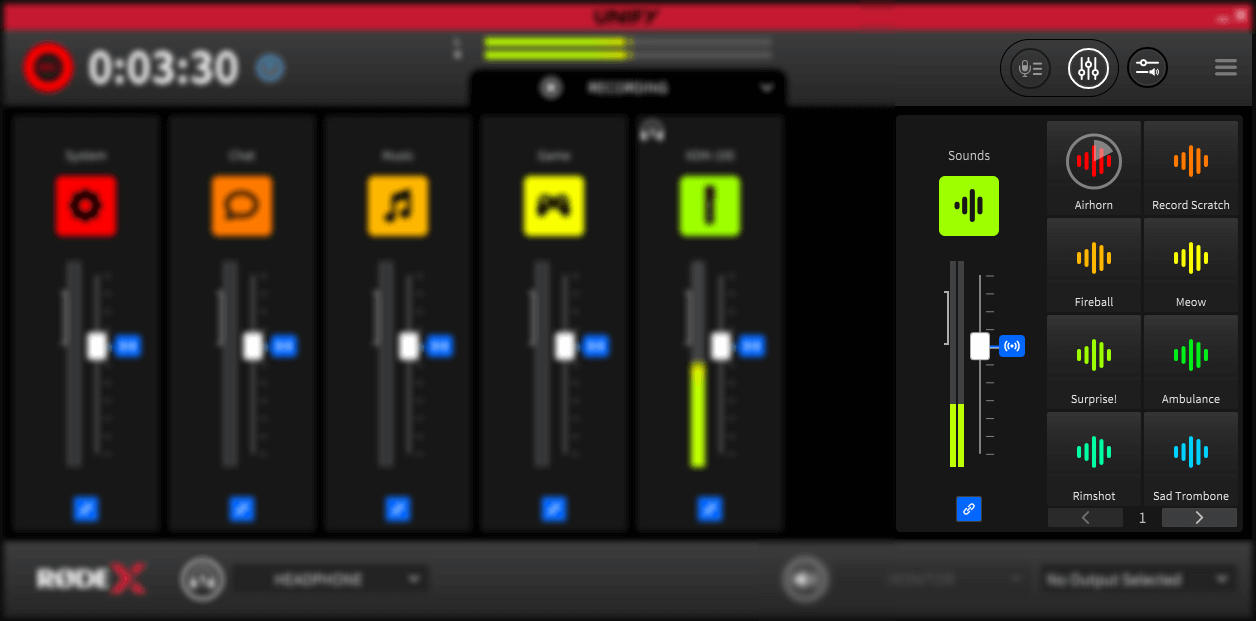
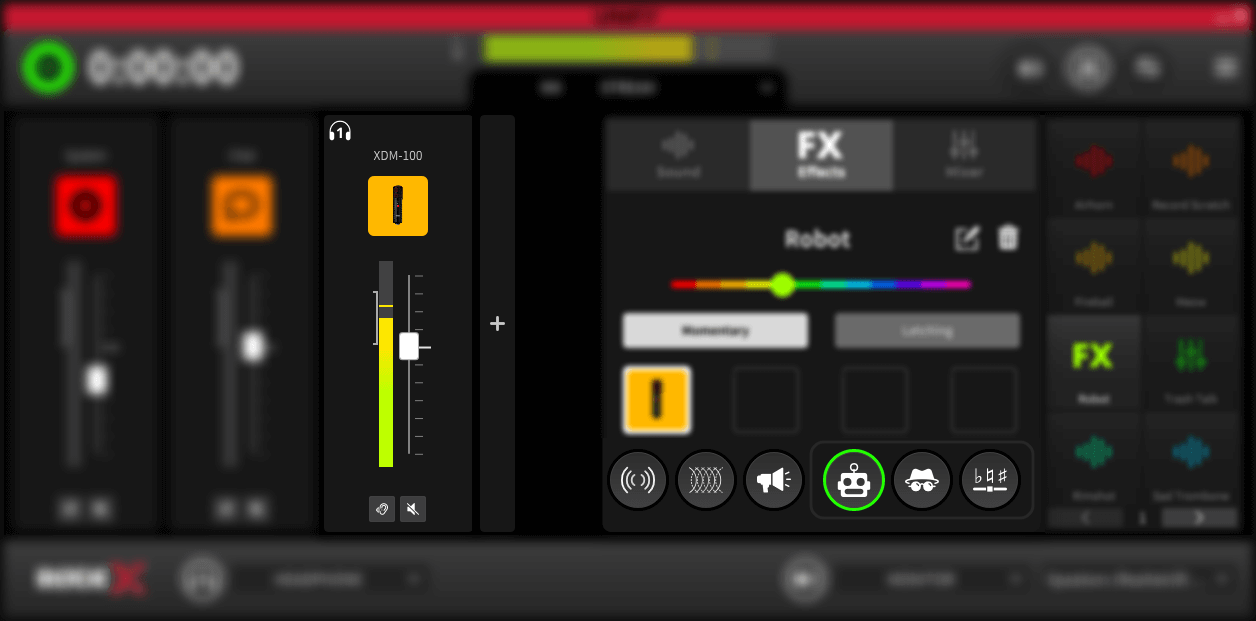
Sounds from the pads appear on the right-hand slider, next to the pads. You can adjust the level of pad playback using this slider. You can also set a different level for the pads in the submixes (see Submix section above).
Pads are triggered by clicking on them. There are three pad functions – sound playback, voice effects and mixer actions.
Note
If you are using the Streamer X, the pads cannot be triggered with the mouse, and are instead triggered by the physical pads on the unit. See the Streamer X user guide for more details on using the pads with the Streamer X.
Sound Pads
When a sound pad has a sound loaded onto it, it will have the ‘sound’ icon showing, with the name of the pad or sound underneath.
Clicking on the pad will play the sound. When the pad is playing, a countdown timer will show on the pod, to indicate how long the sound will play for.
What happens when you click the pad again depends on the pad settings; see below for more details.
Voice Effect Pads
Voice effects pads have the ‘FX’ logo on them, and the name showing underneath. Various voice effects are available, including pitch shift, reverb and megaphone effects. Voice effects can be configured to operate on just a single microphone, or on multiple microphones if they are connected.
Voice effects pads can either remain triggered when clicked, staying activated until they are clicked again, or they can just be activated by holding down the mouse button. See below for more details on configuring the pads.
Mixer Action Pads
Mixer action pads can carry out a range of functions relating to audio levels and microphone outputs, including a profanity bleep, automatic fade out and communications functions.
Mixer action pads can either remain triggered when clicked, staying activated until they are clicked again, or they can just be activated by holding down the mouse button. See below for more details on configuring the pads.
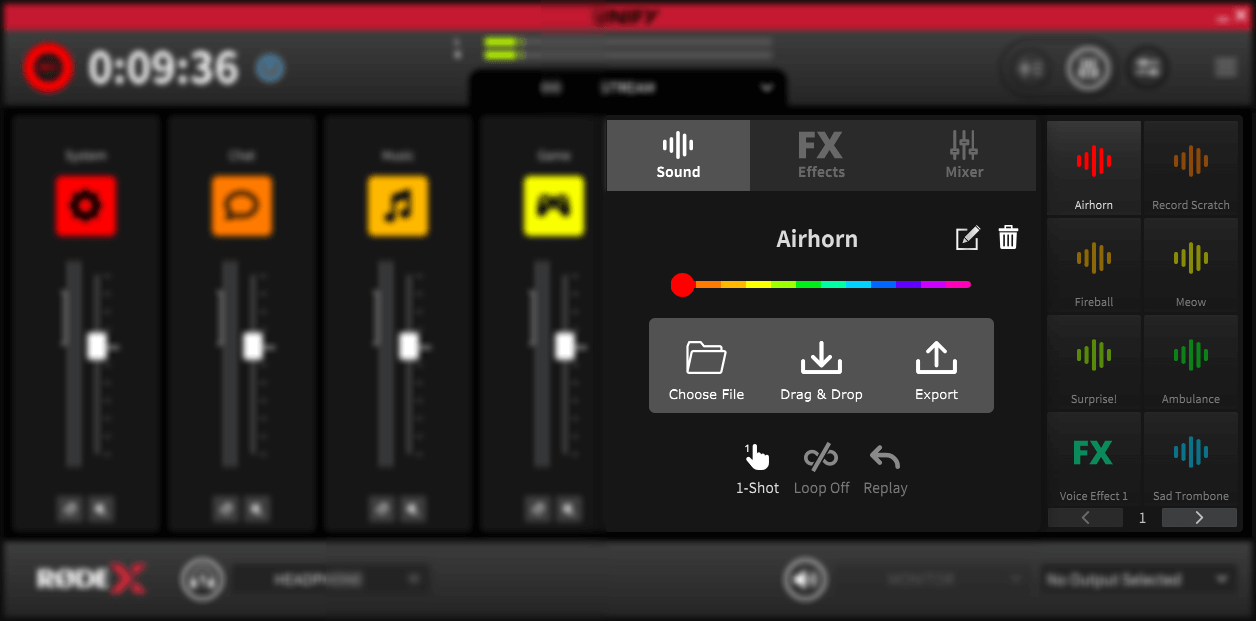
Pad Banks
You can configure multiple banks of pads, and switch between banks using the bank switch buttons underneath the pads. Up to 8 banks can be configured, giving up to 64 pad actions. A new bank will be added (up to the maximum of 8) when a pad is configured on the highest number bank.
.png)
Note
When using the Streamer X, there will only by 4 pads on the screen, to correspond with the physical pads on the device. For more details on using the SMART pads with the Streamer X, check the Streamer X user guide.
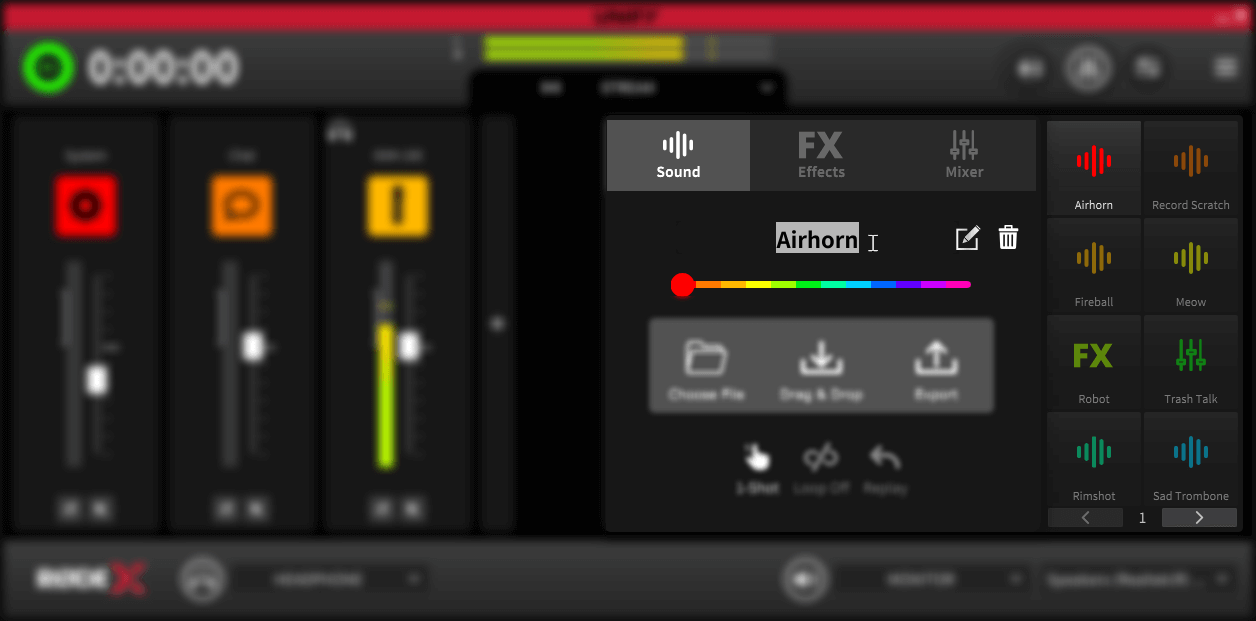
Changing the Pad Type, Colour and Name
Changing Pad Type, Colour and Name
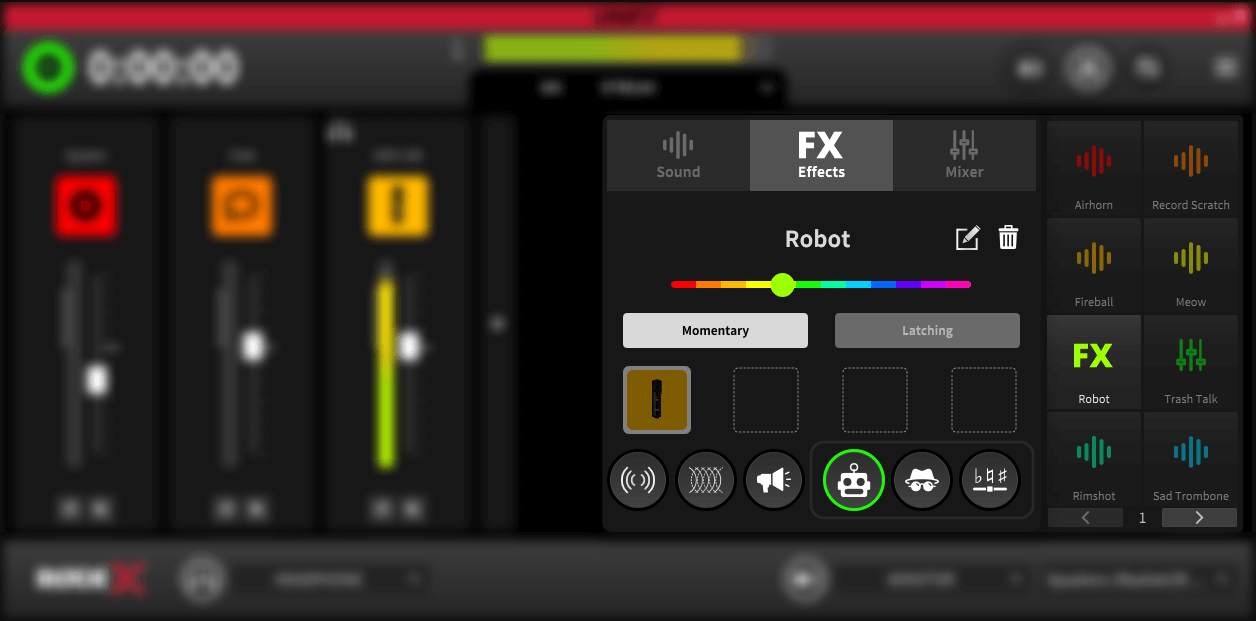
To configure the SMART pads, right-click on the pad you want to configure. This will reveal a pop-out menu with pad options.
At the top of the menu, you can select what kind of pad you want it to be – either sound, voice effect or mixer action.
Underneath this is a slider where you can select the pad colour. Under this is the name of the pad. By default, this will be the name of the sound file or effect that has been configured, but this can be edited by pressing the ‘edit’ pencil icon. A new name can then be typed – note this is limited to 25 characters.
You can delete (completely clear) the pad by clicking on the delete (trash can) icon. This allows you to remove all the pad settings from that pad.
Configuring Sound Playback From Pads
Loading Sounds on the Pads
To load a new sound on to the pad, right click on the pad you want to add a sound to, and ensure that the ‘sound’ pad type is selected at the top left of the pop-out menu.
You can add a sound either by dragging the sound file you want to add to the pad onto the ‘drag and drop’ icon from the file manager, or you can browse to the file by clicking on the ‘choose file’ option.
Files in either MP3 or WAV format are supported.
When a new sound is added to the pad, the pad will be renamed the name of the sound file. You can further edit the name if needed; see above for details.
Sound Playback Modes
You can alter the playback mode for the pad by clicking on the icons at the bottom of the sound pad configuration menu.
Standard Sound Playback
There are three standard playback modes for sound the pads. Clicking the left icon will cycle through the available playback modes:
1. Toggle
In this mode, the pad will start playing when clicked. Clicking it again will stop playback.
2. 1-shot
In this mode, clicking the pad will start playing. Clicking the pad again will start the sound again from the beginning, allowing ‘stutter’ type effects
3. Hold
In this mode, the pad will play whilst the pad is clicked, and playback will stop when the mouse button is release.
Looping Sound Playback
If looping is activated, the sound loaded on the pad will loop continuously when the pad is activated. This allows for continuous playback of beats, atmospheres and other loops.
Note that loop mode is not available with the ‘1-shot’ playback mode.
To activate loop mode, click on the ‘loop’ icon in the centre at the bottom on the pad configuration menu.
Replay Mode for Sound Pads
Replay mode changes what happens when a pad is stopped. There are two modes:
1. Replay
In this mode, the pad will play from the start of the sound each time it is activated.
2. Continue
In this mode, the pad will continue playback from the point reached when it was stopped.
Note that continue mode is not available with the ‘1-shot’ playback mode.
To change replay type mode, click on the ‘replay’ icon on the right at the bottom on the pad configuration menu.
Configuring Pad Voice Effects
Activating Voice Effects
To add a voice effect to a sound pad, right click on the pad you want to add the effect to, and ensure that the ‘FX pad type is selected at the top of the pop-out menu.
In this menu you will also see all the microphones (or audio devices) that are available in UNIFY. To add a sound effect to a microphone, click the icon for that microphone so it is highlighted. You can add the sound effect to up to 4 microphones.
Voice Effects Activation modes
There are two different activation modes for voice effects which are selected using the buttons in the pop-out pad configuration menu. They operate as follows:
1. Momentary
This mode will activate the effect whilst the pad is being clicked on
2. Latching
This mode will activate the effect when the pad is clicked, and remain active until the pad is clicked for a second time
Note
If you have a Streamer X connected, you will not be able to add voice effects to other microphones that are connected, even if they are available in UNIFY.
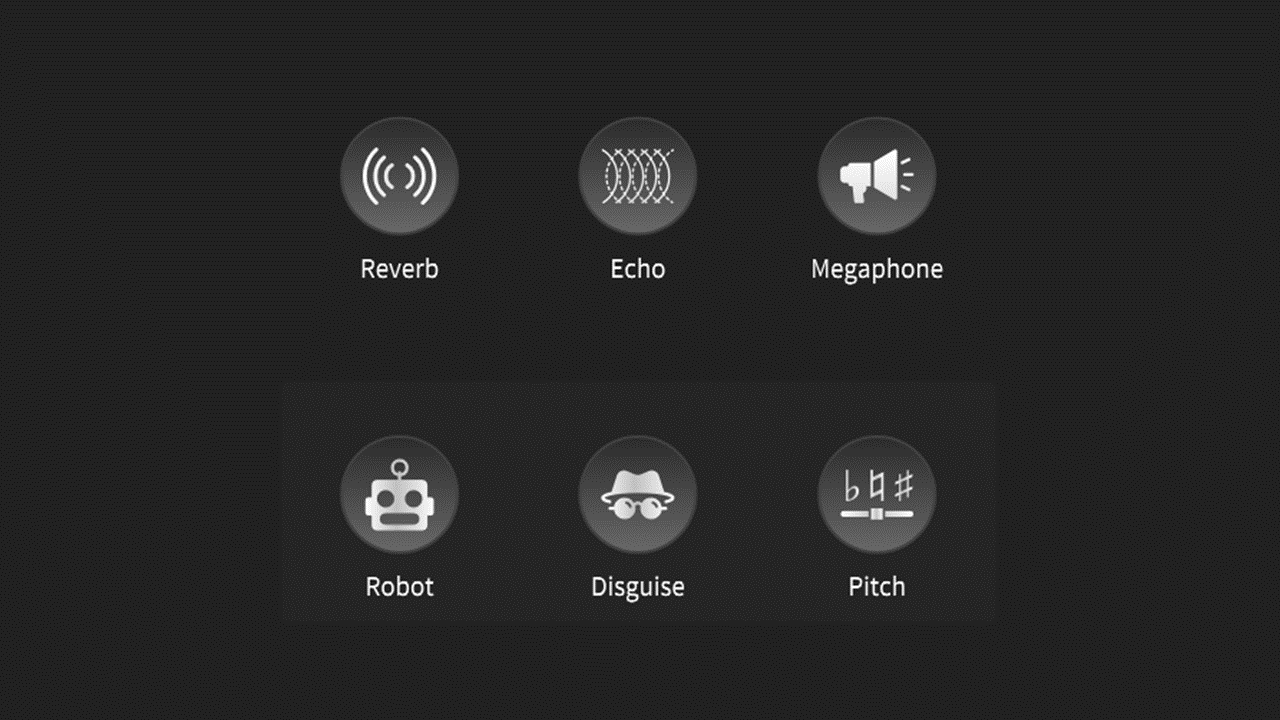
The Types of Voice Effects Available
There are four different voice effects that can be used. They can be used singly, or more than one effect can be layered up on top of each other. The effects are:
1. Reverb
This adds a reverb to your voice as if you are in a large room or cave
2. Echo
This adds a repeating echo to your voice
3. Megaphone
This adds a megaphone effect to your voice, a if you are speaking through a loudhailer
Modulation Effects
There are three different modulation effects to choose from which will change the timbre, character or pitch of your voice:
1. Robot
This makes your voice sound like a sci-fi robot
2. Voice Disguise
This will disguise your voice making you sound very different
3. Pitch Shift
This will alter the pitch of your voice, allowing you to sound like a monster or a munchkin
Whilst you can use all four main voice effects at once, you can only use one modulation effect at a time.
Selecting Voice Effects
To add voice effects to a pad, right click on the pad to activate the pop-out pad configuration menu. Select the ‘FX’ type from the top of the menu.
At the bottom of the menu are icons for the different voice effect types. Effects that are activated are highlighted green.
When you click on the icons, the control panel for that effect will appear. Each control panel has an on/of switch, which can be used to either activate or deactivate the effect. See below for more details on the controls for each effect.
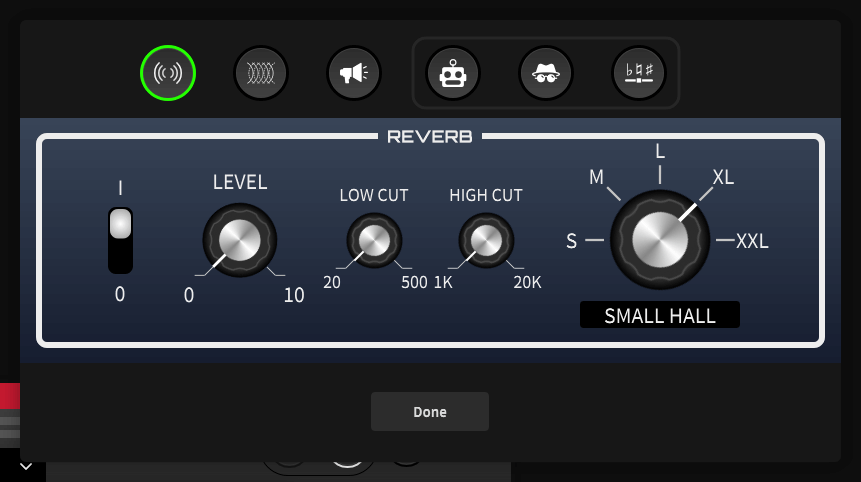
Configuring the Reverb Effect
Clicking on the ‘reverb’ icon in the pad pop-out configuration menu will open up the reverb control panel. The controls operate as follows (from left to right):
1. I/O switch
This turns the reverb effect on and off
2. Level
This controls the level of the effect. The higher it is, the more obvious the effect will be
3. Low cut
This reduces the amount of low-frequency sounds in the reverb to make it less muddy and enhance voice clarity
4. High cut
This reduces the amount of high frequency sounds in the reverb to reduce unpleasant sibilance
5. Size
This controls the type of reverb, simulating a range of settings from a room to a very large hall.
To close the control panel when finished click ‘Done’.
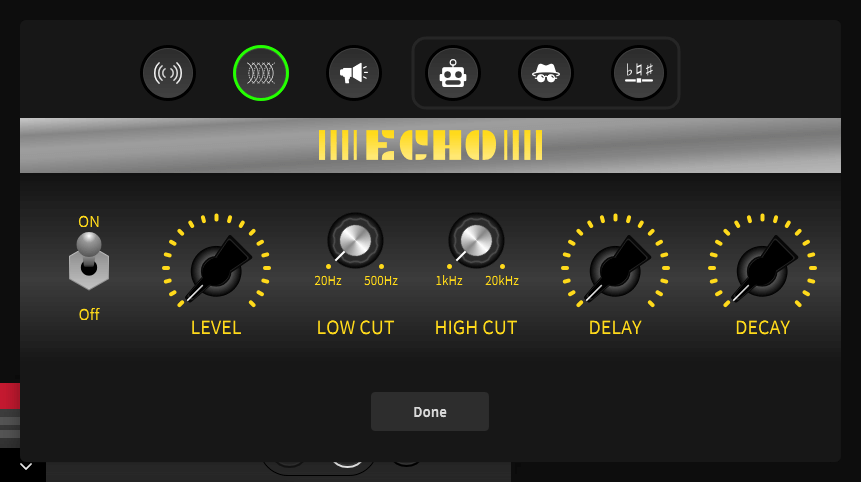
Configuring the Echo Effect
Clicking on the ‘echo’ icon in the pad pop-out configuration menu will open up the echo control panel. The controls operate as follows (from left to right):
1. On/off switch
This turns the echo effect on and off
2. Level
This controls the level of the effect. The higher it is, the more obvious the effect will be
3. Low cut
This reduces the amount of low-frequency sounds in the echo to make it less muddy and enhance voice clarity
4. High cut
This reduces the amount of high frequency sounds in the echo to reduce unpleasant sibilance
5. Delay
This controls the length of time between each echo. A higher setting will mean there is a longer gap between each echo
6. Decay
This determines how quickly the echoes die away. A higher setting will mean the echoes go on for longer
To close the control panel when finished click ‘Done’.
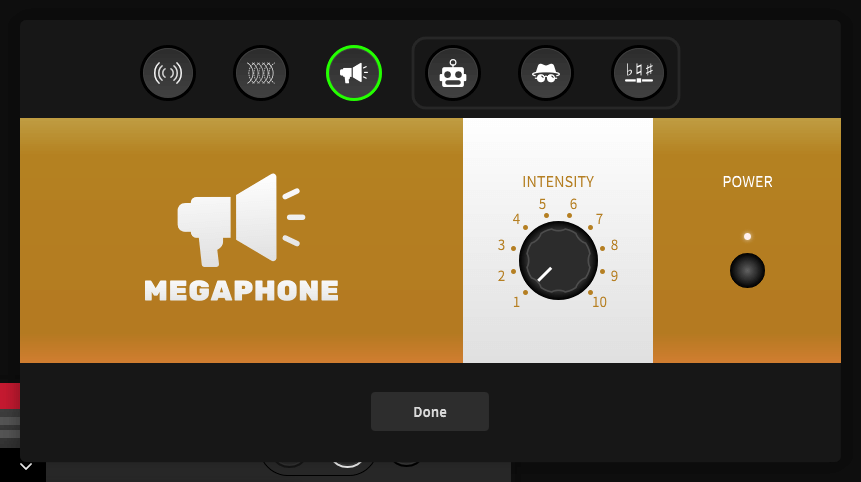
Configuring the Megaphone Effect
Clicking on the ‘megaphone’ icon in the pad pop-out configuration menu will open up the megaphone control panel. The controls operate as follows (from right to left):
1. Power button
This turns the megaphone effect on and off
2. Intensity
This controls the overall sound of the effect. The higher it is, the more obvious the effect will be
To close the control panel when finished click ‘Done’.
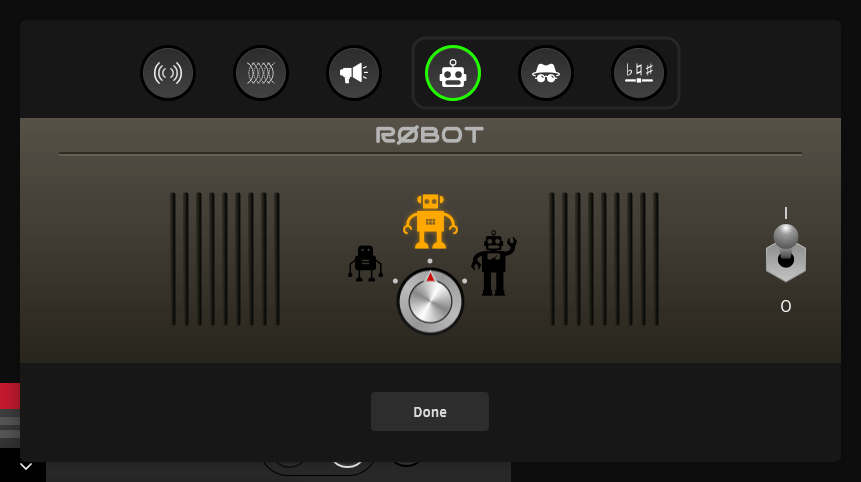
Configuring the Robot Effect
Clicking on the ‘robot’ icon in the pad pop-out configuration menu will open up the robot control panel. The controls operate as follows (from right to left):
I/O switch
This turns the robot effect on and off
Robot type
This allows you to choose between three different robot voice types, representing different sized robots
To close the control panel when finished click ‘Done’.
Note that the robot effect cannot be used at the same time as voice disguise or pitch shift. Only one modulation effect can be used at a time (see above for details).
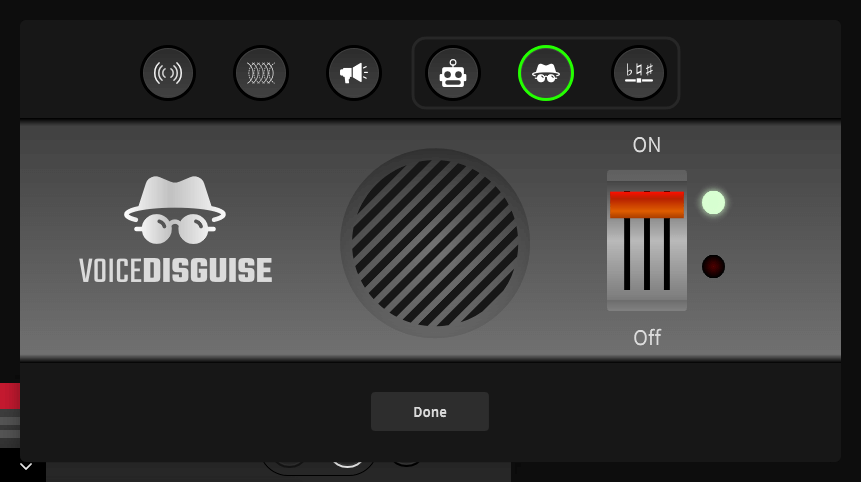
Configuring the Voice Disguise Effect
Clicking on the ‘voice disguise’ icon in the pad pop-out configuration menu will open up the voice disguise control panel. This only has one control, which turns the effect on or off.
To close the control panel when finished click ‘Done’.
Note that the voice disguise effect cannot be used at the same time as robot or pitch shift. Only one modulation effect can be used at a time (see above for details).
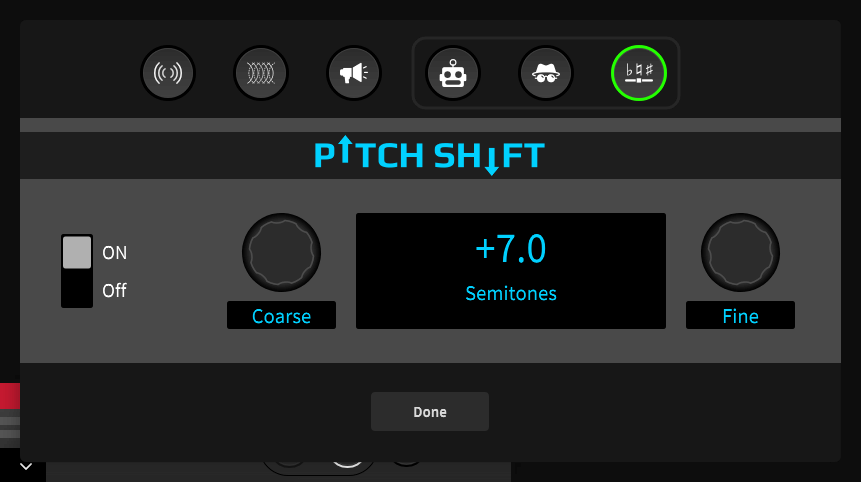
Configuring the Pitch Shift Effect
Clicking on the ‘pitch shift’ icon in the pad pop-out configuration menu will open up the pitch shift control panel. The controls operate as follows (from right to left):
1. On/off switch
This turns the pitch shift effect on and off
2. Course
This allows you to change the pitch of your voice in semitone increments, up to an octave up or down
3. Fine
This allows you to change the pitch of your voice in cent increments, to fine tune the pitch shift.
The amount of pitch shift being applied is shown on the centre display.
To close the control panel when finished click ‘Done’.
Note that the pitch shift effect cannot be used at the same time as robot or voice disguise. Only one modulation effect can be used at a time (see above for details).
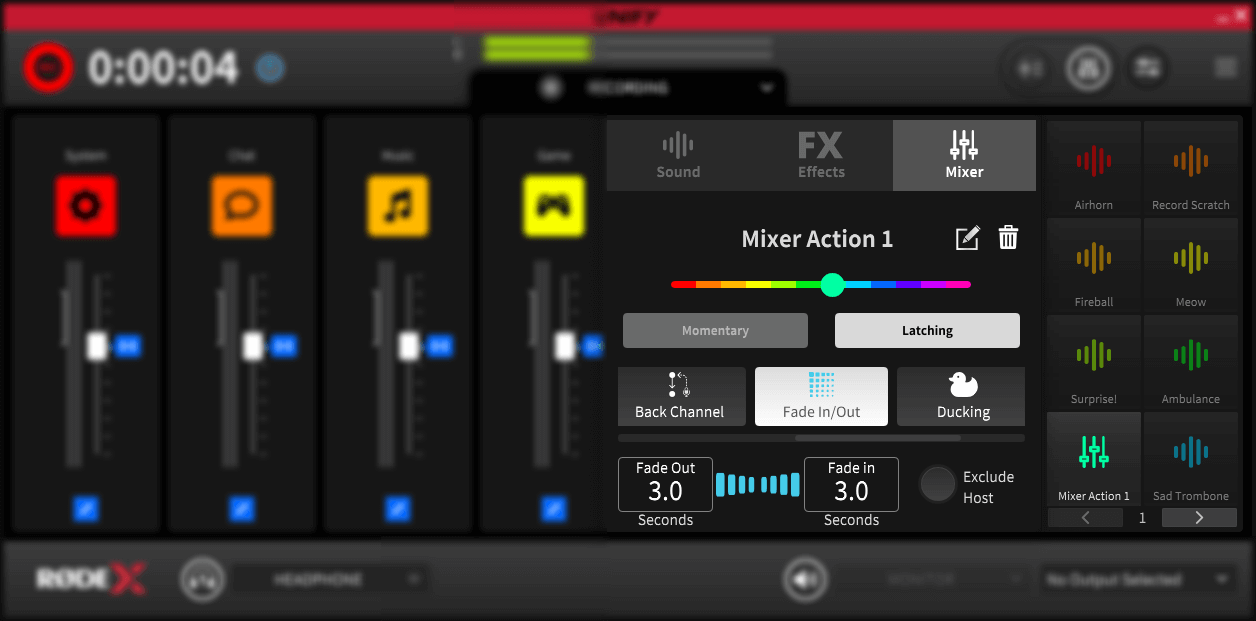
Configuring Pad Mixer Actions
There are several mixer actions available, which can be accessed via the horizontal scroll bar in the centre of the pop-out pad configuration menu.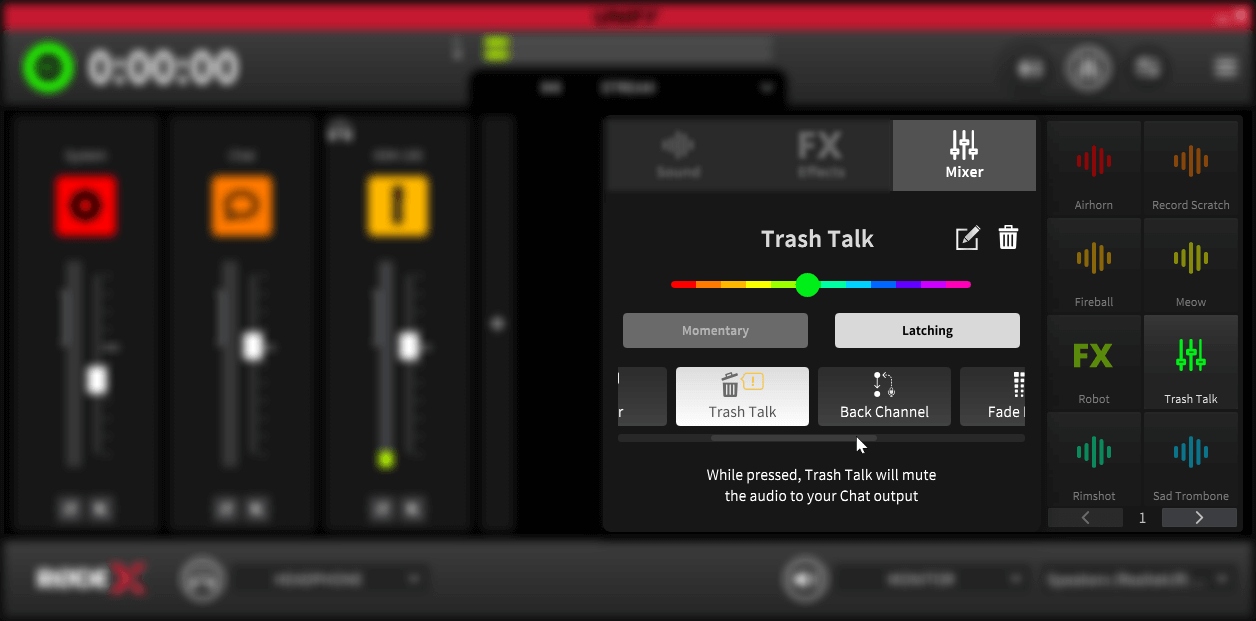
Activating Mixer Actions
To add a mixer action to a sound pad, right click on the pad you want to add the effect to, and ensure that the ‘mixer’ pad type is selected at the top of the pop-out menu.
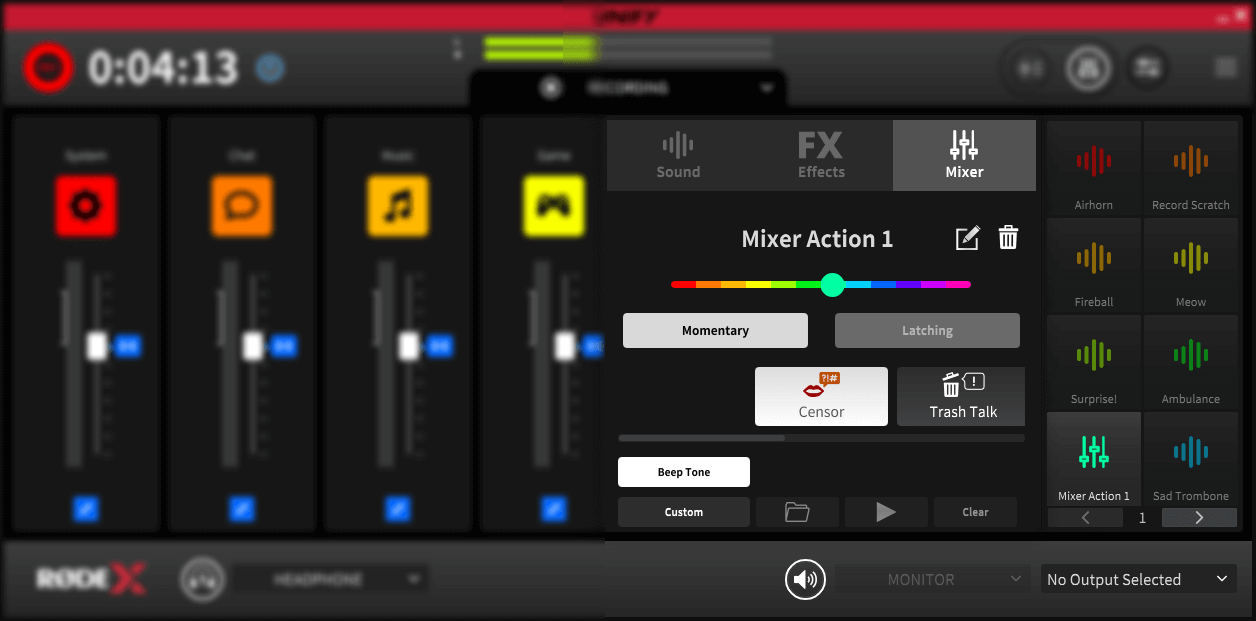
There are two different activation modes for mixer actions which are selected using the buttons in the pop-out pad configuration menu. They operate as follows:
Momentary
This mode will activate the mixer action whilst the pad is being clicked on
Latching
This mode will activate the mixer action when the pad is clicked, and remain active until the pad is clicked for a second time
Available Mixer Actions
There are several mixer actions available, which can be accessed via the horizontal scroll bar in the centre of the pop-out pad configuration menu.
1. Censor
This mode will mute ALL other audio sources, and play either a beep tone or a custom sound when pressed
2. Trash Talk
This mode will mute the audio being sent to your Chat audio device, meaning you can talk about your online guests without them hearing you!
3. Back Channel
This mode will remove your chat and your microphones from the stream mix and any submixes, allowing you to talk to your guests on the chat without it going out on your stream. Great for setting up a conversation without your audience hearing you.
4. Fade In/Out
This will automatically fade out all your audio whilst the pad is activated. When the pad is deactivated, the audio will fade back in.
5. Ducking
This will lower the volume of all other audio playing when microphone 1 is active (someone is speaking into it). This is great for allowing the host to cut through the chatter and noise to be heard on the stream.
Configuring the Censor Mode
When you select the censor tone, by default the pad will play a classic ‘bleep’ tone when activated. However, you can replace this with a custom sound of your choice.
To do this, select ‘custom’ from the buttons at the bottom of the pad set-up screen for the censor effect. You can then use the ‘file browse’ button to select the file you want to play. You can preview the file using the play icon. To delete the sound, click the ‘clear’ button.
Note that if you clear the sound but do not select ‘beep tone’, no sound will play when the pad is activated.
Custom sounds will loop continuously whilst the censor pad is activated.
Configuring the Fade In/Out Mode
When you select the fade in out effect, activating the pad will fade out all of your audio on your stream and submixes.
You can configure the speed of both the fade in and the fade out using the controls at the bottom of the configuration pop-our menu. To do this, click on the time you wish to change, and move the mouse left or right. Fades can be set from 0s to 3s in length.
If you activate the ‘exclude host’ option by clicking on the control on the right, it will not fade out microphone 1, so the host can continue talking as the rest of the audio is faded out.