Recording to MicroSD Card
Now that you’ve set up your audio channels with advanced processing and effects, you are finally ready to record your podcast.
One of the advantages of podcasting with the RØDECaster Pro is that you don’t necessarily need to connect a computer to record. By recording to a microSD card, everything can be done entirely within the console. This is one of the quickest and easiest ways to podcast with the RØDECaster Pro.
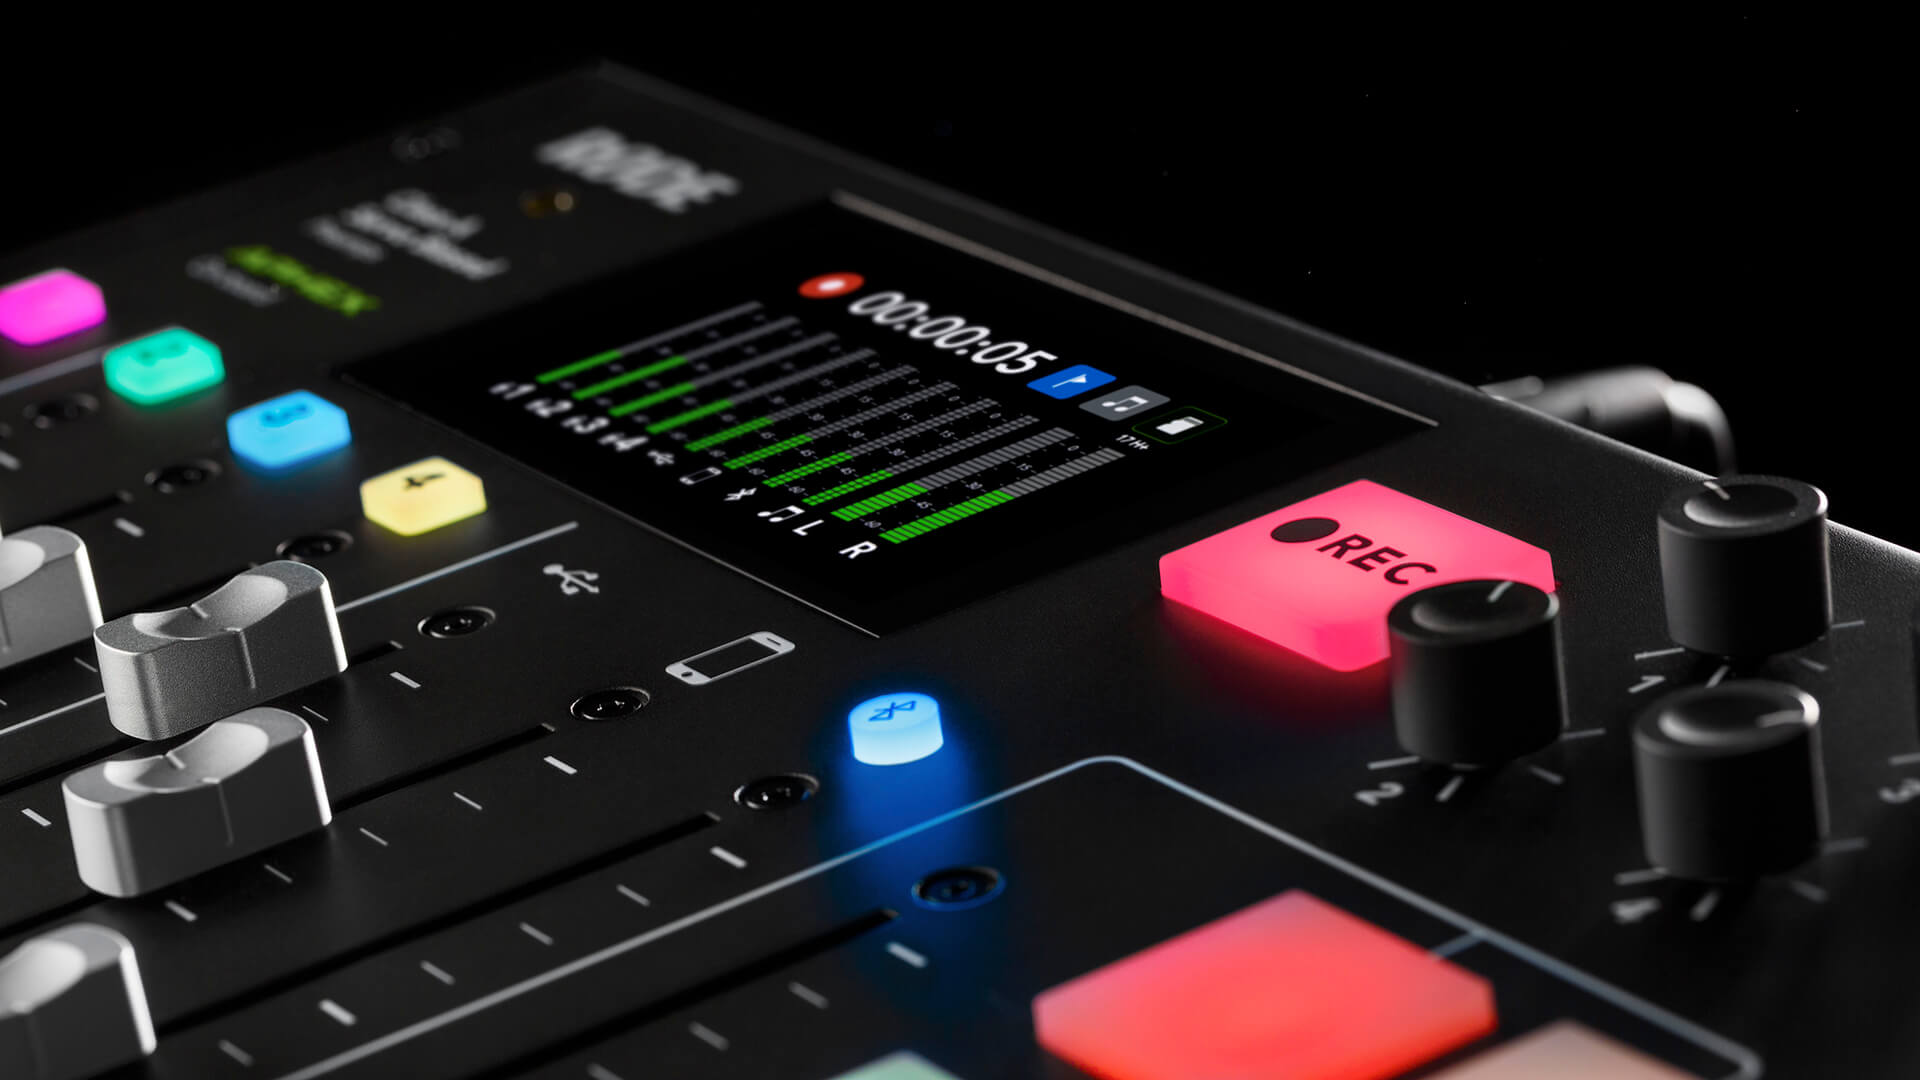
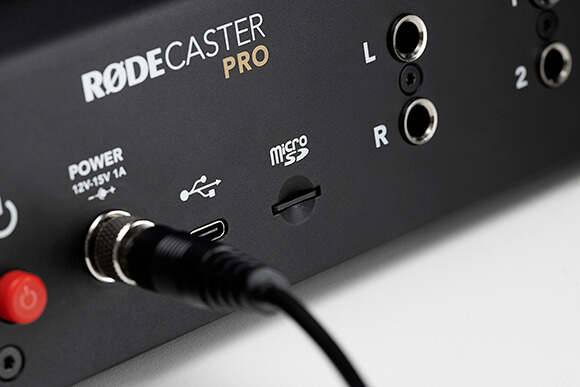
To get started, insert a microSD card. The card slot can be found on the back of the unit, next to the USB output. You should see the SD card icon in the top right corner of the main screen turn green, with a number underneath indicating how much recording time you have left on the card (also indicated by the colour fill on the icon).
Types of MicroSD Cards
It is important to use a high-quality microSD card with the RØDECaster Pro. Using a lower-quality card may mean the read and write speed of the card is compromised, and this can cause recording and playback errors.
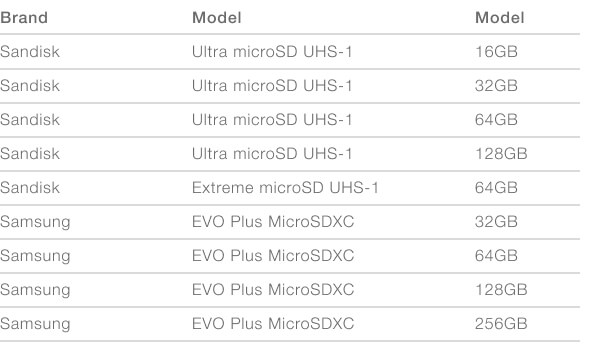
These microSD cards have been extensively tested with the RØDECaster Pro.
If your card is not on this list, any card from these manufacturers that is Class 10 or above would be ideal (for example, the Sandisk Ultra Plus and Extreme ranges).
Formatting MicroSD Cards
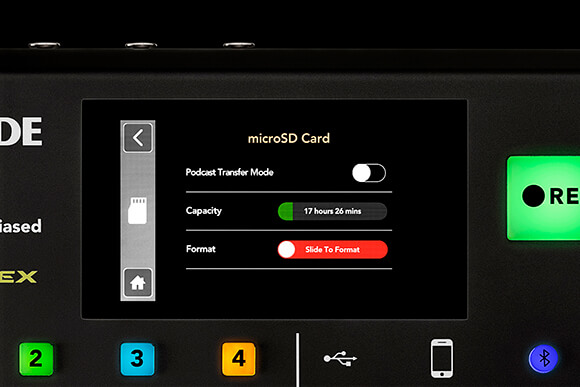
If this is the first time you're using a microSD card to record with the RØDECaster Pro, it’s a good idea to format the card before recording. This will avoid any potential formatting issues, speed up file transfer and ensure your podcasts are recorded properly.
To do this, navigate to the microSD card menu by either tapping the icon on the home page or going to ‘Settings’ > ‘Advanced’ > ‘MicroSD Card’. From here you can not only see how much recording time you have left on the card, but you can use the slide control at the bottom to format your inserted microSD card.
Now that you have the correct type of microSD card and it is formatted properly, you can hit record!
Pro Tip
You can pause your recording mid-podcast by pressing and holding the record button. This is handy if you need to take a bathroom break or organise a guest for the podcast. Simply press the record button again to resume your recording.
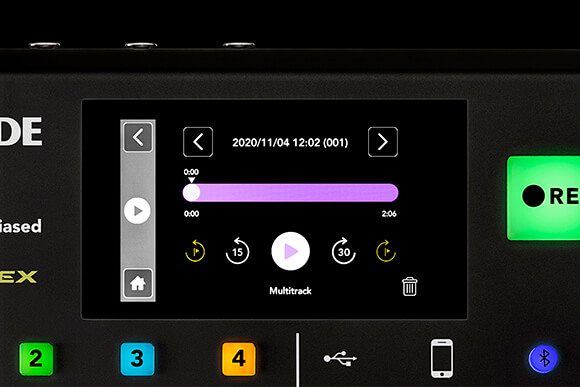
Once you’ve recorded a podcast, you can easily listen back to it on the RØDECaster Pro. To do this, go to ‘Settings’ > ‘Podcasts’. Here, every podcast recorded onto the microSD card can be accessed.
Each podcast is stamped with the date and time it was recorded, which is displayed at the top of the screen. Pressing the arrow buttons either side of this will scroll through the other podcasts you’ve recorded. At the bottom right, you also have the option to permanently delete the displayed podcast from the microSD card.
To navigate through your podcast to listen to specific sections, you can press and drag the scrub tool along the timeline. You also have the option to jump back 15 seconds or forward 30 seconds with the skip controls.
If you used the flag tool to insert flags throughout your podcast, they will be displayed on the timeline as lines. You can then use the 'skip to flag’ control to flick back and forth between these marks and listen to specific areas that you flagged.
The bottom of the display tells you if the podcast was recorded in stereo or multitrack. In its default mode, your RØDECaster Pro will record podcasts as a stereo file, but you also have the option to record in multitrack. Both have benefits and your decision will depend on the workflow you prefer.
Stereo Recording to MicroSD Card
Recording in stereo will sum all of the channels (including the microphone channels, communications channels, sound pads etc) and record them as single stereo file. This has the benefit of a smaller file size, quicker file transfer, simplicity and faster workflow as you already have a file type that is ideal for uploading to a distribution platform like Spotify or Apple Podcasts.
If you decide this is the way you want to record, leaving your RØDECaster Pro in its default mode and recording in stereo is the way to go. Check out the section on exporting your podcasts to learn how to transfer podcasts from your RØDECaster Pro to your computer, ready for upload.
Multitrack Recording to MicroSD Card
If you decide that you want more options for editing your podcast or there are some changes or extra elements you want to add later on in post-production, you might consider recording in multitrack.
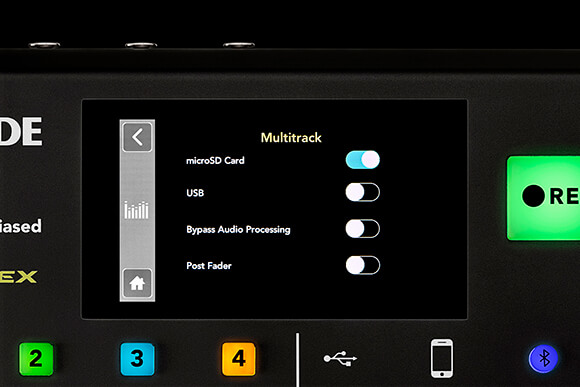
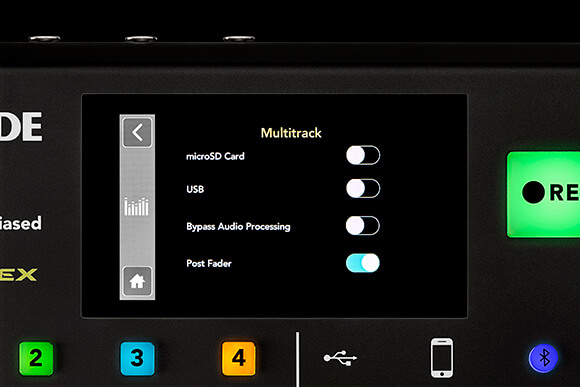
To set this up, you’ll need to go to ‘Settings’ > ‘Advanced’ > ‘Audio’ > ‘Multitrack’ and at the top of the list, activate the slider next to ‘microSD Card’.
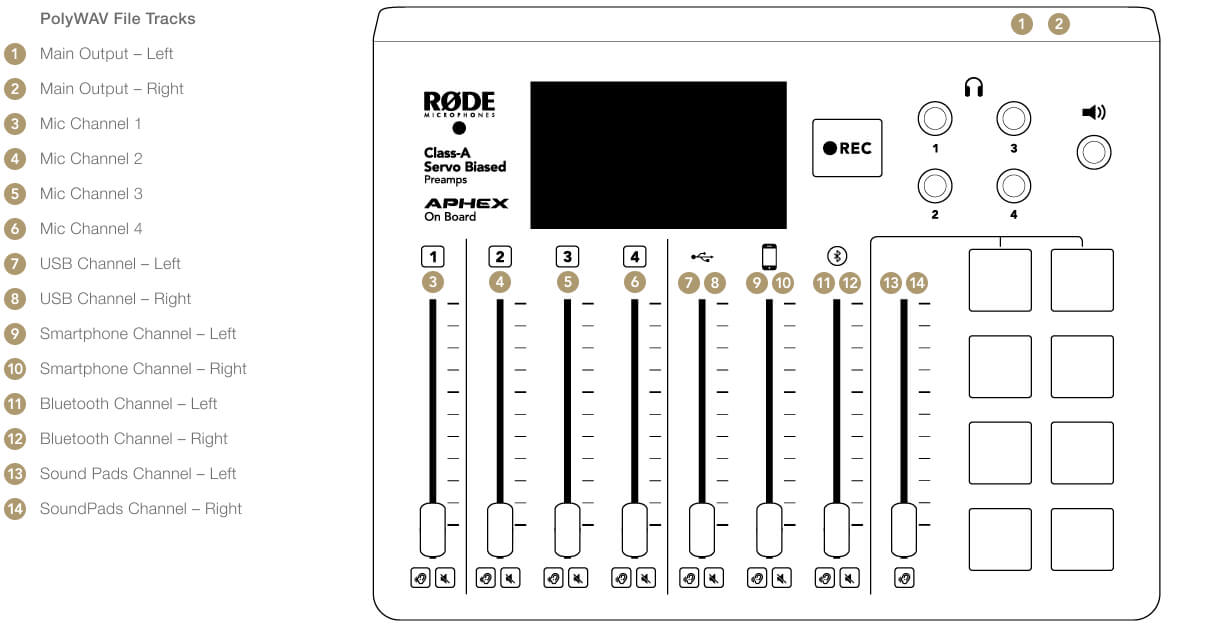
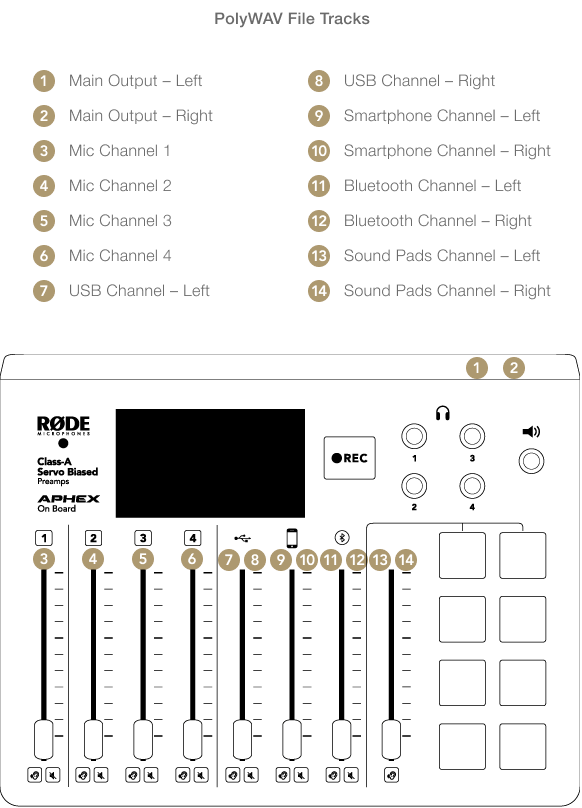
With multitrack recording switched on for the microSD card, whenever you hit record, each take will be recorded as a polyWAV file. This single file contains 14 tracks of audio.
These 14 tracks consist of both the left and right tracks of the stereo output of your entire podcast, mono tracks for each microphone channel, and four stereo tracks for each of your other audio sources (left and right for the USB channel, sound pads etc).
The graph below can be especially useful for keeping track of each sound source and its designated channels within the PolyWAV file.
Recording in multitrack to microSD is especially useful if you would prefer to edit your audio later in post-production as you have the option to make edits to each audio channel individually. This opens up unlimited options for mixing, editing and processing; all of which can be done on a computer in a digital audio workstation (DAW), such as GarageBand or Audacity.
There are a few ways to transfer your stereo or multitrack files from the microSD card to a computer. Check out the section on exporting your podcast to learn more.
Pro Tip
Recording in multitrack means the file sizes are a lot larger, so you may want to consider using a higher capacity microSD card. If you want to check how much recording time is left on your microSD card, navigate to the microSD card menu. The remaining capacity is displayed in hours and minutes. This figure will change depending on the mode that your RØDECaster Pro is set to record with, whether that’s stereo or multitrack.
Other Recording Options
You might notice that, after recording your multitrack podcast to a microSD Card and listening back to it on your computer, all channels are the same volume, with none of the mixing you did before or during recording carrying over to your multitrack files. This is because in its default mode, the RØDECaster Pro will always record in pre-fader.
Pre-Fader Mode
Recording pre-fader means the audio output is taken from the signal chain before it reaches the fader. Therefore, any changes made to levels through positioning the fader will not be applied to your final recording.
This might seem counterproductive, but recording in 'Pre-Fader Mode' has a few benefits. The main reason is that it’s completely non-destructive, meaning that if you are not happy with the volume on a certain channel or the mix that you pulled at the time of recording, you have a clean slate to return to.
While this means you will need to mix all channels again in post-production, it is a much ‘safer’ way to record.
Bypassing Audio Processing
When recording in ‘Pre-Fader Mode’, the output will still include any processing you have applied to the signal, so you can still take advantage of the RØDECaster Pro’s signal-shaping capabilities and only focus on mixing levels in post-production.
If you would like to bypass the processing as well as level settings, go to ‘Settings’ > ‘Advanced’ > ‘Audio’ > ‘Multitrack’, then toggle on ‘Bypass ‘Audio Processing’. This will give you a completely clean slate when mixing in post-production.
Post-Fader Mode
If you decide that you want all fader positions, processing and effects to be applied to the recording, 'Post-Fader Mode' can be switched on.
To do this, navigate to the ‘Multitrack’ menu by going to ‘Settings’ > ‘Advanced’ > ‘Audio’ > ‘Multitrack’, then switch on the ‘Post Fader’ option.
Once engaged, all fader positions, processing and effects will be applied to the audio output. Recording this way is somewhat riskier because any mistakes made during the recording process, such as a channel being accidentally muted while someone is talking, will be present in the final recording and will therefore be difficult to fix in post-production.
Final Tips
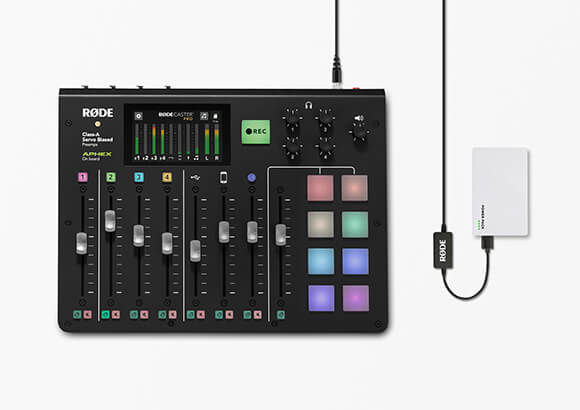
Recording to a microSD card is great because it allows you to make an entire podcast on the RØDECaster Pro, without the need to be connected to a computer. In fact, using the DC-USB1 and a USB power bank, you don’t even need to be plugged into a power socket, meaning you can podcast anywhere you like!