How To Record Or Stream With Multiple USB Microphones Using RØDE Connect
USB microphones have become increasingly popular in recent years due to their portability, ease of use and versatility in a multitude of recording, streaming and content creating applications.
Recording one USB microphone is relatively straightforward – that’s the core element of their design. In most cases, it's as simple as plugging it in, selecting the mic as the input device in your settings, adjusting your levels, and you’re good to go.
But what happens if you want to record two or three mics for an interview or a livestream, or even four mics for a group podcast or presentation? How do you connect them all to your computer and process them so that they all sound record-ready?
Before You Start
The first and most important thing is to establish is the number of microphones you will be using and ascertain whether or not your computer has enough USB ports to accommodate the number of microphones you wish to use.
With many modern computers refining their designs to include less type-specific ports, opting for universal (USB or Thunderbolt) ports instead, this limits the options that you have when connecting multiple USB microphones (and other devices) to your computer.
If you find that you're in need of more ports, using a USB hub is the way to go, as it expands the maximum number of devices you can connect via USB to your computer. We strongly recommend choosing a powered hub when using multiple USB mics with RØDE Connect to ensure that your mics have enough juice to operate properly.
The Software
Once you’ve connected the mics to your computer, the next step is getting them all to work together in a unified setup. But once the mics are all plugged in, how do you select each one and adjust the levels? How do you record with them?
 You can easily record and stream with multiple USB microphones with the free and easy-to-use RØDE Connect software
Previously this was quite complicated and, in many cases, not even possible. With RØDE Connect, it couldn’t be simpler.
Featuring a user-friendly interface that is perfect for beginners and pros alike, RØDE Connect lets you quicky select your microphones, route them to an easy-to-use digital mixer and add powerful audio processing to your mics in seconds.
You can also easily incorporate remote guests for your podcasts or interviews, seamlessly integrate applications such as Xsplit and OBS for gaming and livestreaming, as well as add music beds and external audio all in one easy-to-navigate application. More on that below.
You can find out more and download RØDE Connect here.
The Microphones
As mentioned, it’s important that you choose the right microphone if you're looking to get the best possible audio in your specific situation or intended use case. You can use (any combination of) the following four mics with RØDE Connect: the NT-USB Mini, Wireless GO II, VideoMic NTG and the VideoMic GO II.
Rugged and portable, the NT-USB Mini is a compact condenser microphone that delivers a warm and full-bodied audio that is ideal for a range of different applications such as gaming, podcasting, streaming, voice recording and presentations.
 The VideoMic GO II and RØDE Connect are a fantastic combo for a variety of recording, streaming and content creating scenarios
If you're thinking of using a shotgun microphone for podcasting or streaming, or recording in larger group settings where you'd like to have the microphone out of the camera shot, the VideoMic NTG or VideoMic GO II are fantastic options. Their directional sound pickup allows you to record from further away while still retaining clarity and richness. Just be mindful of your recording environment, as you may pick up unwanted sound if you aren’t quiet, relatively soundproof recording space.
Finally, the Wireless GO II is a great handsfree option for recording and streaming applications that require a bit more wireless flexibility, such as casual podcasting, group presentations or even as a quick and easy option for miking up guests on stream.
How to Record or Stream with RØDE Connect
Now that both the software and hardware side of things has been sorted, it's time for the magic to begin. Once you have connected your mics to your computer, open up RØDE Connect. If this is the first time you’ve used the software, you’ll see each microphone pop up under the ‘Available Microphones’ section.
Simply drag and assign each microphone into one of the four channels at the top of the window and click 'Next’ and assign your ‘Virtual’ and ‘System’ channels in the same fashion (click here to find out more about using the ‘Virtual’ and ‘System’ channels).
 When you open RØDE Connect for the first time, simply drag your compatible USB microphones from the "Available Microphones" section into one of the four channels above
Once you've assigned your channels, you'll be taken to the main RØDE Connect mixer interface that shows all your available channels, including all mics, system and virtual channels and your sound pads. Connecting these RØDE mics (excluding the Wireless GO II) to RØDE Connect unlocks powerful digital signal processing within them, which gives you access to four high-quality audio processors: a compressor, noise gate, and legendary APHEX Aural Exciter and Big Bottom effects. To access these, simply click the buttons above each mic channel.
If the microphone that you're using has both a 3.5mm and USB output such as the NT-USB Mini, VideoMic GO II or the VideoMic NTG, you'll be able to plug in a pair of headphones into the 3.5mm output and monitor your audio in real-time without delay, eliminating the need for an audio interface or headphone splitter.
Once you've got your mix sounding sweet, all you need to do to record is click the red ‘Record’ button at the top of the window and you're set! For lengthy recordings such as a podcast, you can place markers at important points or section transitions by clicking the flag icon, allowing you to quickly locate and access them later on. You can find a complete archive of your recordings that you can playback and monitor by clicking the list icon at the top-left of the RØDE Connect window.
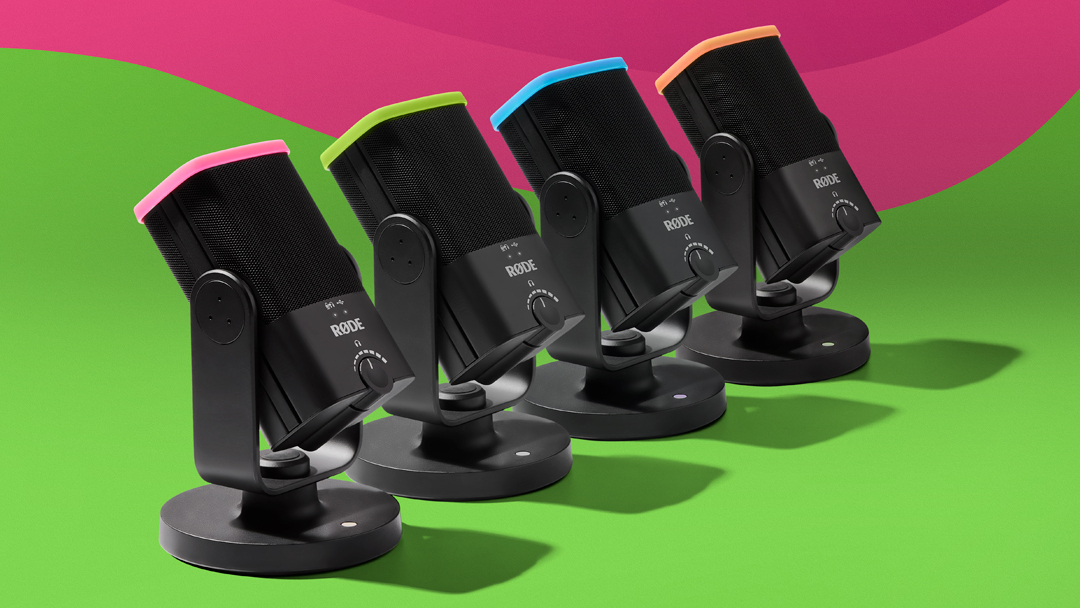
 It's incredibly easy to record a professional-quality roundtable podcast with just a laptop, RØDE Connect and four NT-USB Mini's
When streaming with software such as OBS or Xsplit or routing your audio output to another program for meetings and presentations (such as Microsoft Teams and Skype) simply select “RØDE Connect Stream” as the audio input and output in the audio settings in your program of choice. The processed audio from RØDE Connect will then be output to your software of choice. You can find out more about livestreaming with RØDE Connect here.
Connecting, processing and recording multiple USB microphones is no longer a challenge with RØDE Connect! Whether it's podcasting, gaming, livestreaming, group meetings or whatever you wish to record, RØDE Connect allows you to easily connect up to four compatible RØDE USB mics and add professional processing to ensure your stream or recording sounds fantastic.