Timecode
Timecode is a media synchronisation system that is designed to perfectly synchronise all your audio and video recordings. Not only does timecode save you time in the editing process, especially when working on shoots using multiple cameras and audio recorders, but it also becomes a single source of truth for referencing specific scenes, moments or timestamps within your project.
Timecode essentially works by labelling every clip with the exact time it starts. These timings are frame-accurate, which means clips can be perfectly aligned down to a fraction of a second, even if your devices started or stopped recording at different times.
How Timecode Works with the Wireless PRO
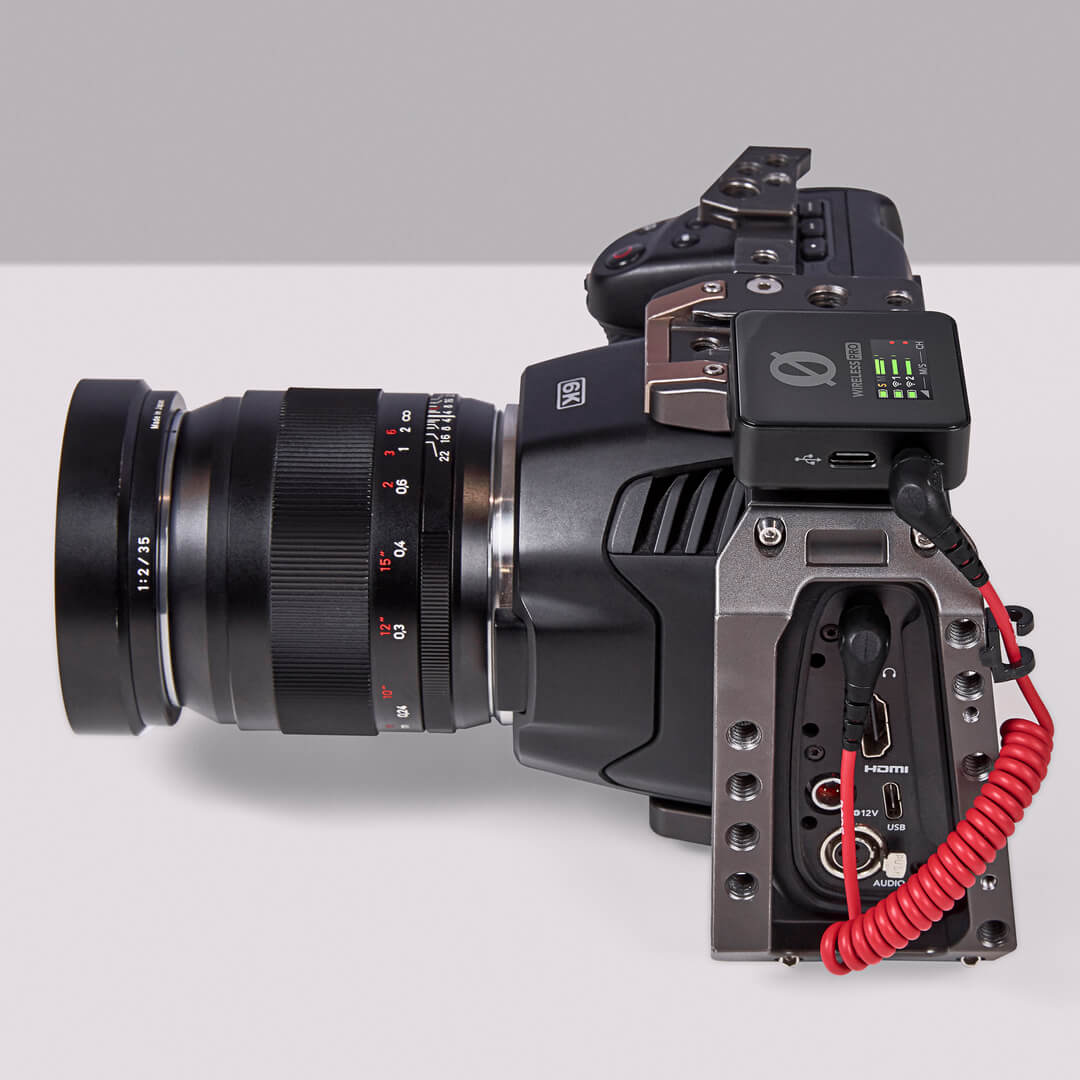
The Wireless PRO uses the SMPTE (Society of Motion Picture and Television Engineers) timecode standard with LTC encoding (Linear Timecode), which is the most widely used format today. The Wireless PRO receiver acts as the ‘Source’ in a timecode setup, meaning that timecode is generated by the Wireless PRO and is received by other ‘Sync’ devices, such as cameras and audio recorders.
The Wireless PRO outputs timecode information as an audio signal. If your camera accepts timecode, it will record this data into your video files directly, but if it doesn’t then you can still record this audio timecode signal into your camera’s mic or aux input just like you would a microphone – this audio is then later recognised as timecode in your editing software.
The Wireless PRO receiver (RX) will automatically send timecode to the transmitters (TX), so the recordings on your transmitters will have timecode baked into them and be perfectly synchronised, but you need to record the timecode onto your camera(s) so that your video files also have this sync information.
Enabling Timecode
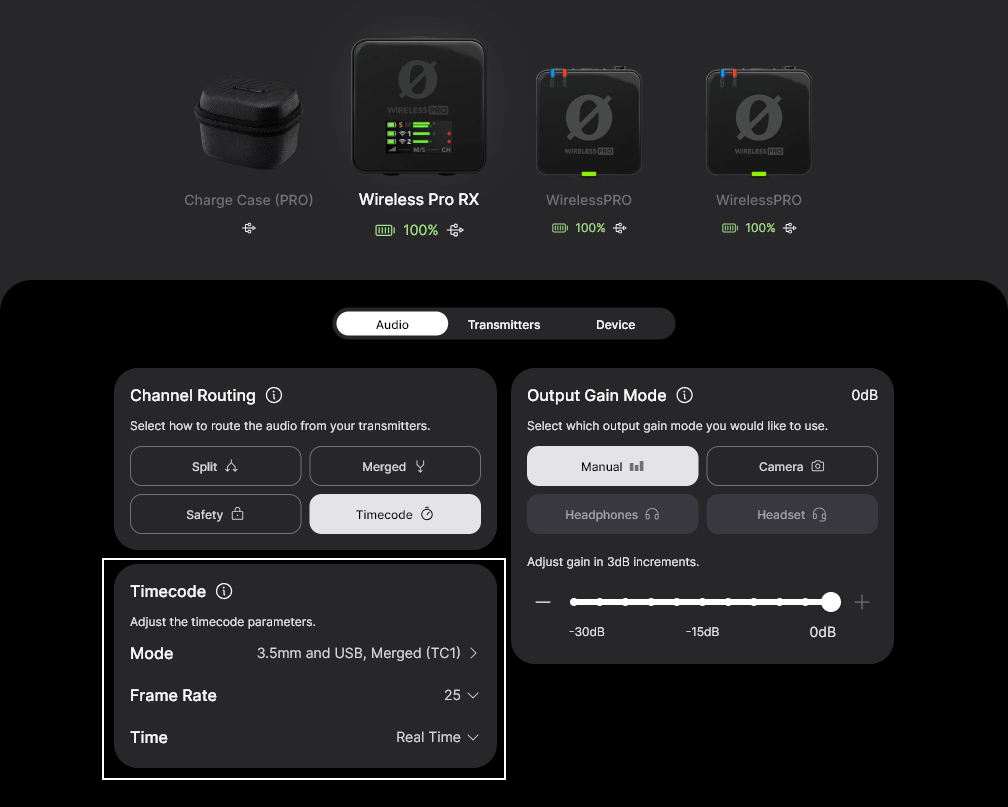
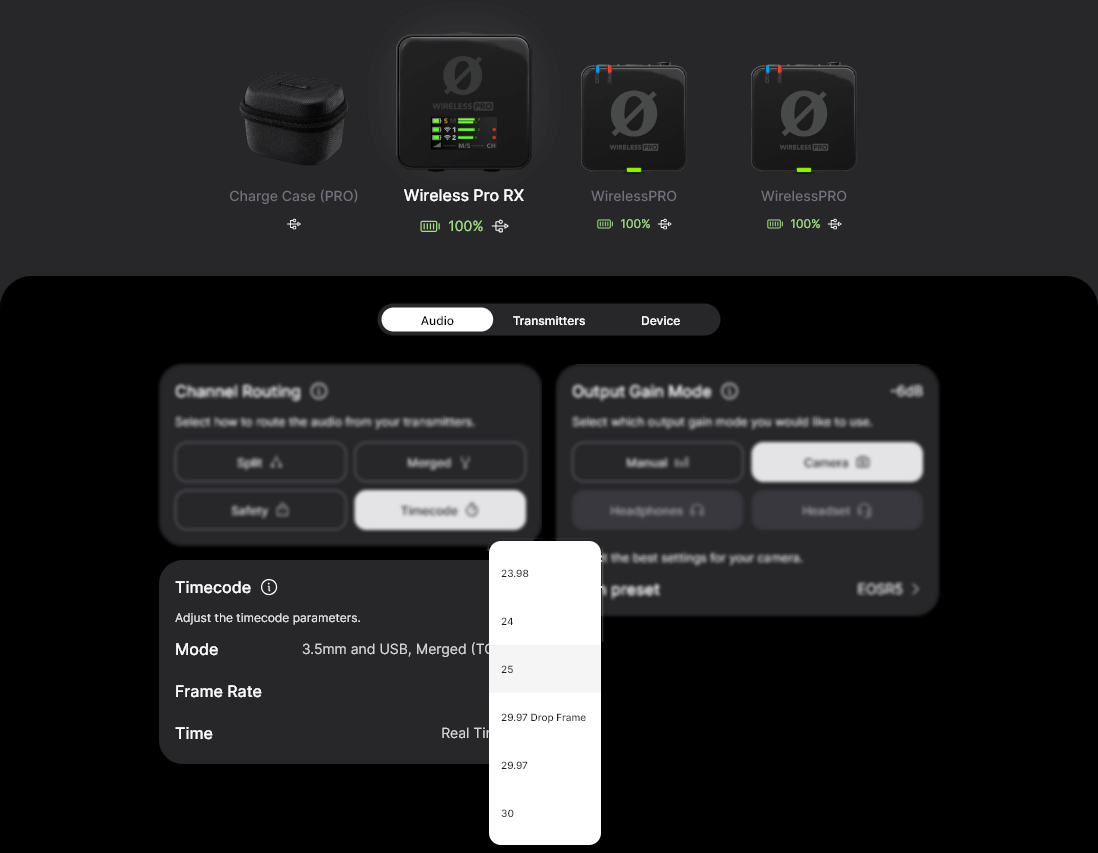
To enable timecode for your Wireless PRO, connect the receiver (RX) to your computer or phone and open RØDE Central. In Central, click “Wireless PRO RX” in the left-hand menu, toggle the ‘Timecode’ setting on and click on the ‘Timecode Modes’ menu. Here you’ll see a list of the available timecode modes (explained in detail below) – click the “Show Mode on Wireless PRO” toggle (“Show on RX” on mobile) for any mode you wish to have access to on your Wireless PRO system and then click ‘Apply’.
Once the timecode modes you wish to use have been added to your Wireless PRO, you can select them on the receiver by pressing-and-holding the Left and Right Navigation buttons, cycling through the modes with the Left Navigation button until your desired mode is displayed on-screen, and then pressing the Right Navigation button to ‘set’ this mode.
Note
For the Wireless PRO to actively generate timecode, the receiver (RX) must be powered on. If the receiver powers off, unpairs, or falls out of range, the timecode on the transmitters will continue to ‘free run’ until they detect the receiver once more, at which point they’ll seamlessly re-sync. In order for the on-board recordings to contain timecode information, timecode needs to first be enabled using RØDE Central, and the recordings need to be started whilst the transmitters are paired to the receiver.
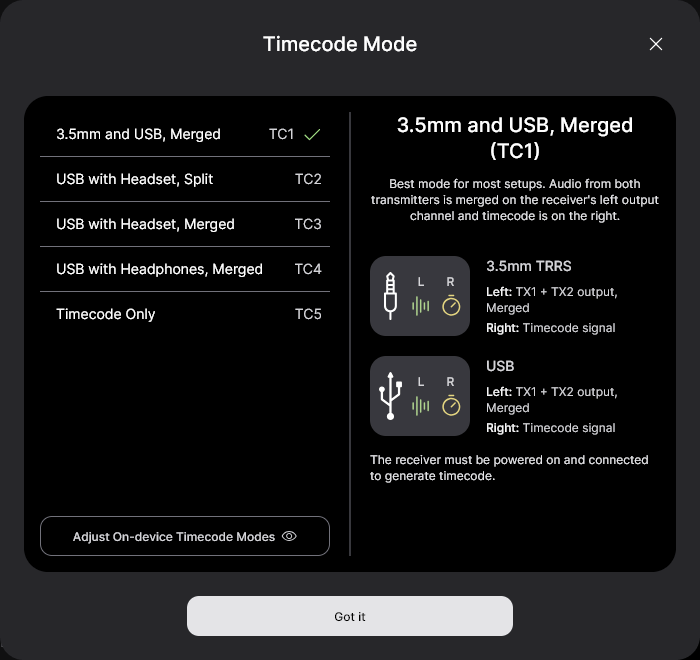
Timecode Mode 1 (3.5mm and USB, Merged)
This is most likely the mode that will suit your setup. In Mode 1, the audio signal from both transmitters will be summed and sent to the receiver output’s left channel, and the timecode signal will be sent to the receiver output’s right channel (via both the 3.5mm and USB outputs). This means your camera will receive timecode information on the right channel and audio on the left channel. Use this mode when recording timecode as audio to a camera or device that doesn’t accept timecode.
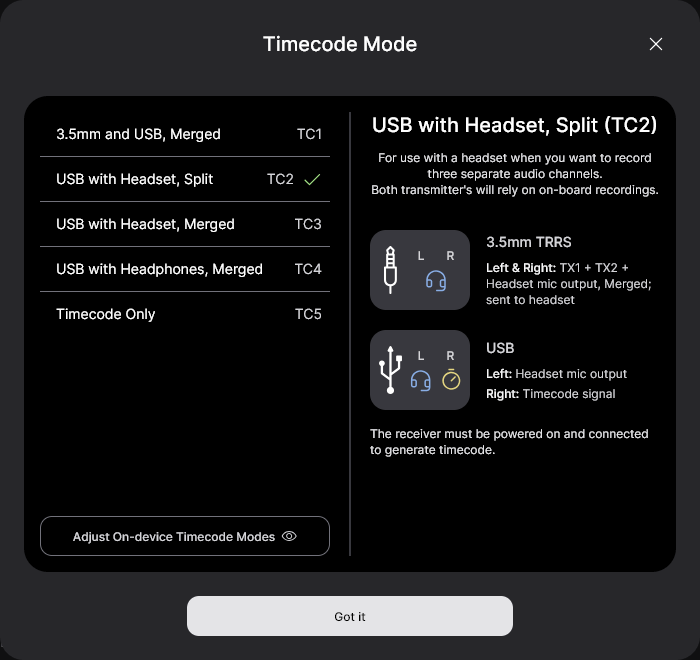
Timecode Mode 2 (USB with Headset, Split)
Mode 2 is for when you have a headset connected to the receiver’s 3.5mm TRRS output and you want to capture audio from both transmitters and the headset microphone on separate channels. In this mode, the headset mic audio will be sent via USB in the left channel, and the right channel will contain the timecode information. Each transmitter will capture audio as on-board recordings, and all three input sources will be summed and sent to the receiver’s 3.5mm output so you can monitor all sources in your headset.
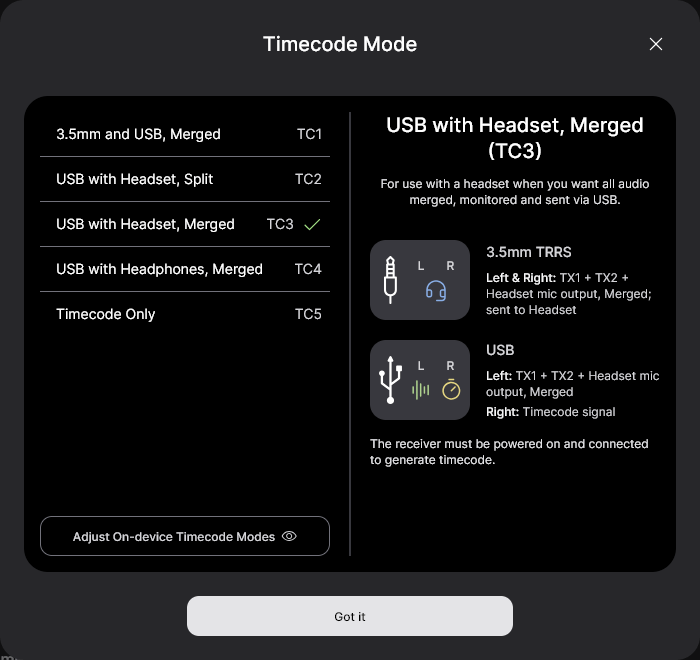
Timecode Mode 3 (USB with Headset, Merged)
Mode 3 works identically to Mode 2, except the audio sent to the left channel of the USB output will be a summed output of all three microphones (TX1, TX2 and your headset microphone) rather than just the headset microphone.
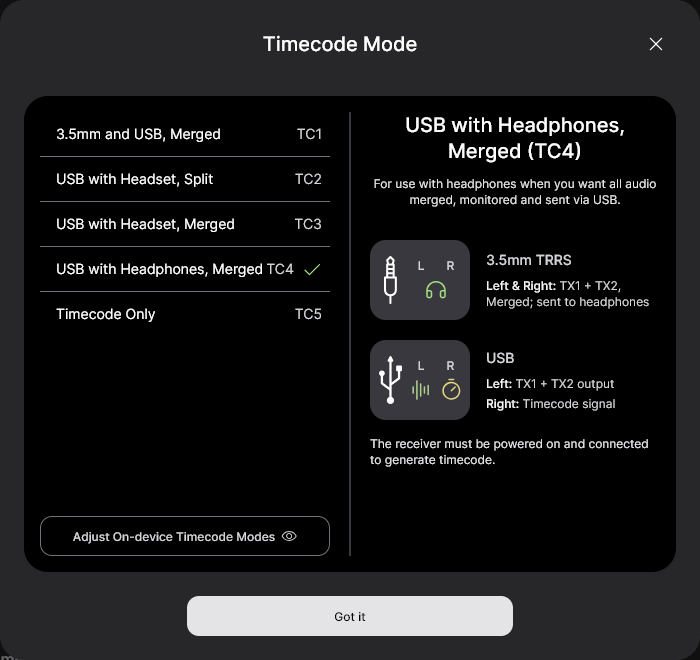
Timecode Mode 4 (USB with Headphones, Merged)
Mode 4 is the same as Mode 3, except that it is optimised monitoring with headphones instead of a headset (i.e. there is no headset microphone input). The USB output contains a summed output from both transmitters (TX1 and TX2) on the left channel, and the timecode information on the right channel. This leaves the receiver’s 3.5mm output available to connect headphones for monitoring your audio.
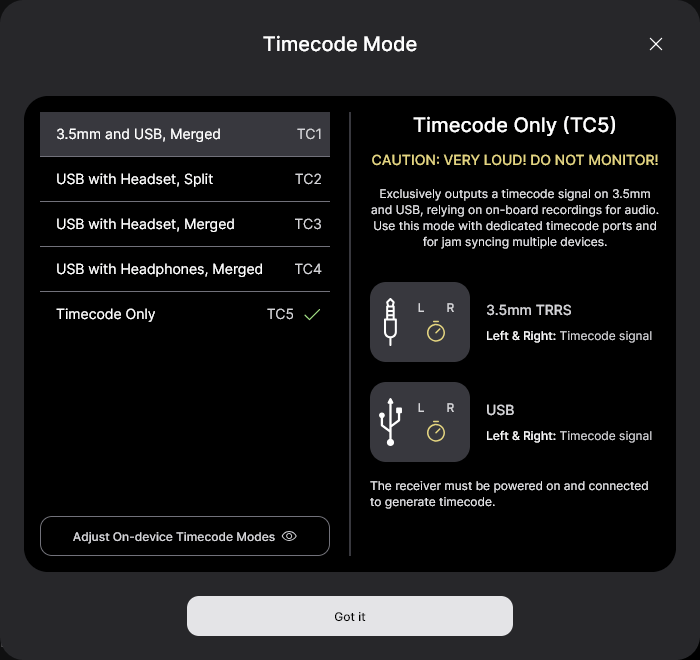
Timecode Mode 5 (Timecode Only / Jam Sync)
Mode 5 will exclusively send a timecode signal – on both left and right channels of both the USB and 3.5mm TRRS outputs on your receiver. Use this mode with cameras or devices that accept timecode.
This mode also allows you to use the Wireless PRO as the ‘source’ clock to sync multiple cameras or other equipment to each other. This is achieved by ‘jam syncing’, which is the process of temporarily connecting the Wireless PRO receiver to each of your devices in order to sync the internal timecode generator of each device.
It’s worth noting that using the jam sync method can result in very minor fluctuations in the synchronisation between your devices over time (referred to as ‘drift’) as their internal generators aren’t perfectly matched. As such, we recommend performing a jam sync about every four (4) hours, or whenever you power cycle your cameras, to ensure accurate syncing.
Note
Mode 5 outputs a very loud timecode signal that complies with the SMPTE standard, so it’s important that you don’t connect headphones to the Wireless PRO receiver or monitor this signal via your camera while in this mode. With that said, if your camera isn’t recognising the timecode signal sent to it, try raising the output gain level on the Wireless PRO receiver – some cameras only detect very loud timecode signals.
Frame Rate
Before you record with timecode, it’s important to establish the frame rate you’ll be shooting your project at and set the timecode to match it. This forms the foundation for how your timecode keeps track of time, and if it doesn’t match your footage, it will fall out of sync or fail to sync in the first place.
If your selected frame rate is higher than those available in the below list, select the option that divides perfectly into your project’s frame rate (e.g. when shooting in 47.96fps, choose 23.98fps).
- 23.98 fps
- 24 fps
- 25 fps
- 29.97 DF (Drop Frame)
- 29.97
- 30 fps
Note
Some cameras offer a 29.97 frame rate without specifying if it’s drop frame – in this case, check the camera’s documentation to determine which format it is.
Real Time
You can choose to generate the Wireless PRO's timecode in ‘real time’ or as a ‘continuous’ mode in which you select the start point. Real time mode reflects the actual time in your region (determined by the ‘Clock and Device Time’ section in RØDE Central) and will be displayed as 24-hour time with seconds and frames in the format HH:MM:SS:FF. For instance, “14:34:42:12” represents 2:34pm, 42 seconds, and 12 frames.
If you disable real time, the Wireless PRO’s timecode will instead start continuously counting up from a particular moment, which is established by hitting the ‘Reset’ button in RØDE Central.
Connecting Your Wireless PRO to a Device That Accepts Timecode
If your camera accepts timecode, it will be able to interpret the timecode signal sent to it from the Wireless PRO and insert this information into your recordings as metadata. For these cameras, use Timecode Mode 5 to ensure the timecode signal is delivered loud and clear.
Many of these cameras feature dedicated timecode ports, in which case you will need to use an adaptor to connect your Wireless PRO receiver’s 3.5mm output to whichever proprietary format your camera uses. Be sure to use a high-quality adaptor to avoid issues.
If your camera isn’t recognising the timecode signal sent to it, ensure your Wireless PRO is running the latest firmware and is set to Timecode Mode 5, and try raising the output gain level on the receiver.
We have created walkthrough guides (linked below) for a number of popular cameras and devices that accept timecode natively. Any camera or device that accepts the SMPTE standard format will work with the Wireless PRO:
* These cameras don’t accept timecode but you can still follow the linked guide to record timecode information as audio.
Connecting Your Wireless PRO to a Device That Doesn’t Accept Timecode
If your camera model doesn’t accept timecode natively, such as the Sony A7s III, Canon EOS R5 or Panasonic Lumix GH5, you’ll need to record the timecode information as audio into its mic input, in the same way you would record any microphone audio.
For this, use the included SC2 3.5mm-to-3.5mm cable alongside Timecode Mode 1 on the Wireless PRO. If you’re recording audio via USB, to a smartphone for instance, use Timecode Mode 2, 3 or 4. You can view the below guides on how to synchronise your footage in post-production.
Syncing Your Video and Audio in Your Editing Software
The process for syncing your video and audio files in your editing software will vary depending on whether your camera recognises timecode or not. If it doesn’t, you’ll need to rely on editing software to interpret the audio timecode information and apply it to the video file’s metadata. Unfortunately, neither Premiere Pro nor Final Cut Pro can do this, so you’ll need to first use software that does (we recommend DaVinci Resolve) to line up the files on your timeline, and then bring this timeline data into your preferred software – we’ve prepared guides for these cases:
A Note on Timecode Limitations
Cameras and other recording devices differ in how they handle internal video and audio file synchronisation, as well as in how they accept timecode, and this can have some consequences for timecode syncing.
While the Wireless PRO system is perfectly synchronised internally between the receiver and transmitters, there’s a small chance that your video and audio may be out of sync by a tiny amount depending on a wide range of variables in the other equipment you’re using (this disparity could measure 1 or 2 frames in extreme cases).
Even with this in mind, it is still significantly quicker to use timecode to synchronise your files and then adjust them by a frame or two. We recommend you record a clap that’s visible and audible on all of your video and audio recording equipment. Once you’ve synchronised your files using timecode, this can be used as a reference point for nudging your video or audio if it’s needed.